User Testing

Interactive Technology Design

Interactive Technology Design

Creating Interactive prototypes for future scenario making.

Project details

Project type:
ECTS:
Time:
Client:
Nature:
Keywords:


Master Course
9
2018
TU Delft
Group Project
Arduino, C++, Product design, Programming, Prototyping, Max MSP, UI, User testing & UX

Project type:
ECTS:
Time:
Client:
Nature:
Keywords:

Master Course
9
2018
TU Delft
Group Project
Arduino, C++, Product design, Programming, Prototyping, Max MSP, UI, User testing & UX

Summary

During Interactive Technology Design (ITD) we were asked to create interactive prototypes that are a form of design fiction. The assignment was to create a future scenario for the year 2050 and design an product & experience. The future scenario was created by extrapolating current trends. The product and experience should help the participants immerse themselves into our future sceneario. The experience and product should provoke the participatns to critically think about the possible future and the current trends in the world. During this course, I mainly focused on programming and creating the interactive prototypes.

Process

During the course, we went through an interactive process and created serval prototypes differing in size and extensiveness. Below three different prototypes will be highlighted each getting more extensitve.

AR experience

An early future scenary we had was a world filled with smog. In this world we envisioned a protoble device that could help clean this smok. To communicate this world to our participants I created an AR app in Unity. This app runs on android and untilised android ARCore. The phone is put into a cardboard ar headset and shows the participants what they would normaly see but with smog placed in the world around them.

Shopping experience I

One of the bigger and more extensive experiences we created was shopping experience. During this exprience you first have to recycle something before your allowed. This experienced was guided by a compute voice.

Shopping Experience II

The second shopping experience we created was related shopping clothes and possible risk poor quality clothes could have on your skin. This experience was even more extensive. Participants had to go through several steps, anwsering very personal questions and scanning their hand. All for the product to determine what kind of clothing would be the least harmfull for their skin.

Overall learnings

Within this course, I learned how to make quick and interactive prototypes utilising several tools but mainly Arduino. These prototypes grew in complexity, both in terms of electronics and interaction. This forced me to be more structural in my programming and pushed me to learn how to use Objetc Oriented Programming in arduino by using libraries.

CTOUCH Leddura 2Meet

CTOUCH Leddura 2Meet

Redesigning the UI & UX of the CTOUCH Leddura 2Meet

Project details

Project type:
ECTS:
Time:
Client:
Nature:
Keywords:


Master Course
9
2018
CTOUCH
Group Project
Desk research, Interviews, Product design, Prototyping, UI, User journey, User observations, User testing & UX

Project type:
ECTS:
Time:
Client:
Nature:
Keywords:

Master Course
9
2018
CTOUCH
Group Project
Desk research, Interviews, Product design, Prototyping, UI, User journey, User observations, User testing & UX

Summary

For this course, Usability and User eXperience Assessment in Design,  we were asked to redesign the CTOUCH Leddura 2Meet. The CTOUCH is a big screen that is supported by an app. It is designed to be used in a business meeting, performing as a multifunctional big screen. The focus of the project was to improve “tagless teamwork” with the CTOUCH: the event of showing multiple other devices’ screens on the CTOUCH at the same time, and the focus issues that this brings along in a business meeting. To improve the tagless teamwork we first analysed the current product, then we did two rounds of creating a redesign and testing it. Finally, we implemented the results and created a final design of the interface and experience of the CTOUCH screen.

Process

The process of redesigning the CTOUCH consisted of four parts. First, we analysed the current screen and its usage. Then we did a round of redesigning and testing of the screen focussing on the identity and tone of the design. The second round of design and testing focussed on UI and interaction. Afterwards, all the results from the tests were processed and a final design was created.

Analysis

Leddura 2Meet as it's currently being used

The first step towards redesigning the CTOUCH was to analysis the current product and its context. The goals were to find areas where the product could be improved and what should be kept the same.


Current Usage

To analyse the product we created a storyboard of how the product is currently being used. Along with that, we created a visual of the flow within the software of the CTOUCH. To get an idea of how good the screen currently performs we did a cognitive walkthrough and peer testing.

Interviews & Observations

We also wanted to better understand the context in which the CTOUCH is, or could be, used. To do so we send out a questionnaire, did interviews and observations.  The questionnaire was about the dynamics of a group during a meeting. The interview was to help us better understands how the CTOUCH could be useful during a meeting and what kind of features is would need. We also observed meetings to understand the flow and dynamic within such meetings.

Persona's & Storyboard

Based on the results of the research, three persona‘s were created. Each persona represents a different usecase of the product. We also created two storyboards, one representing a meeting without the CTOUCH, and the second representing a meeting with the CTOUCH as it is. Below only the first storyboard is shown.

Based on the performed analysis we came to the following problem statement and ambition.

Problem Statement

The problem is characterized by two core issues:
the user journey of connecting multiple devices and the identity of the CTOUCH Leddura 2Meet during meetings.

Ambition

Interaction with the screen should be fluent and organic, as if the team is interacting with another member

Concept redesign

Identity & Feel

First, we wanted to redesign the overall identity the screen currently has. To do so we created three characters that guided the design and its interaction. The characters are as follow, an avatar, a facilitator and a manager. They differ in that the avatar is helpful and customisable, the facilitator guides the user by providing him with the right information at the right time and the manager is sterner and in control of the meeting, only showing you what he thinks you need.

User Flow & Wireframes

For each of these characters, a flow and a set of wireframes was designed.

User test

These concepts were put to the test to find, 1 what aspects of each concept work well during a meeting, 2 what is the relative quality of each concept and 3 how clear is the charter in each design to the users. In this test, we simulated a meeting with the CTOUCH using paper prototypes. During the test we observed the participants, afterwards, we interviewed them and they were asked to fill in a questionnaire.

Test analysis

The results of the observation, interview and questionnaire were then analysed. Although not every result gave a significant advantage for a single concept, we were able to use it to converge. Based on the results we converged to a single concept and combined features from different concepts into one.

UX & UI Redesign

Storyboard

The first step towards a UX & UI was to ensure we got a clear goal to work towards. We focused on optimizing two functionalities of the CTOUCH, connecting your laptop to the screen, and sharing your and other peoples screens. To help us envision how this would look at work we sketched a storyboard of a scenario in which our version of the screen is used.

Functional design & UX

From there we first focused on the functional design UX of both the connecting to the screen and the share of screens. For each, we designed wireframes and the flow of the experience. The aim was to optimize and streamline the experience of using the CTOUCH. We also considered how the interaction should feel.

Visual Design

Having created the wireframes we set out to create a visual style complete our UI. To do so we looked at what kind of applications our target audience uses and used that as reference for creating our own visual style. The applications that we looked to for inspiration were, Zenefits, Slack, Mailchimp and Gusto.

Prototype & Test Setup

Having created a functional and visual design, we set out to create a prototype that could be used in a user test to validate our design. To create this prototype we used Framer and InVision to create a setup where the user was let to believe the program was actually working. With that, we were able to create a test setup.

Analysis

To analyse the user test we transcripted what people set during the user test. Having created a transcript we selected quotes and used an on the wall approach to make sense and find themes in all the data. Using the results we were able to see how much of the ambition we set, in the beginning, we were able to fulfil and make some final adjustments to the design.

Final Design

Based on the test results, we created a final iteration of the product, where we optimized the UI, UX and interaction with the product. To show the final design we created a video demonstrating our design & use case of the CTOUCH. Below are also images showing the final design.

Interactive Floor

Designing for a potential future with an interactive floor

Project details

Project type:
ECTS:
Time:
Client:
Nature:
Keywords:


Master Elective
3
2019
TU Delft
Group Project
Interaction design, Interviews, Product design, Programming, Prototyping, User interface, User observations & User experience

Project type:
ECTS:
Time:
Client:
Nature:
Keywords:

Master Elective
3
2019
TU Delft
Group Project
Interaction design, Interviews, Product design, Programming, Prototyping, User interface, User observations & User experience

Summary

In this project, we were given a future scenario in which a floor could be used as an interactive display. For this scenario, we were challenged to envision an implementation of this technology in the faculty of industrial design. This meant finding useful and novel use case of this technology, designing the interface and design the interaction. This resulted in a floor that facilitates interaction and the exchange of information between collaborating students. 

Process

To design an interactive floor we first determined the functionality is should have and created a storyboard of how we hypothetically would see the interaction. From there we started ideating and created two concepts. By doing user tests and detailing the functionality, style guide and the animations we converged into a final concept. This concept was then detailed by creating a video showing different interactions with the floor.

Functionality

The main function of the floor is to exchange information and facilitate interaction between collaborating students. The floor will give all the information that is regularly used. It will also support group work for students who work together in the surroundings of the surfaces.  Based on these functionalities a storyboard was created to envision the interaction with the product.

The scenario goes as follows: our participant enters the faculty. On the floor appears a nice, warm message. Right after, a schedule appears, indicating that he has a few minutes left as not all his group members have arrived yet. He takes this opportunity to get some coffee. He then proceeds to his group member. The floor shows him exactly where to go, saving him time. Most part of the day is spent on working on a group project. After a few hours, the floor indicated that he has been working for a while and it encourages him to take a break. After the break, he and his group member decide to show each other what they have done using the floor. Then it’s finally time to go home. With all this extra help, he and his group member have had a productive day. 

Conceptualisation

Based on the storyboard and functionality we created individual ideas and sketched. These were merged into two concepts, concept fluid and concept compass.

Concept Fluid

Concept fluid is mainly inspired by natural elements such as water, as such the animations and movements aim to be fluid.

Concept Compass

Concept compass aims to be more structured and uses geometrical shapes and parts of geometrical shapes.

User tests

User tests were executed to see how people would respond to ideas from the concepts. They were also used to validate and iterate on the size of different elements of the interface.

Based on the users test the functionality of the product was further defined and developed. The types of animations and interactions were also explored

Final concept

Based on the findings from the user tests and the exploration, a final concept was designed. In this concept, every user has a personal avatar. This avatar is their companion and can assist them with whatever they need.

Testing the interaction

After the design was done, the interaction with it was tested and validated. This was done by projecting the animations on the floor using a beamer. Together with the participants we walked through the interactions and asked them for feedback. Using their feedback we were able to iterate upon the design and fine-tune the interactions. From there the design was finalised and put into a video, presenting the whole concept and the interaction with the concept.

Final design video

Specific interactions

Pam

Pam

The interactive bedside lamp

Project details

Project type:
ECTS:
Time:
Client:
Nature:
Keywords:


Elective
3
2019
TU Delft
Group Project
Design fiction, Interaction design, Interviews, Product design, Prototyping, User observations & UX

Project type:
ECTS:
Time:
Client:
Nature:
Keywords:

Elective
3
2019
TU Delft
Group Project
Design fiction, Interaction design, Interviews, Product design, Prototyping, User observations & UX

Summary

For the course, “interactive formgiving”, the assignment was to design an Object with Intent (OwI) through user research, prototyping and design fiction. OwI is a new perspective on smart objects (Rozendaal, Boon, & Kaptelinin, 2019). They are everyday objects that act as collaborative partners in human activity. The product we designed is an interactive bedside lamp that helps with smartphone usage at bedtime. This lamp does not tolerate the usage of a smartphone in bed and goes from being annoyed to aggressive and annoying.

Process

To design an OwI we utilised video and WoZ prototyping. This allowed us to create quick prototypes and test, enact and specify behaviour. This allowed us to design and intelligent product without having to actually program and create it. This process consisted of creating a first version of the product, testing it, and using the results to itterate and create a final video. 

Concept

To design this we first decided on a product and context. A bedside lamp that helps you with phone usage in bed. From there we looked at what behaviour characteristics the product should have. For this, we went with an overprotective girlfriend that is also demanding and aggressive. Based on these characteristics a storyboard, behaviour flow and an early prototype were created. This behaviour was then sketched out in a video.

Early prototype

This prototype was then used in a wizard of oz (WoZ) style user test. In this test, we enacted the behaviour of the product to see how users responded and find what kind of behaviour is desired. During this test, there was a dialogue between the users and the designers. During this, we went into specifics with regards to the behaviour and how the behaviour felt.

Final design

Based on the feedback from the users we iterated on the prototype and its behaviour. The behaviour was finetuned by creating a video of a scenario in which the object enacts its behaviour. Through the creation of the video, the behaviour became concrete and detailed. Sound effects were also added as an additional layer to further communicate and solidify the character of the bedside lamp.

Result

Graduation Project

The making of a smart pillow

Designing an object with intent through a data-enabled design process

Project details

Project type:
ECT:
Time:
Client:
Nature:
Grade:
Links:

Keywords:


Master Graduation
30
2019/2020
TU Delft
Individual Project
9.0
Tudelft repository, Dutch Design week
Co-Creation, Data visualisation, Desk research, Interviews, Product design, Programming, Prototyping, User observations & UX

Project type:
ECT:
Time:
Client:
Nature:
Grade:
Links:

Keywords:

Master Graduation
30
2019/2020
TU Delft
Individual Project
9.0
Tudelft repository, Dutch Design week
Co-Creation, Data visualisation, Desk research, Interviews, Product design, Programming, Prototyping, User observations & UX

Summary

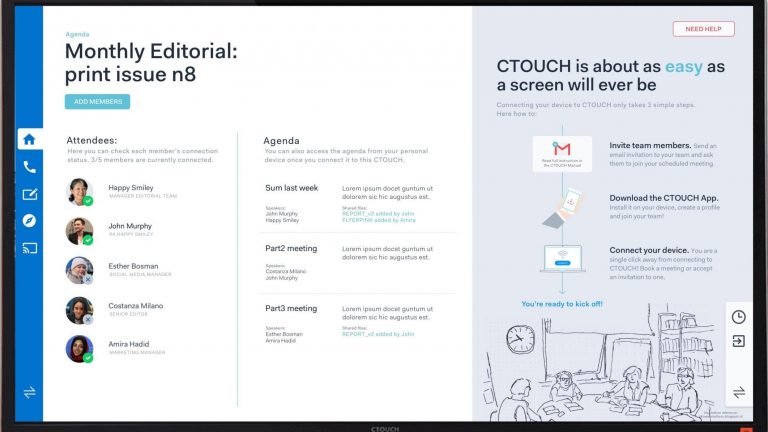
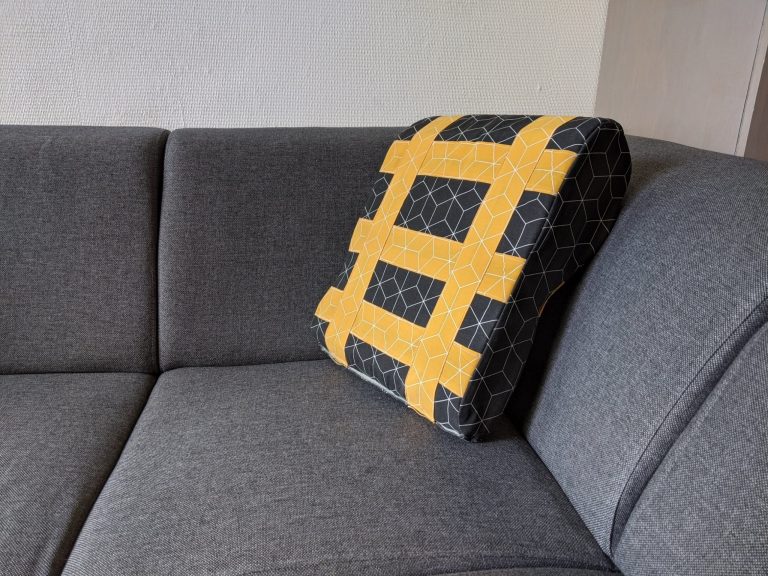
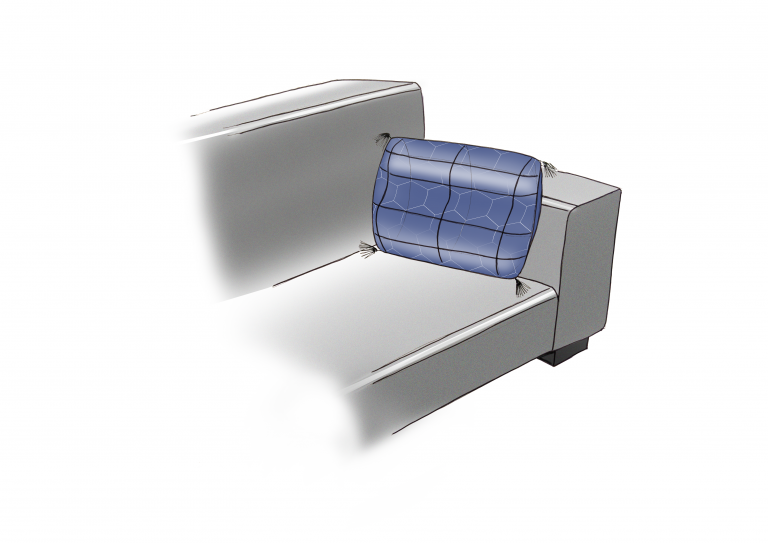
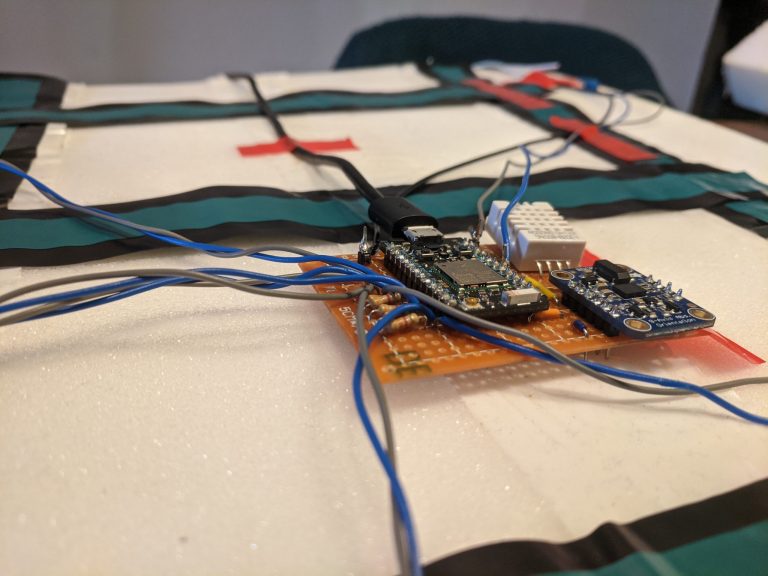
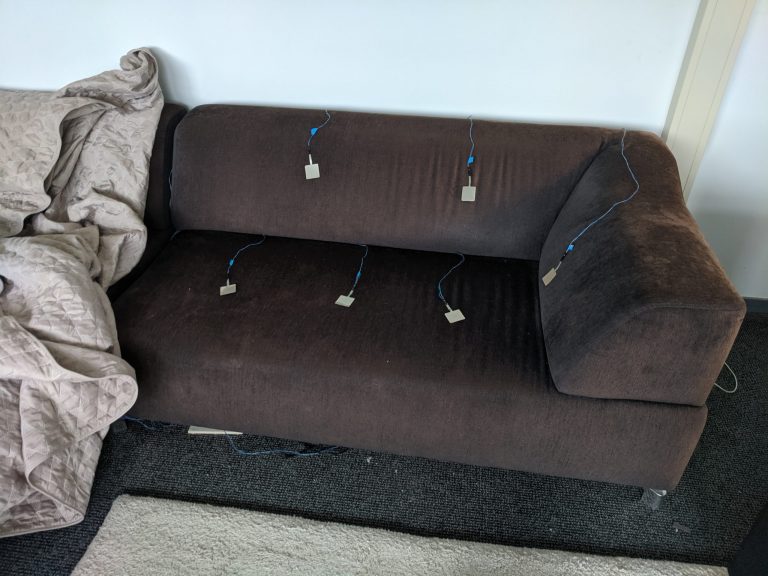
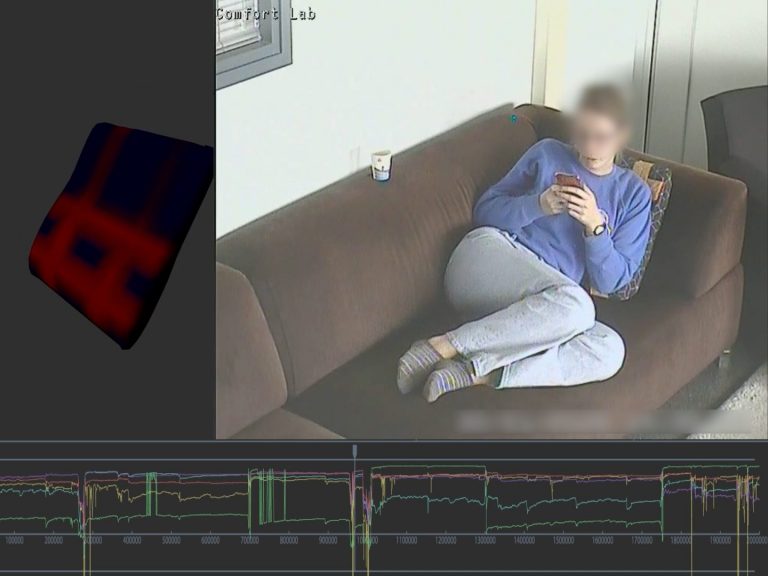
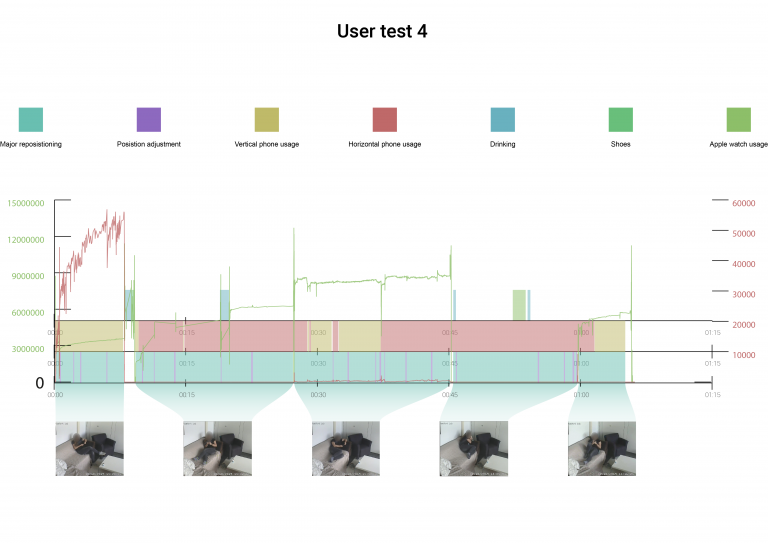
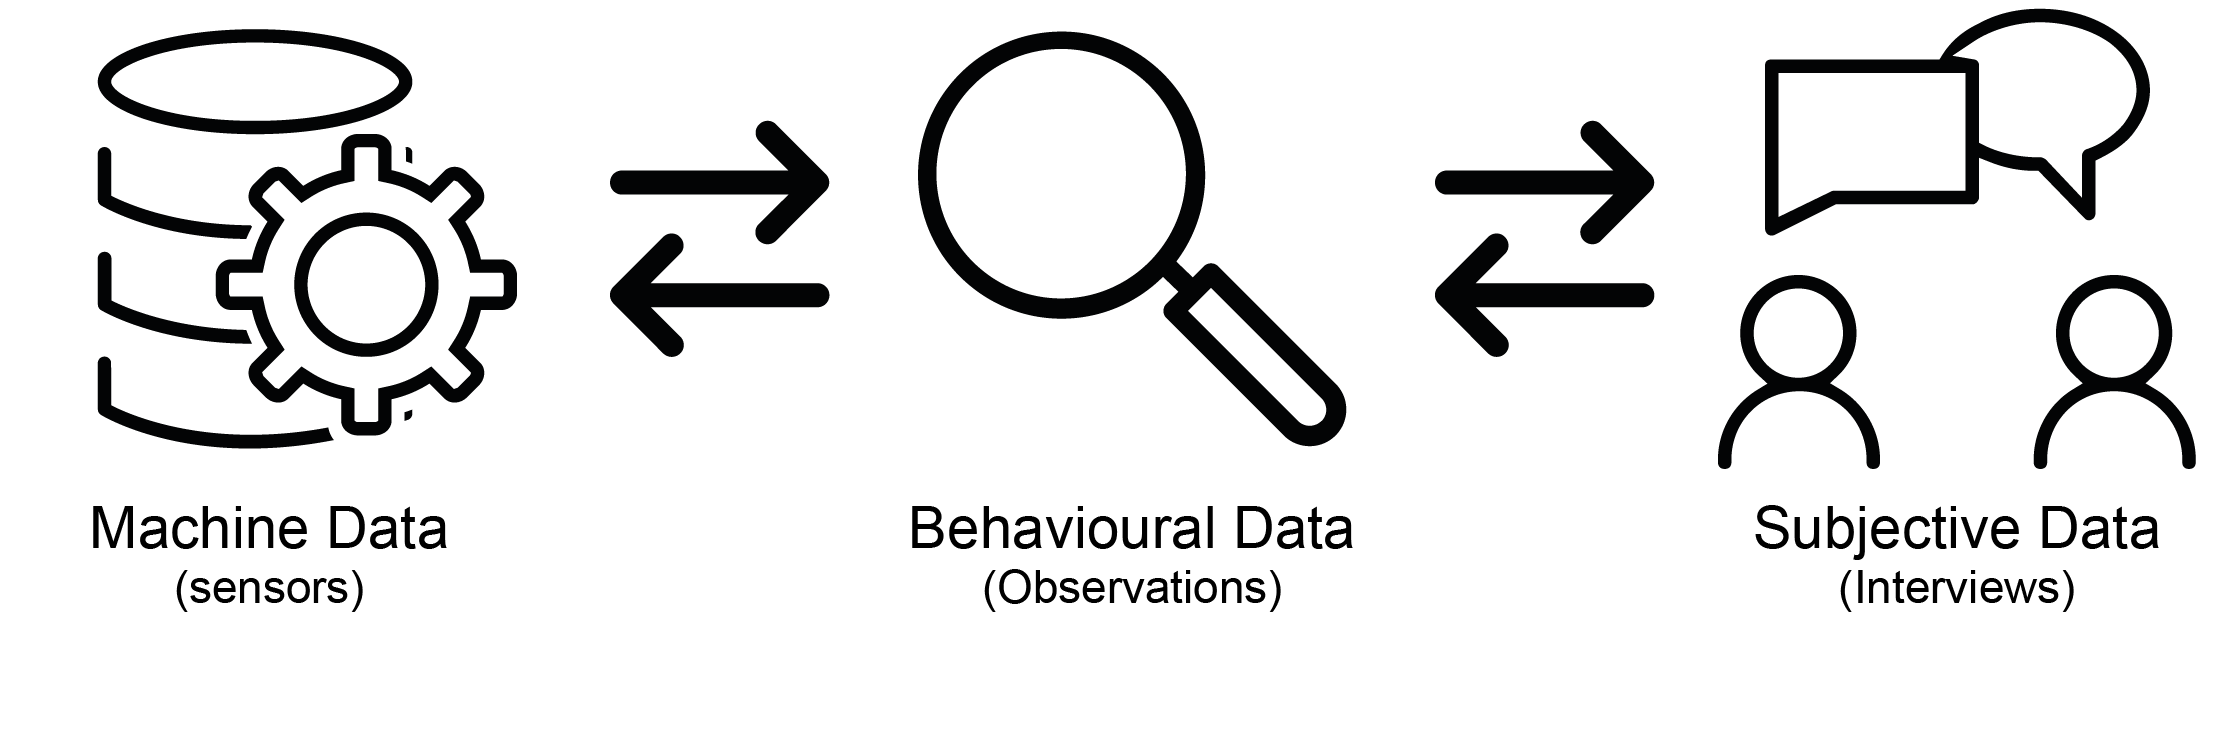
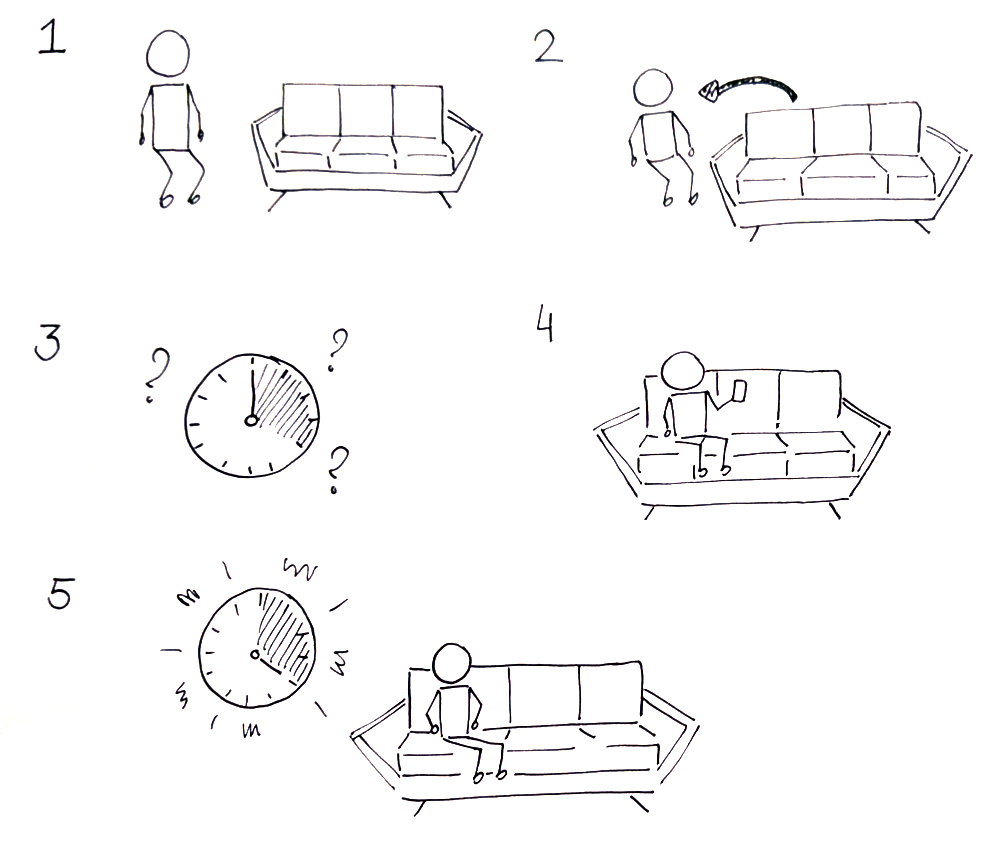
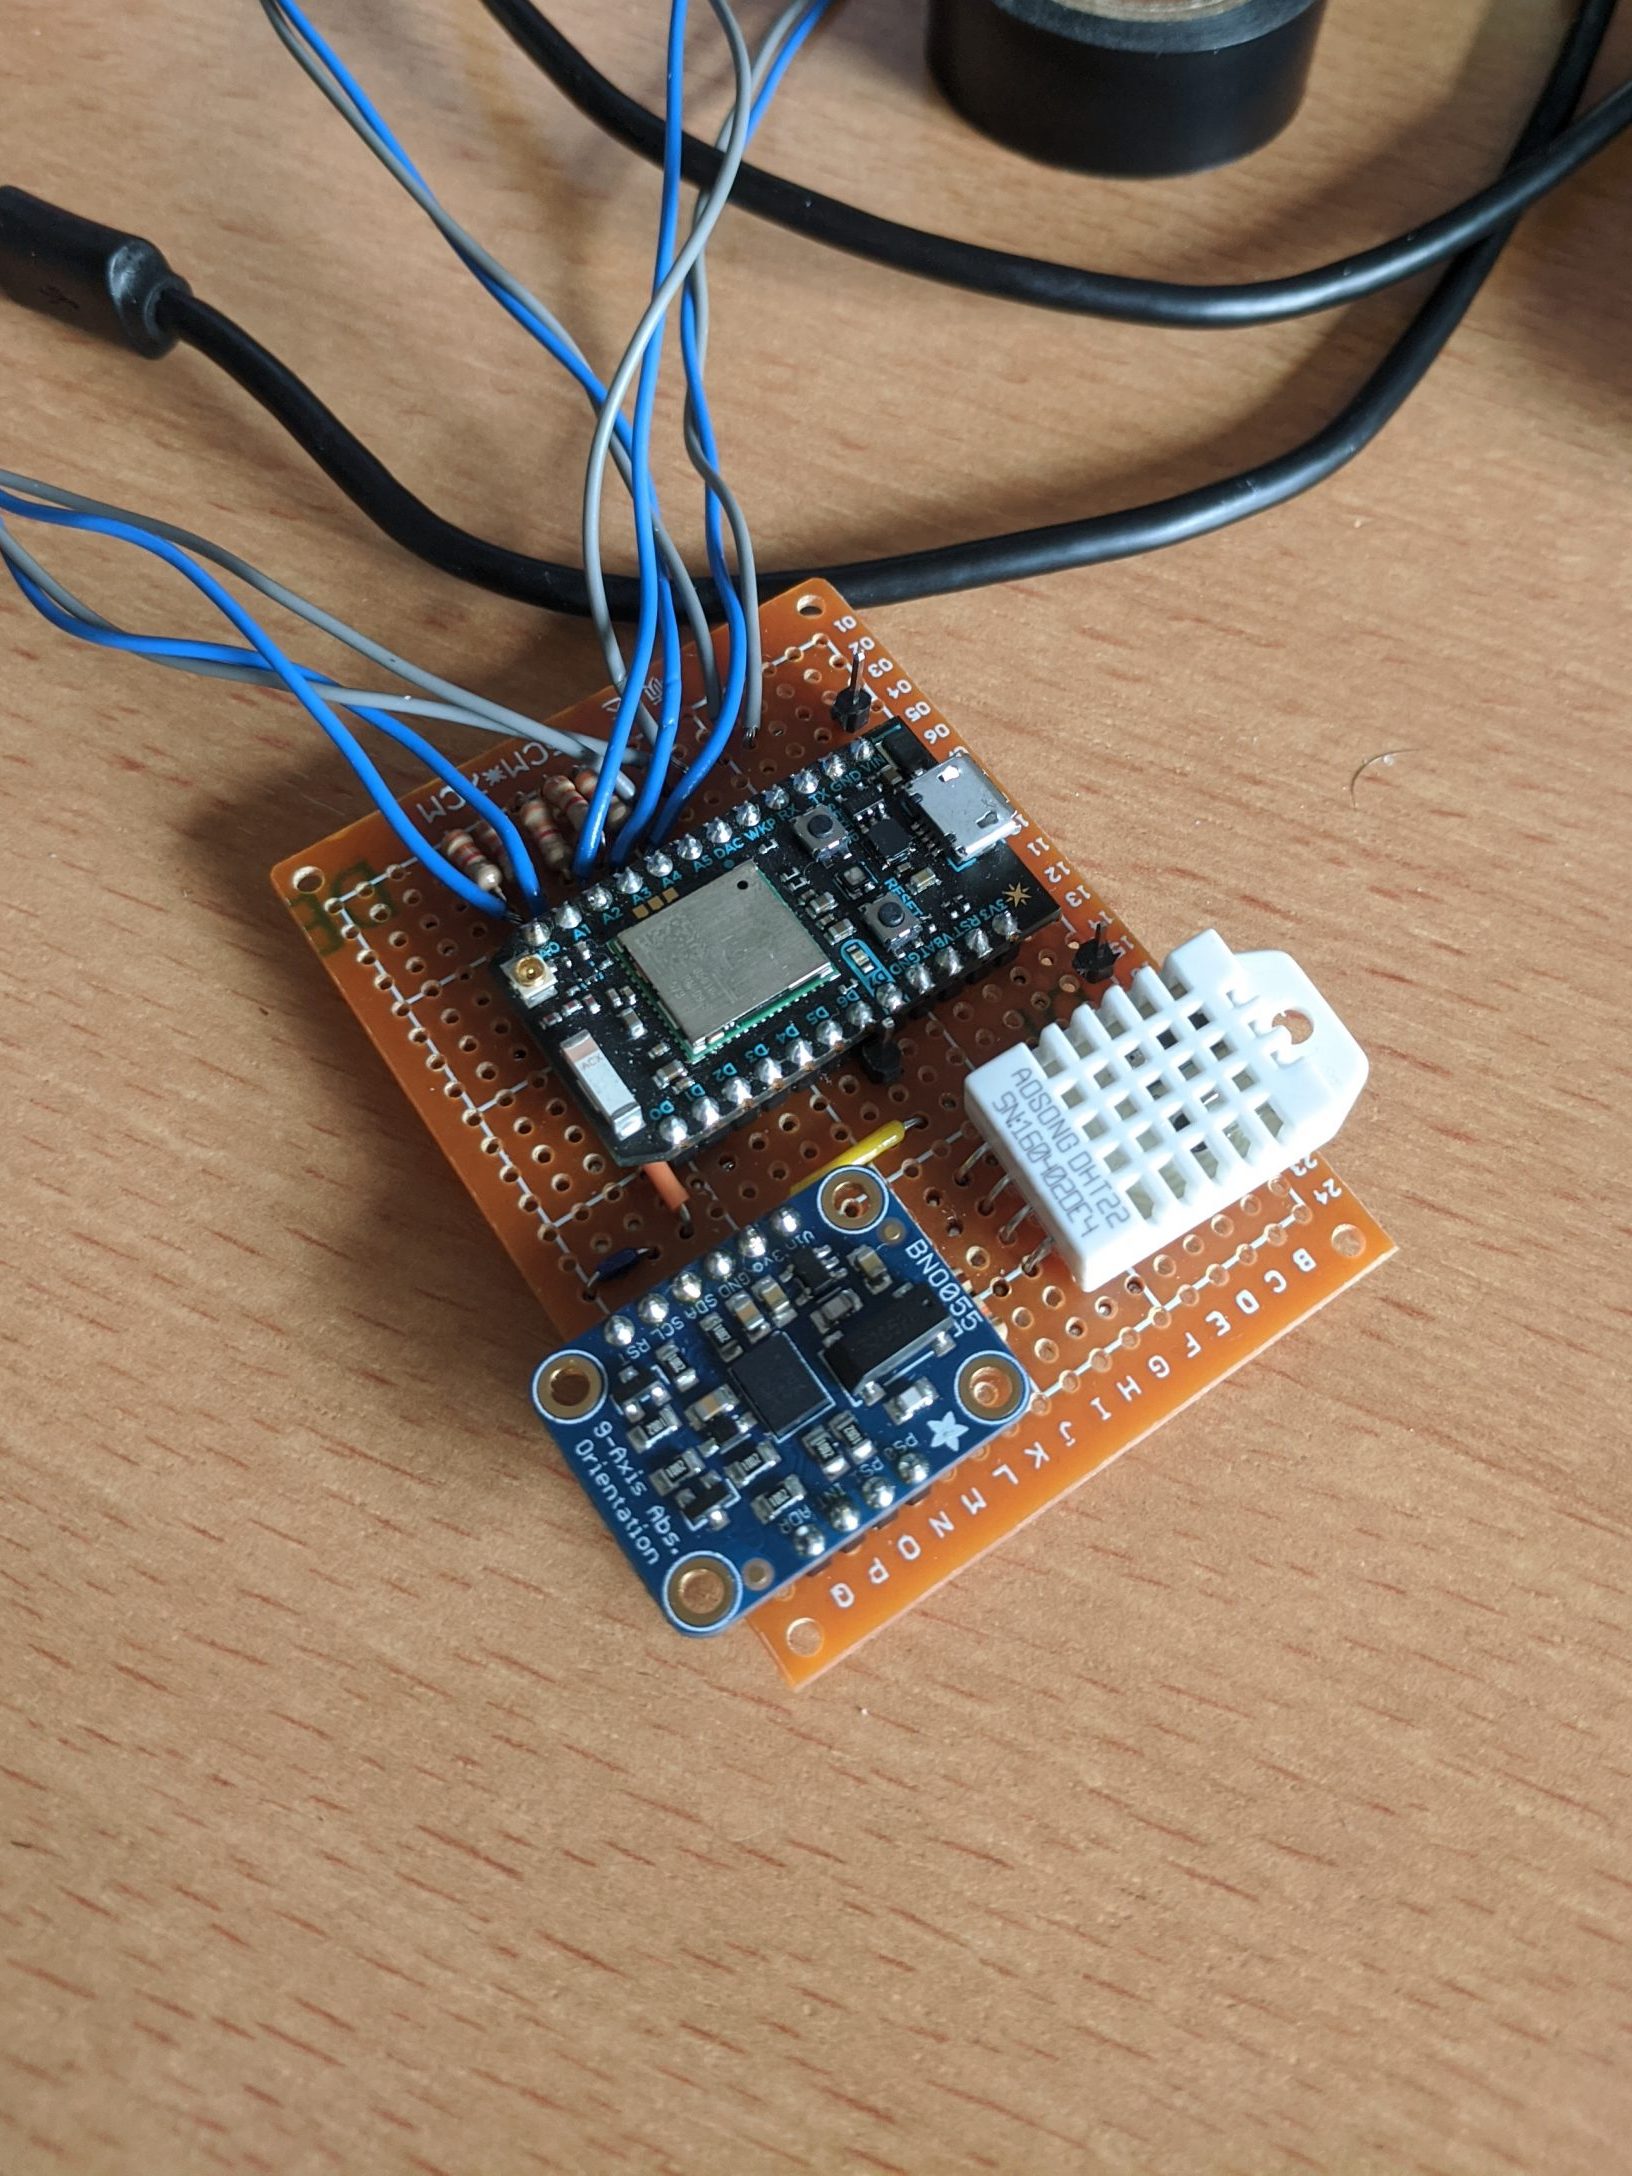
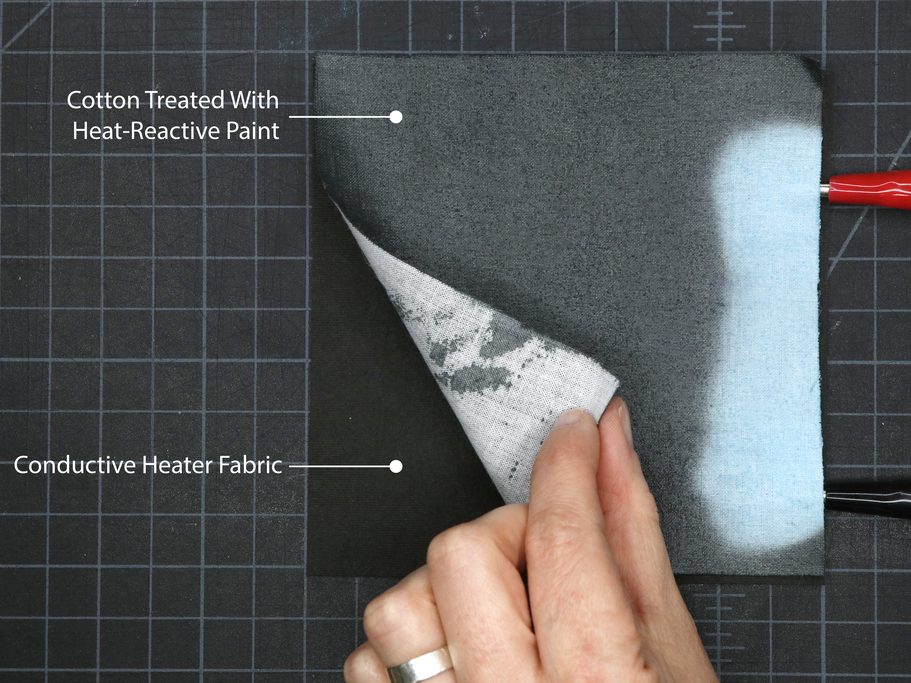
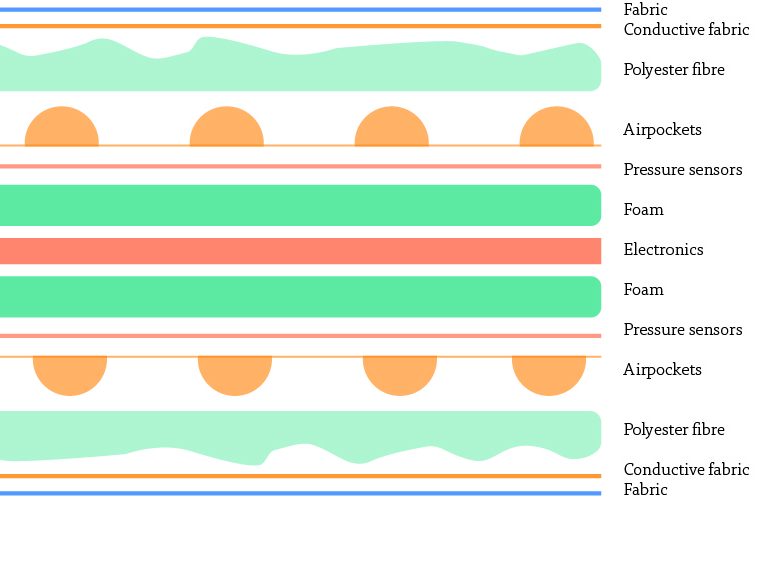
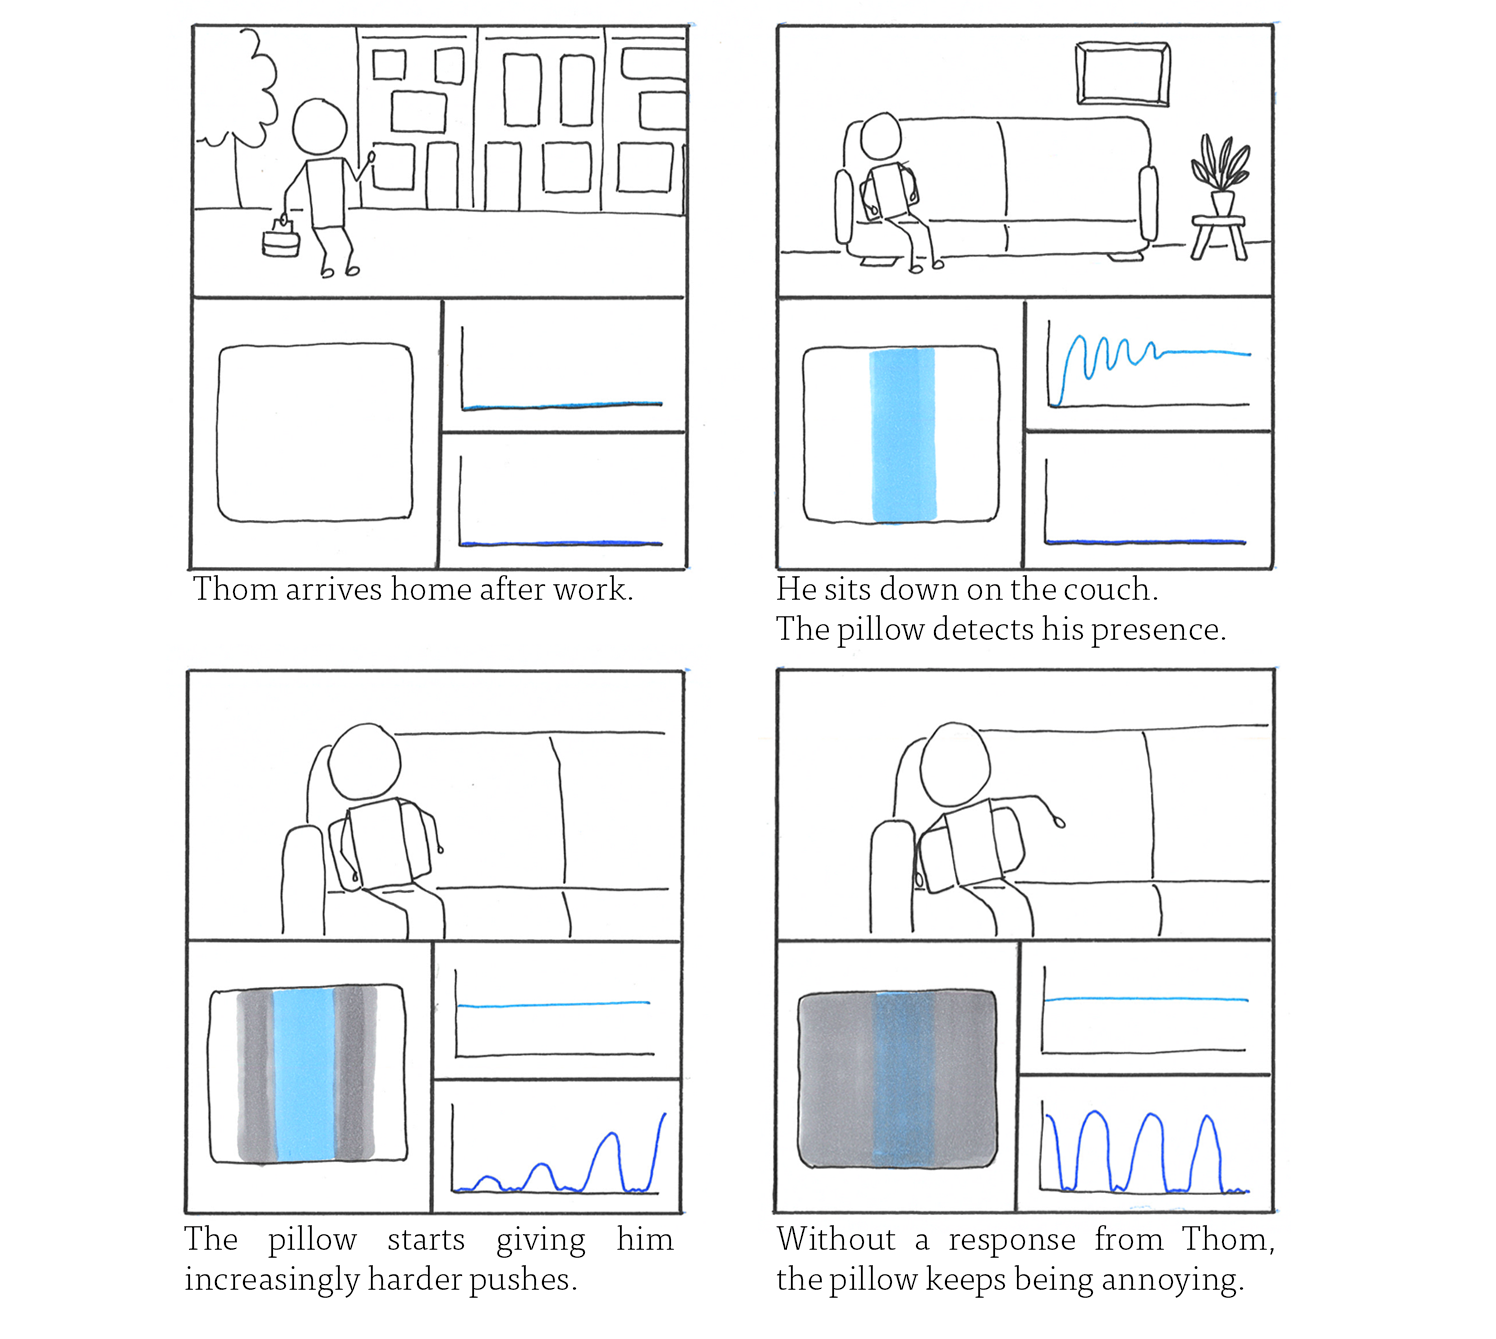
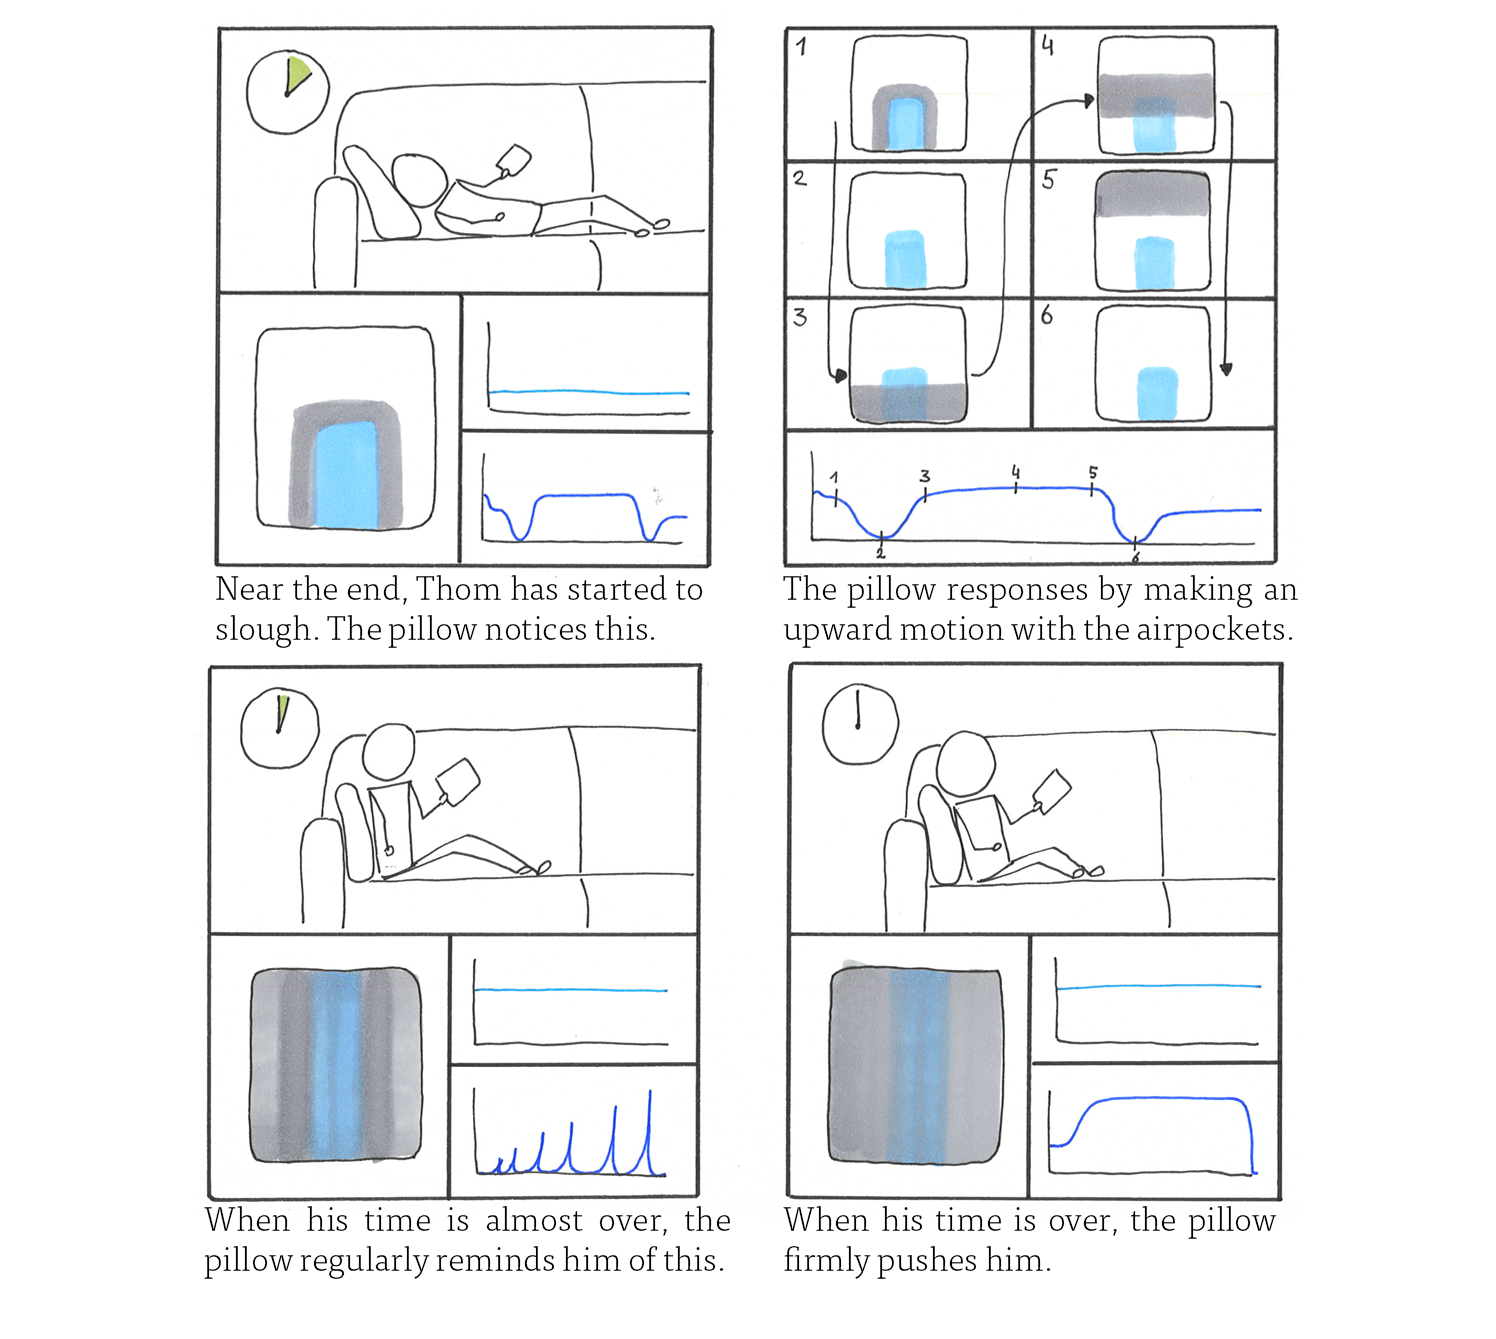
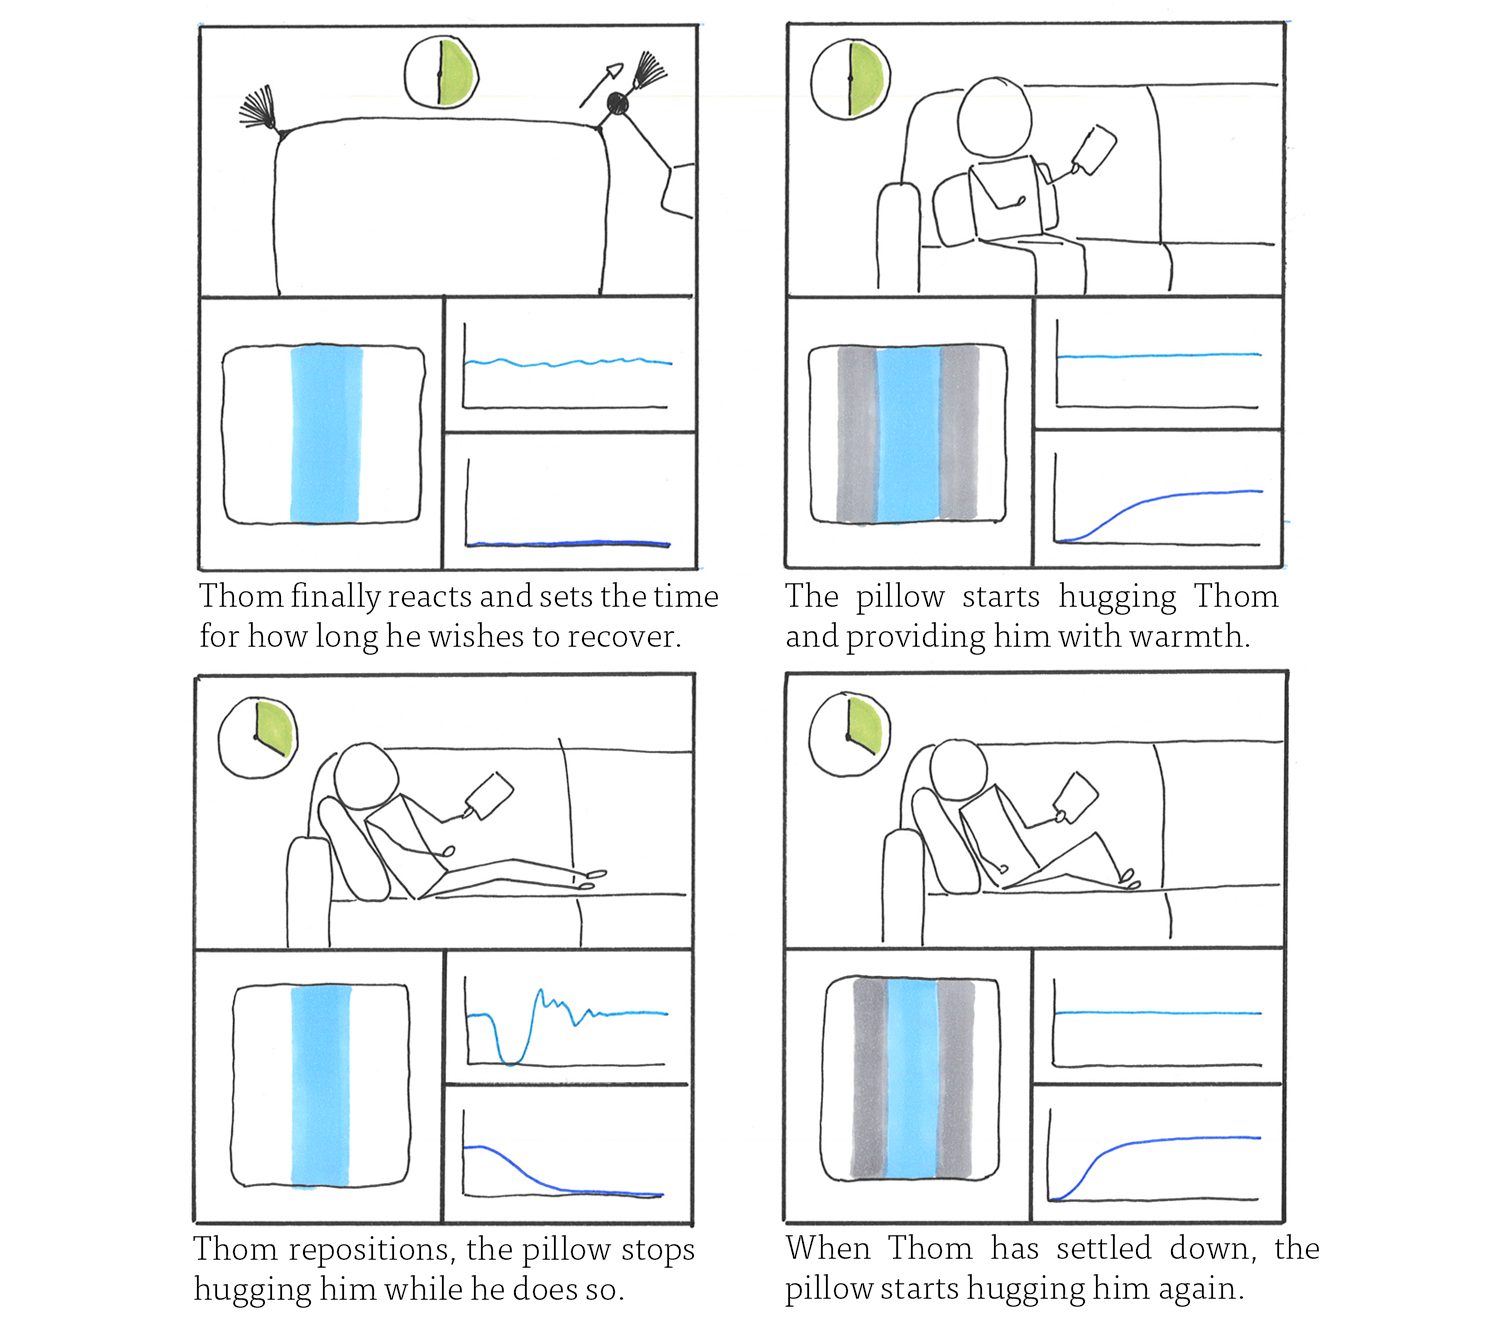
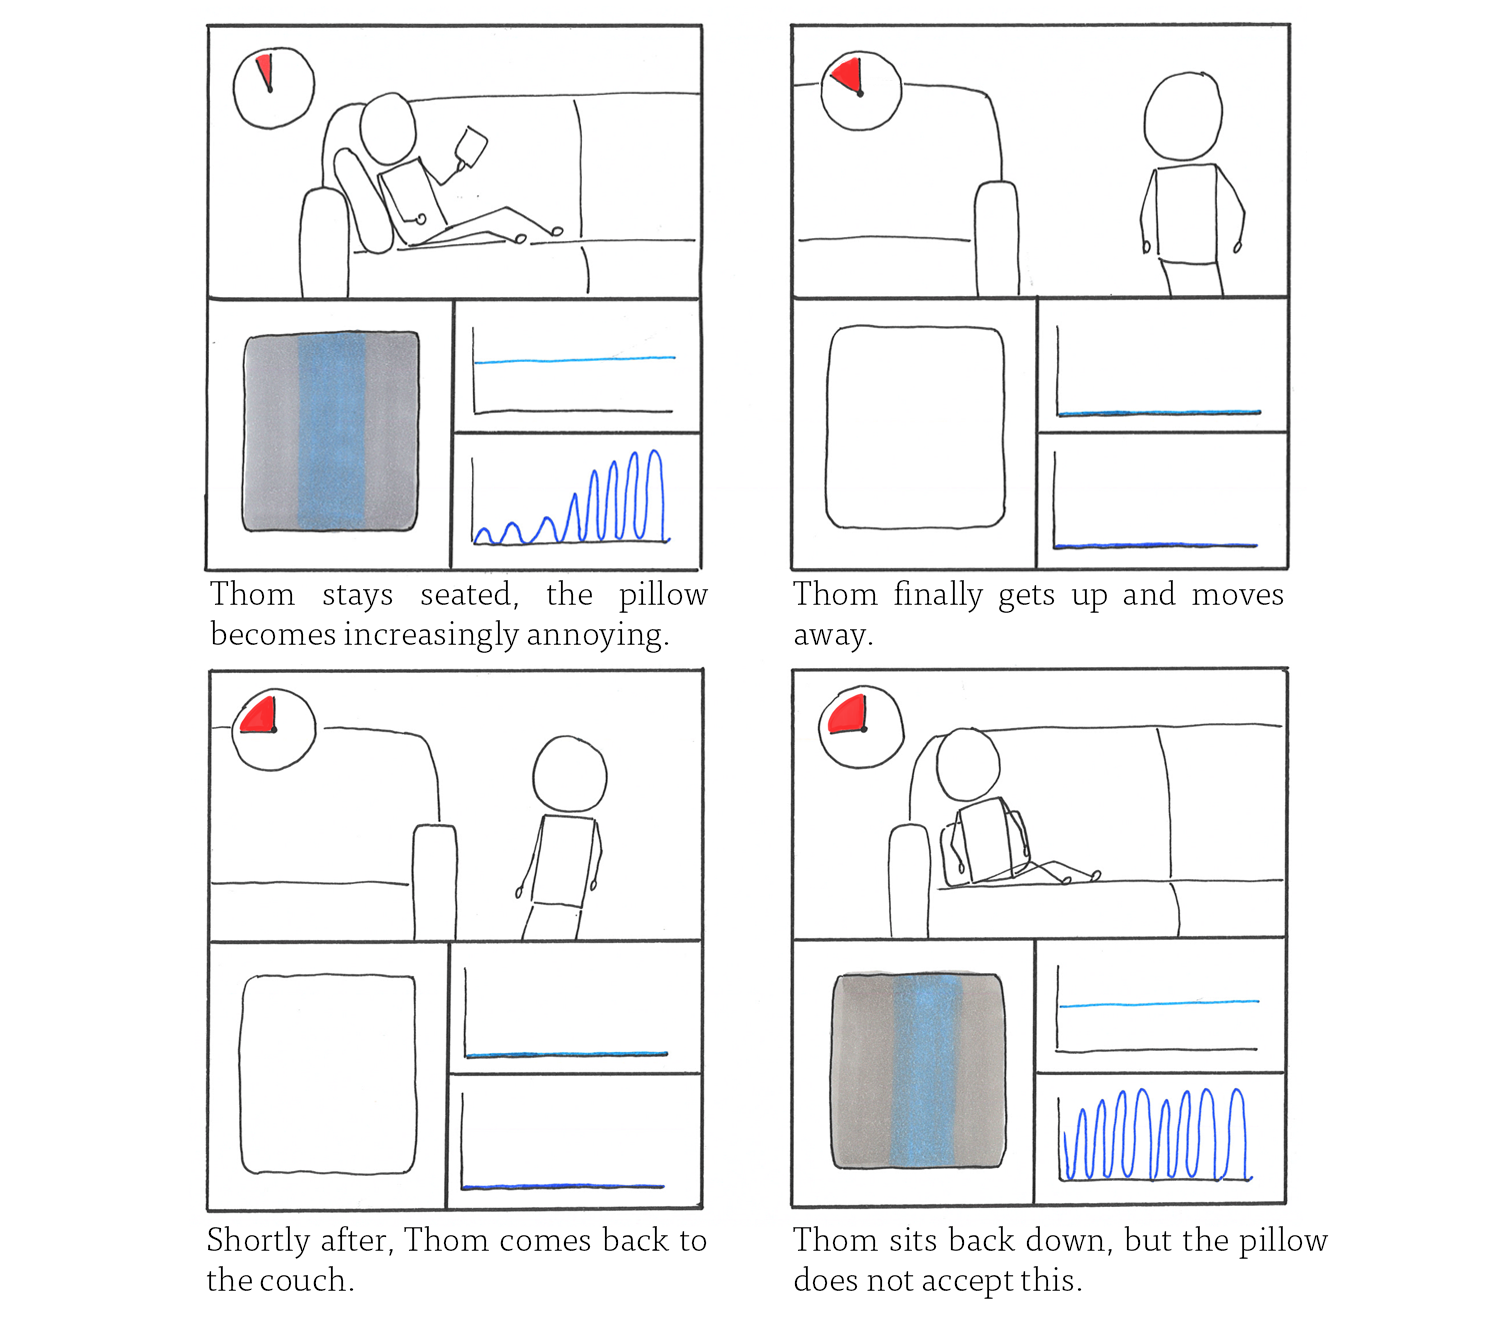
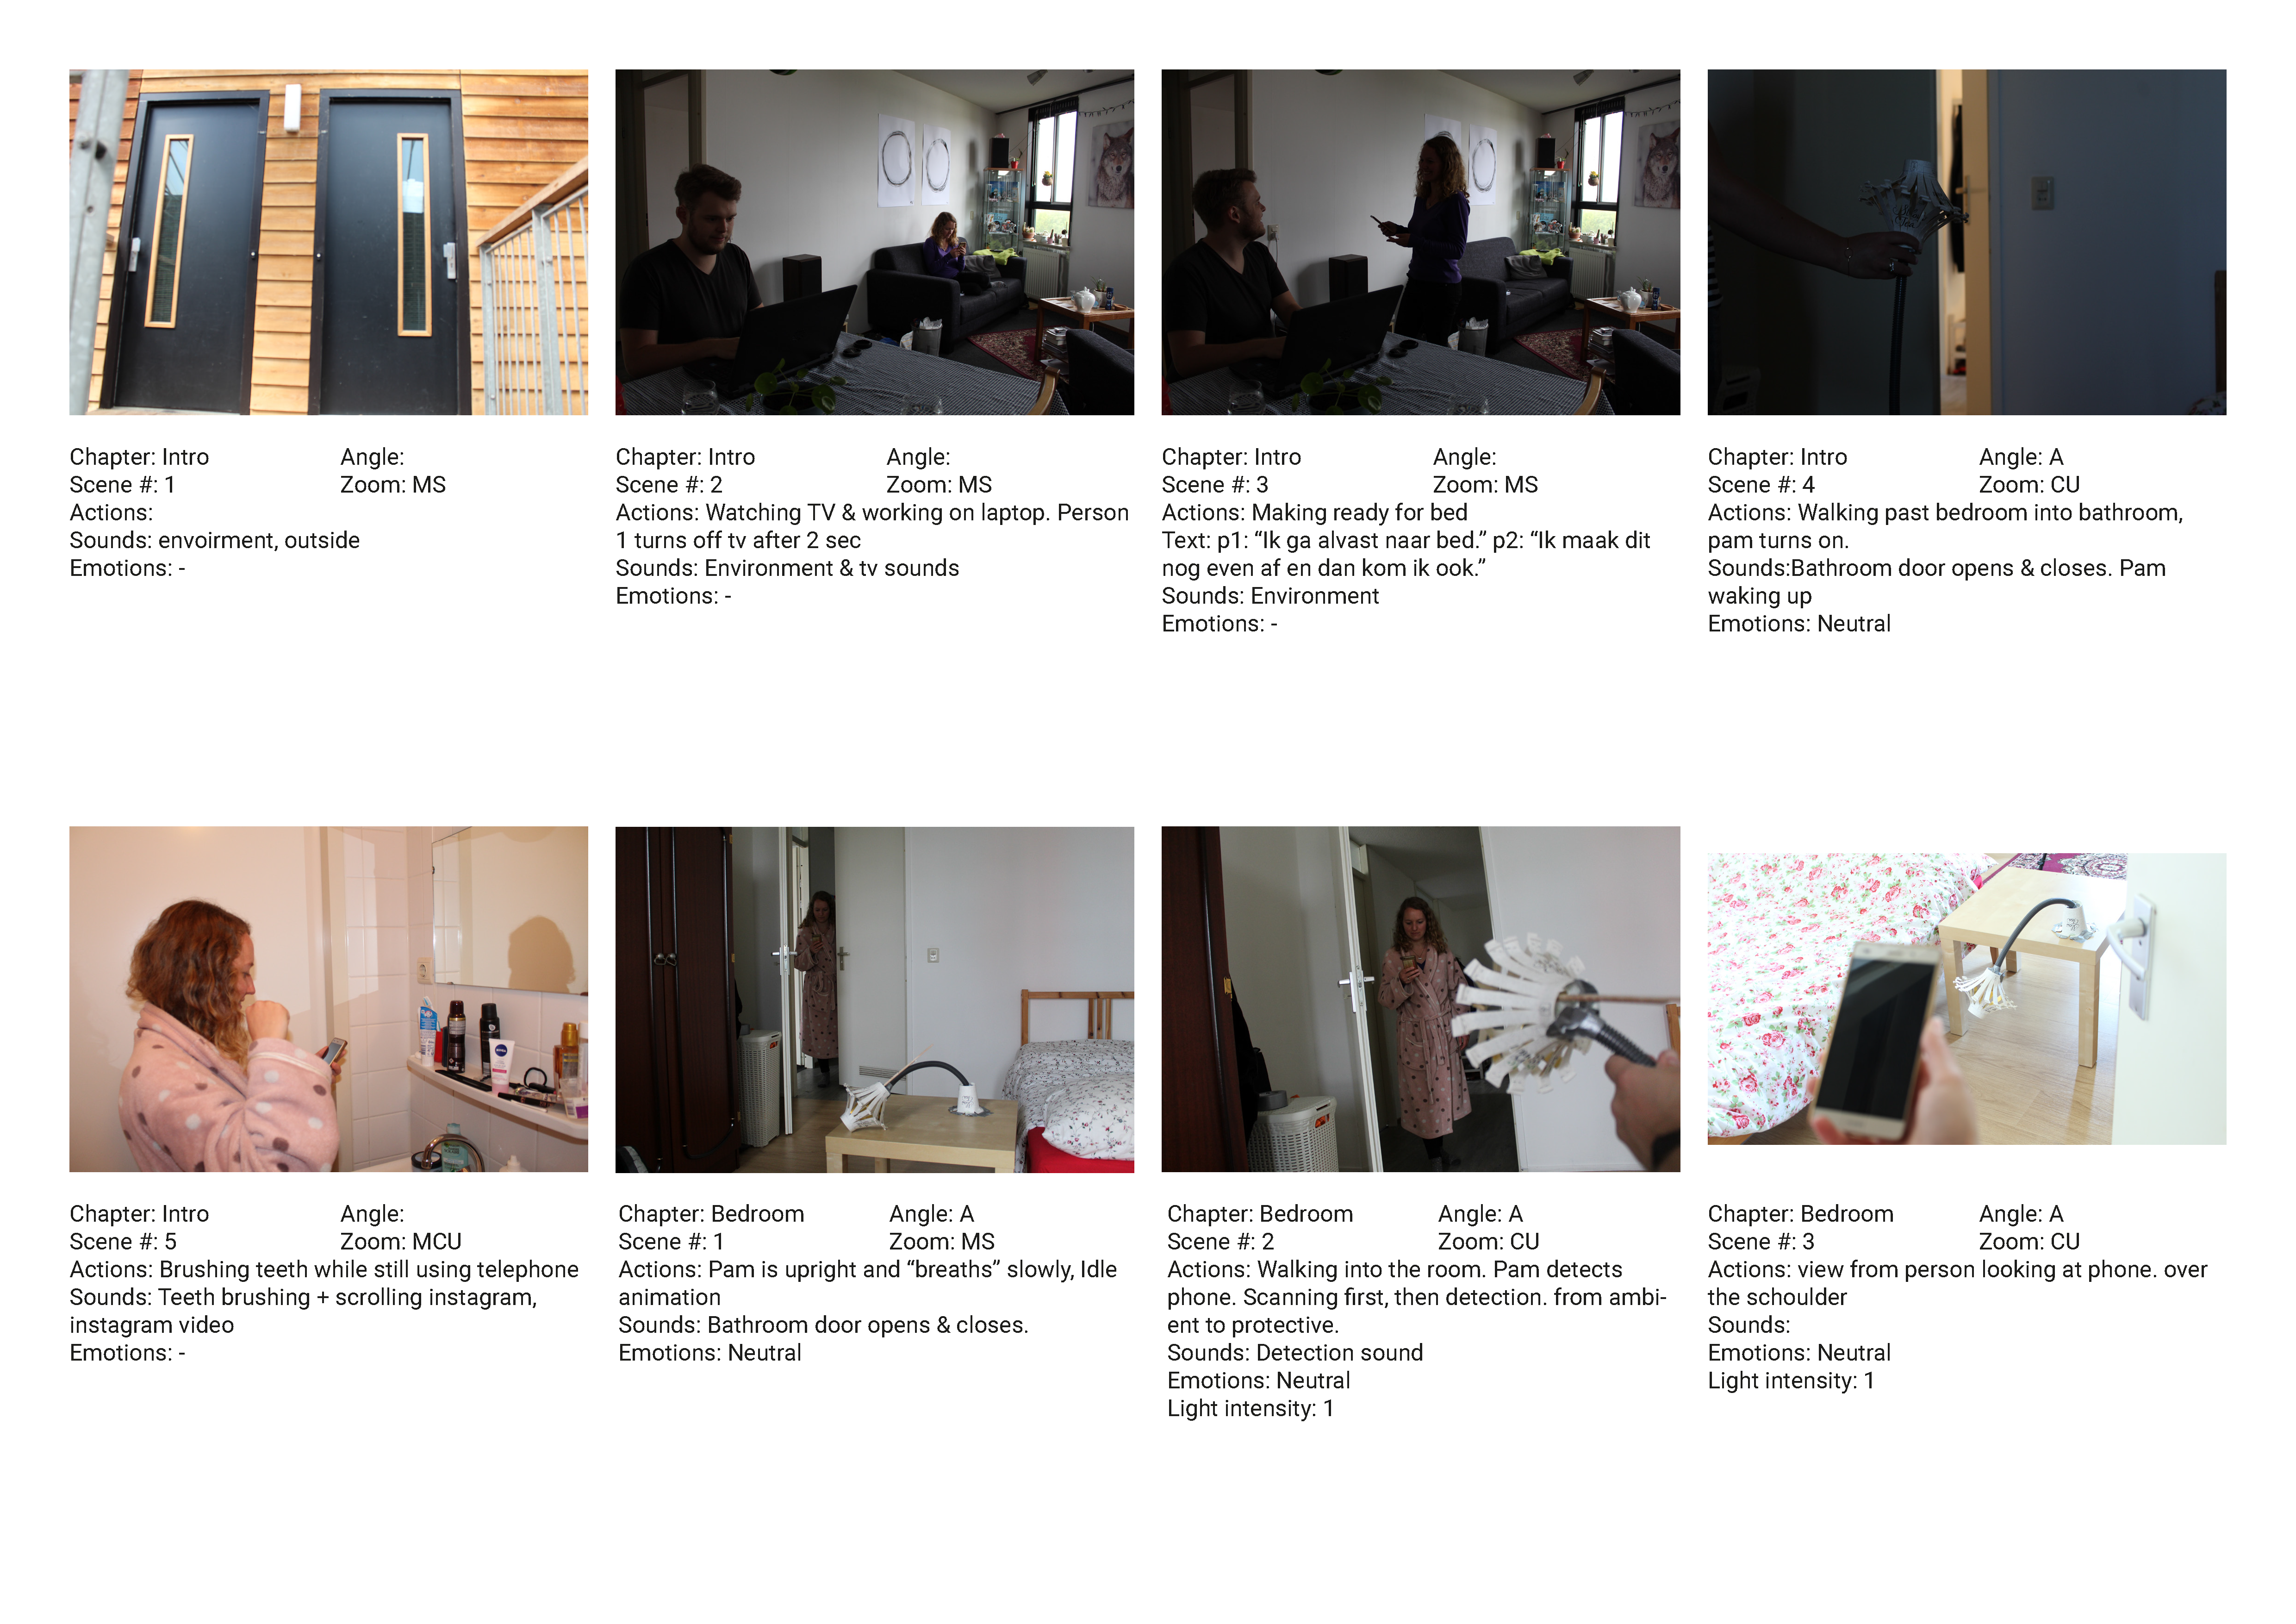
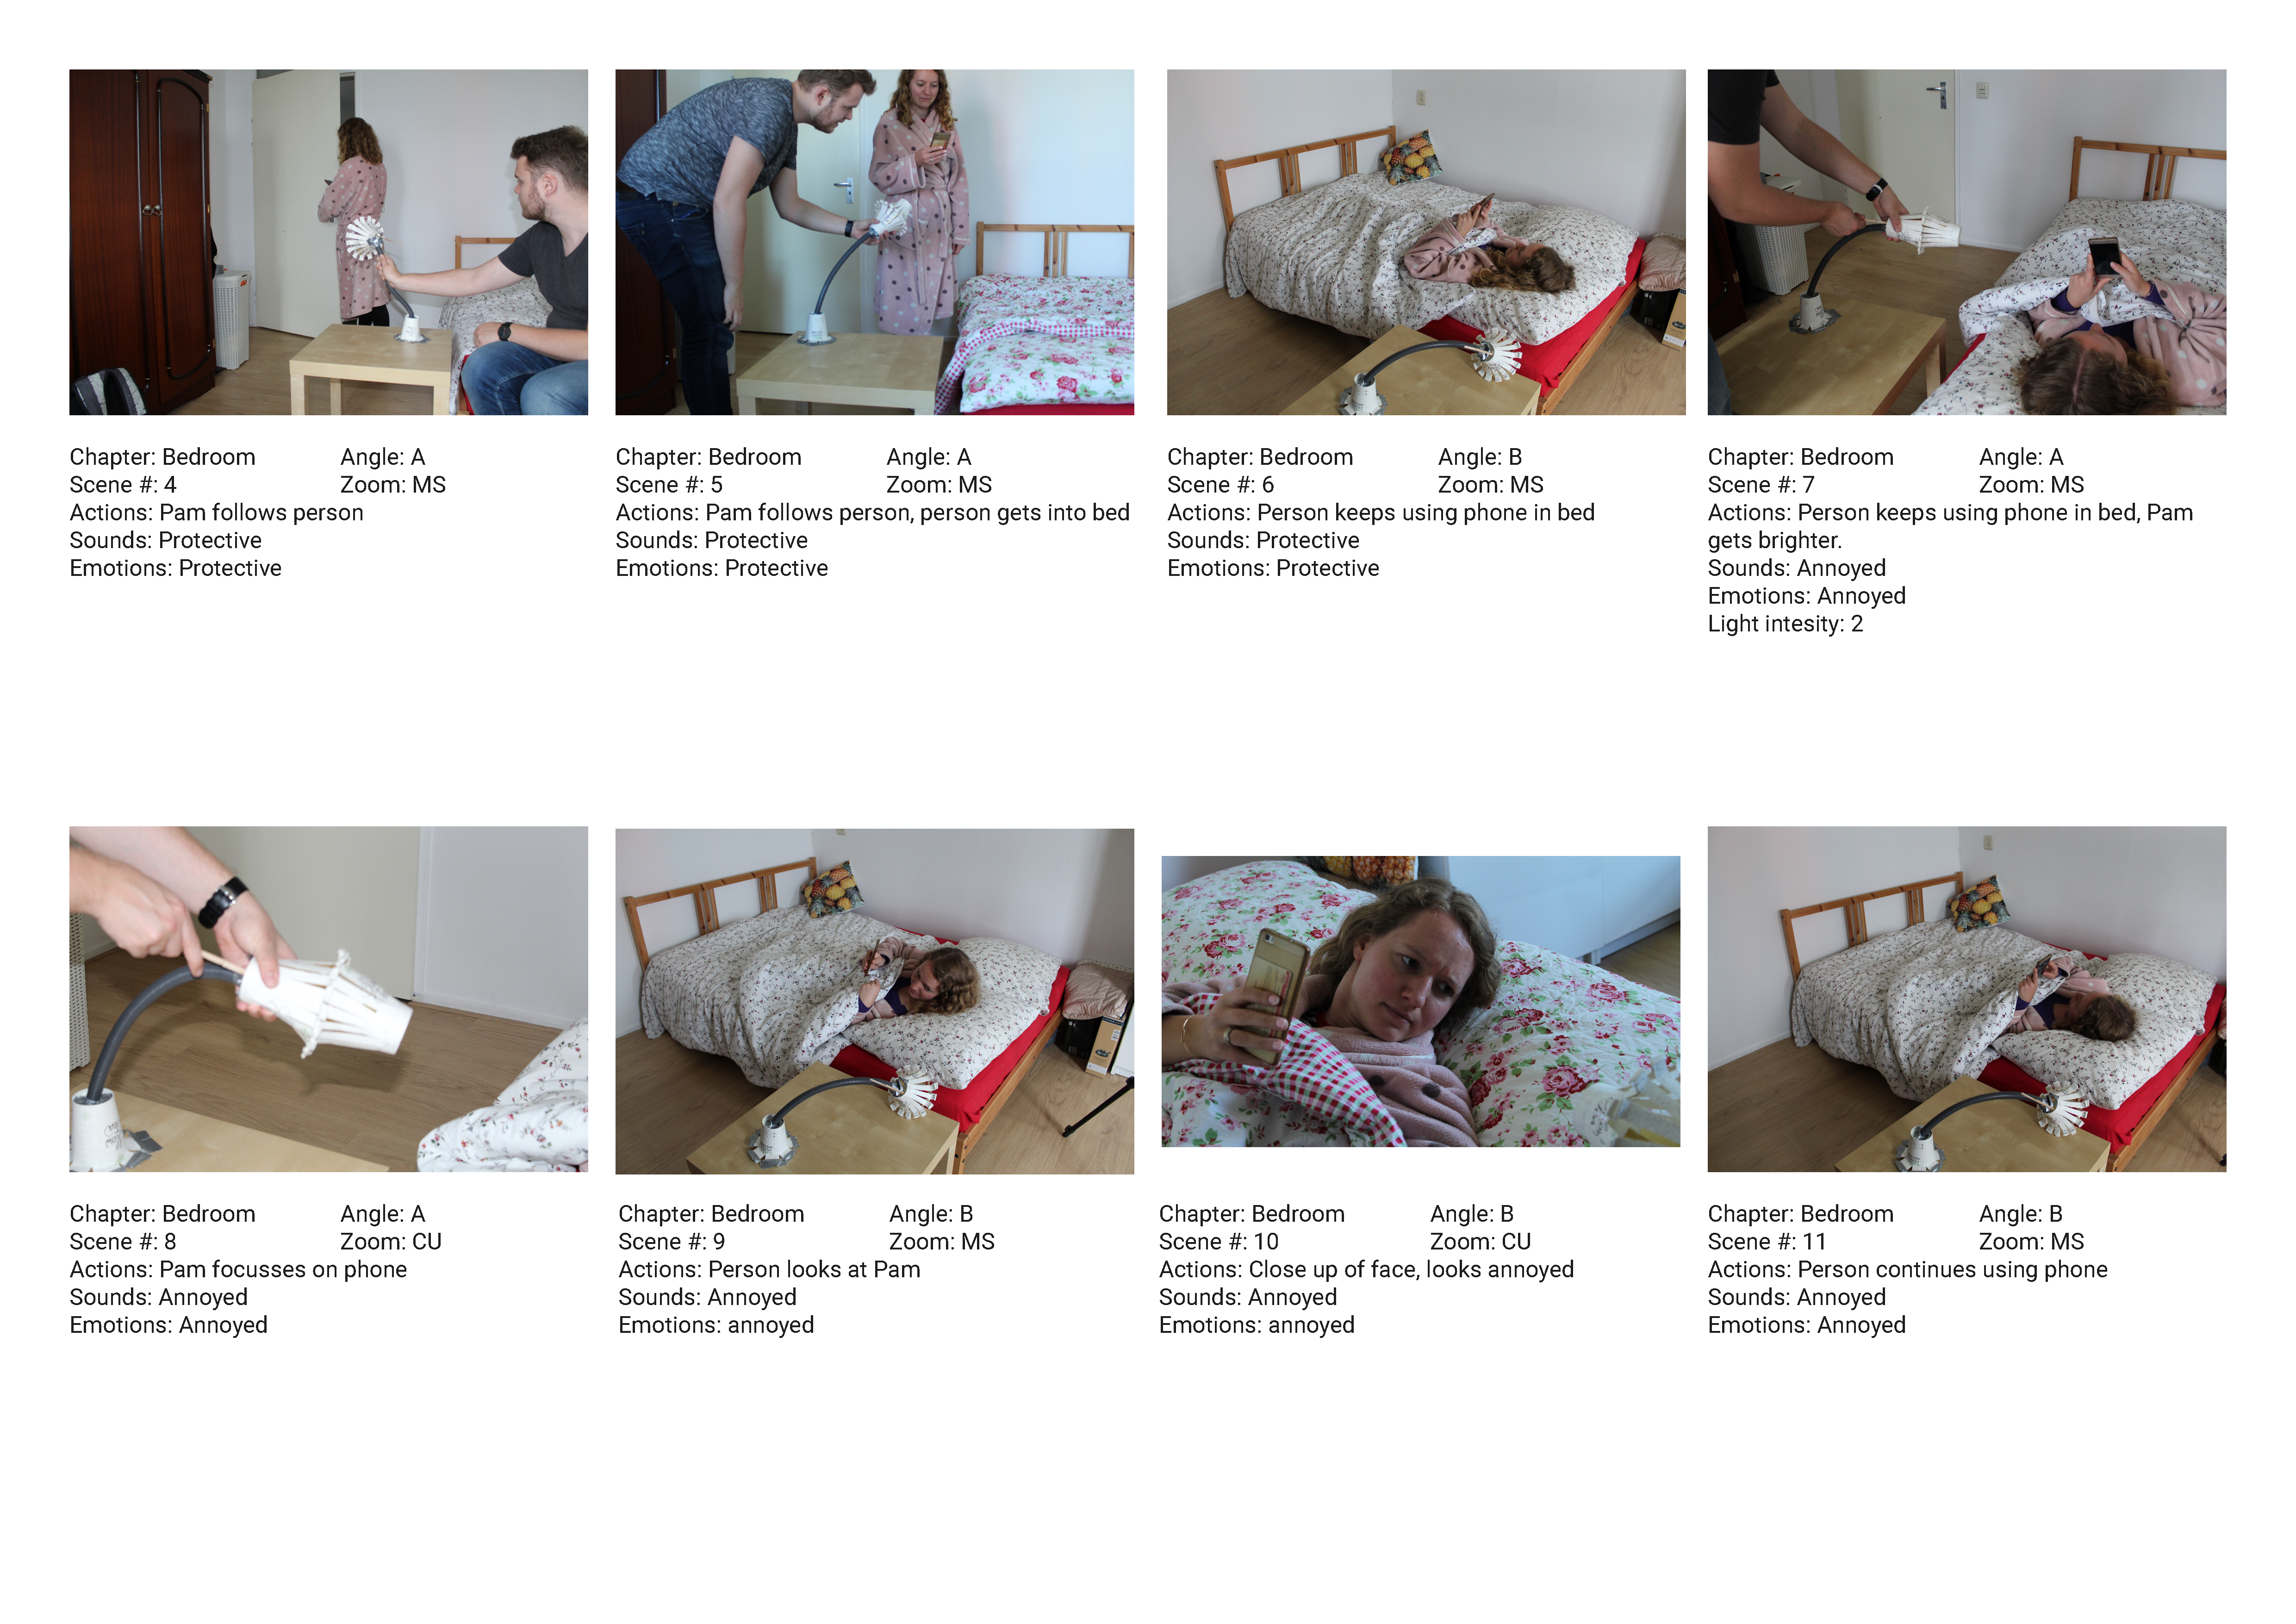
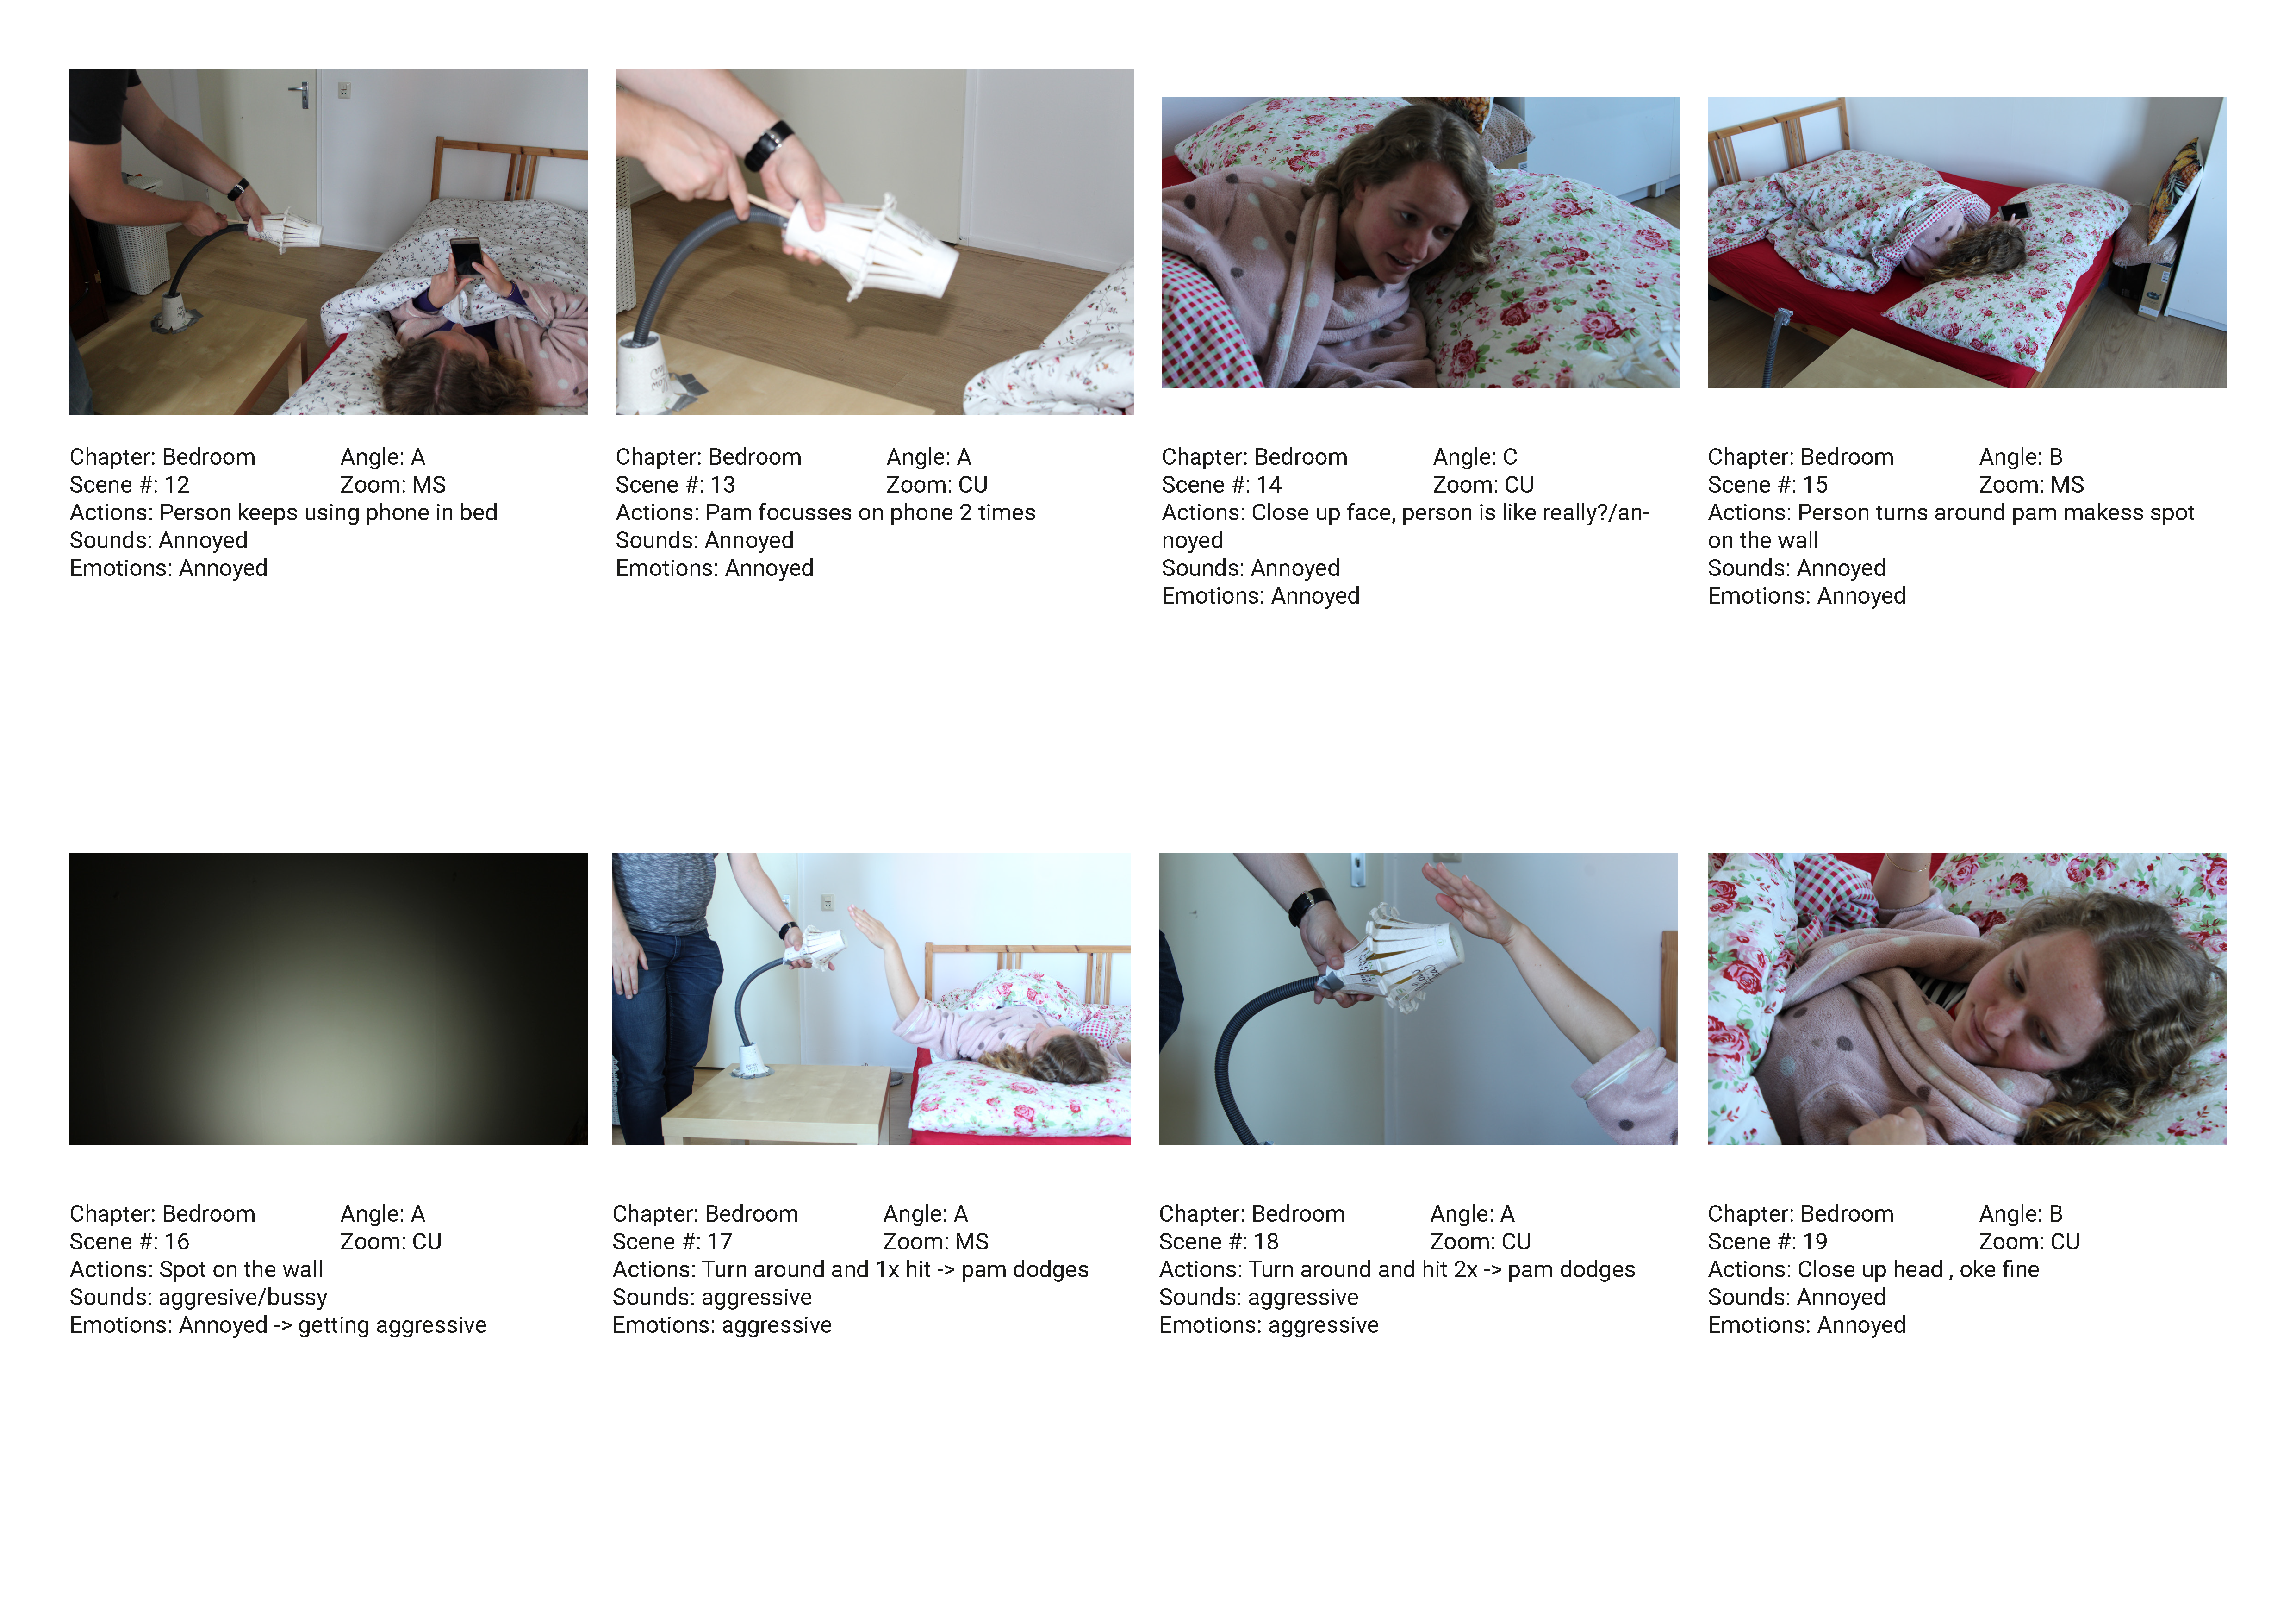
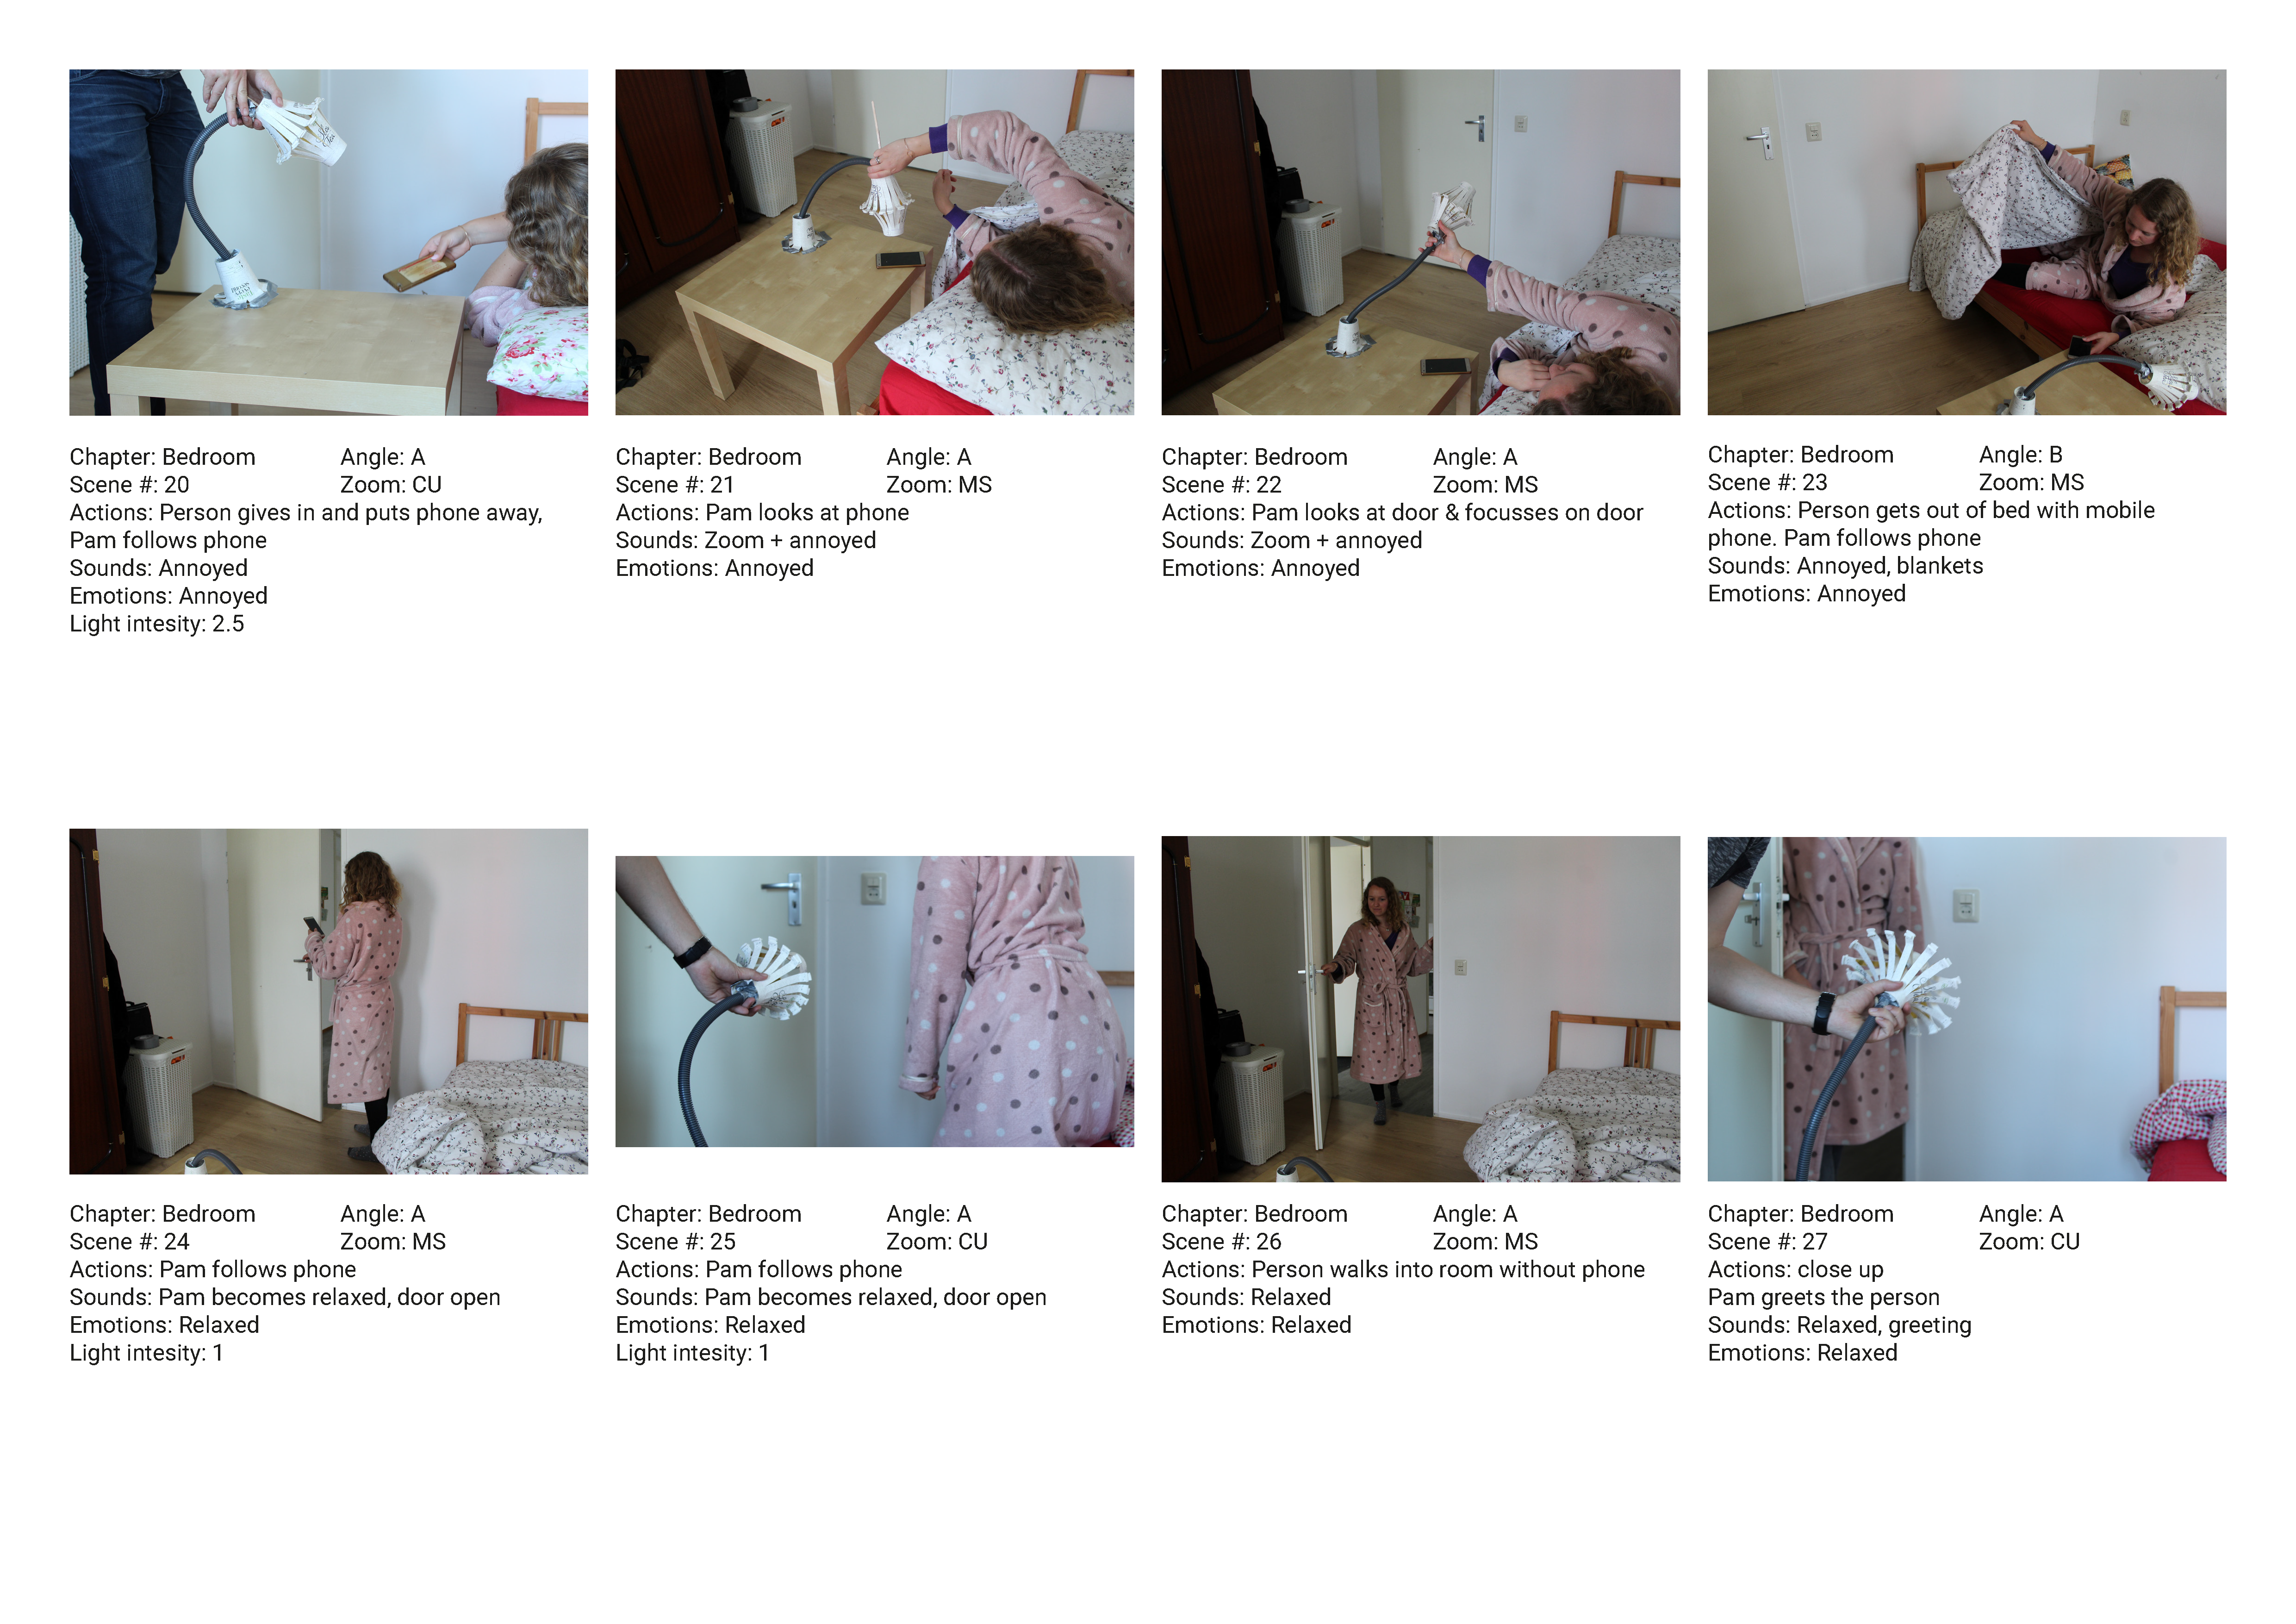
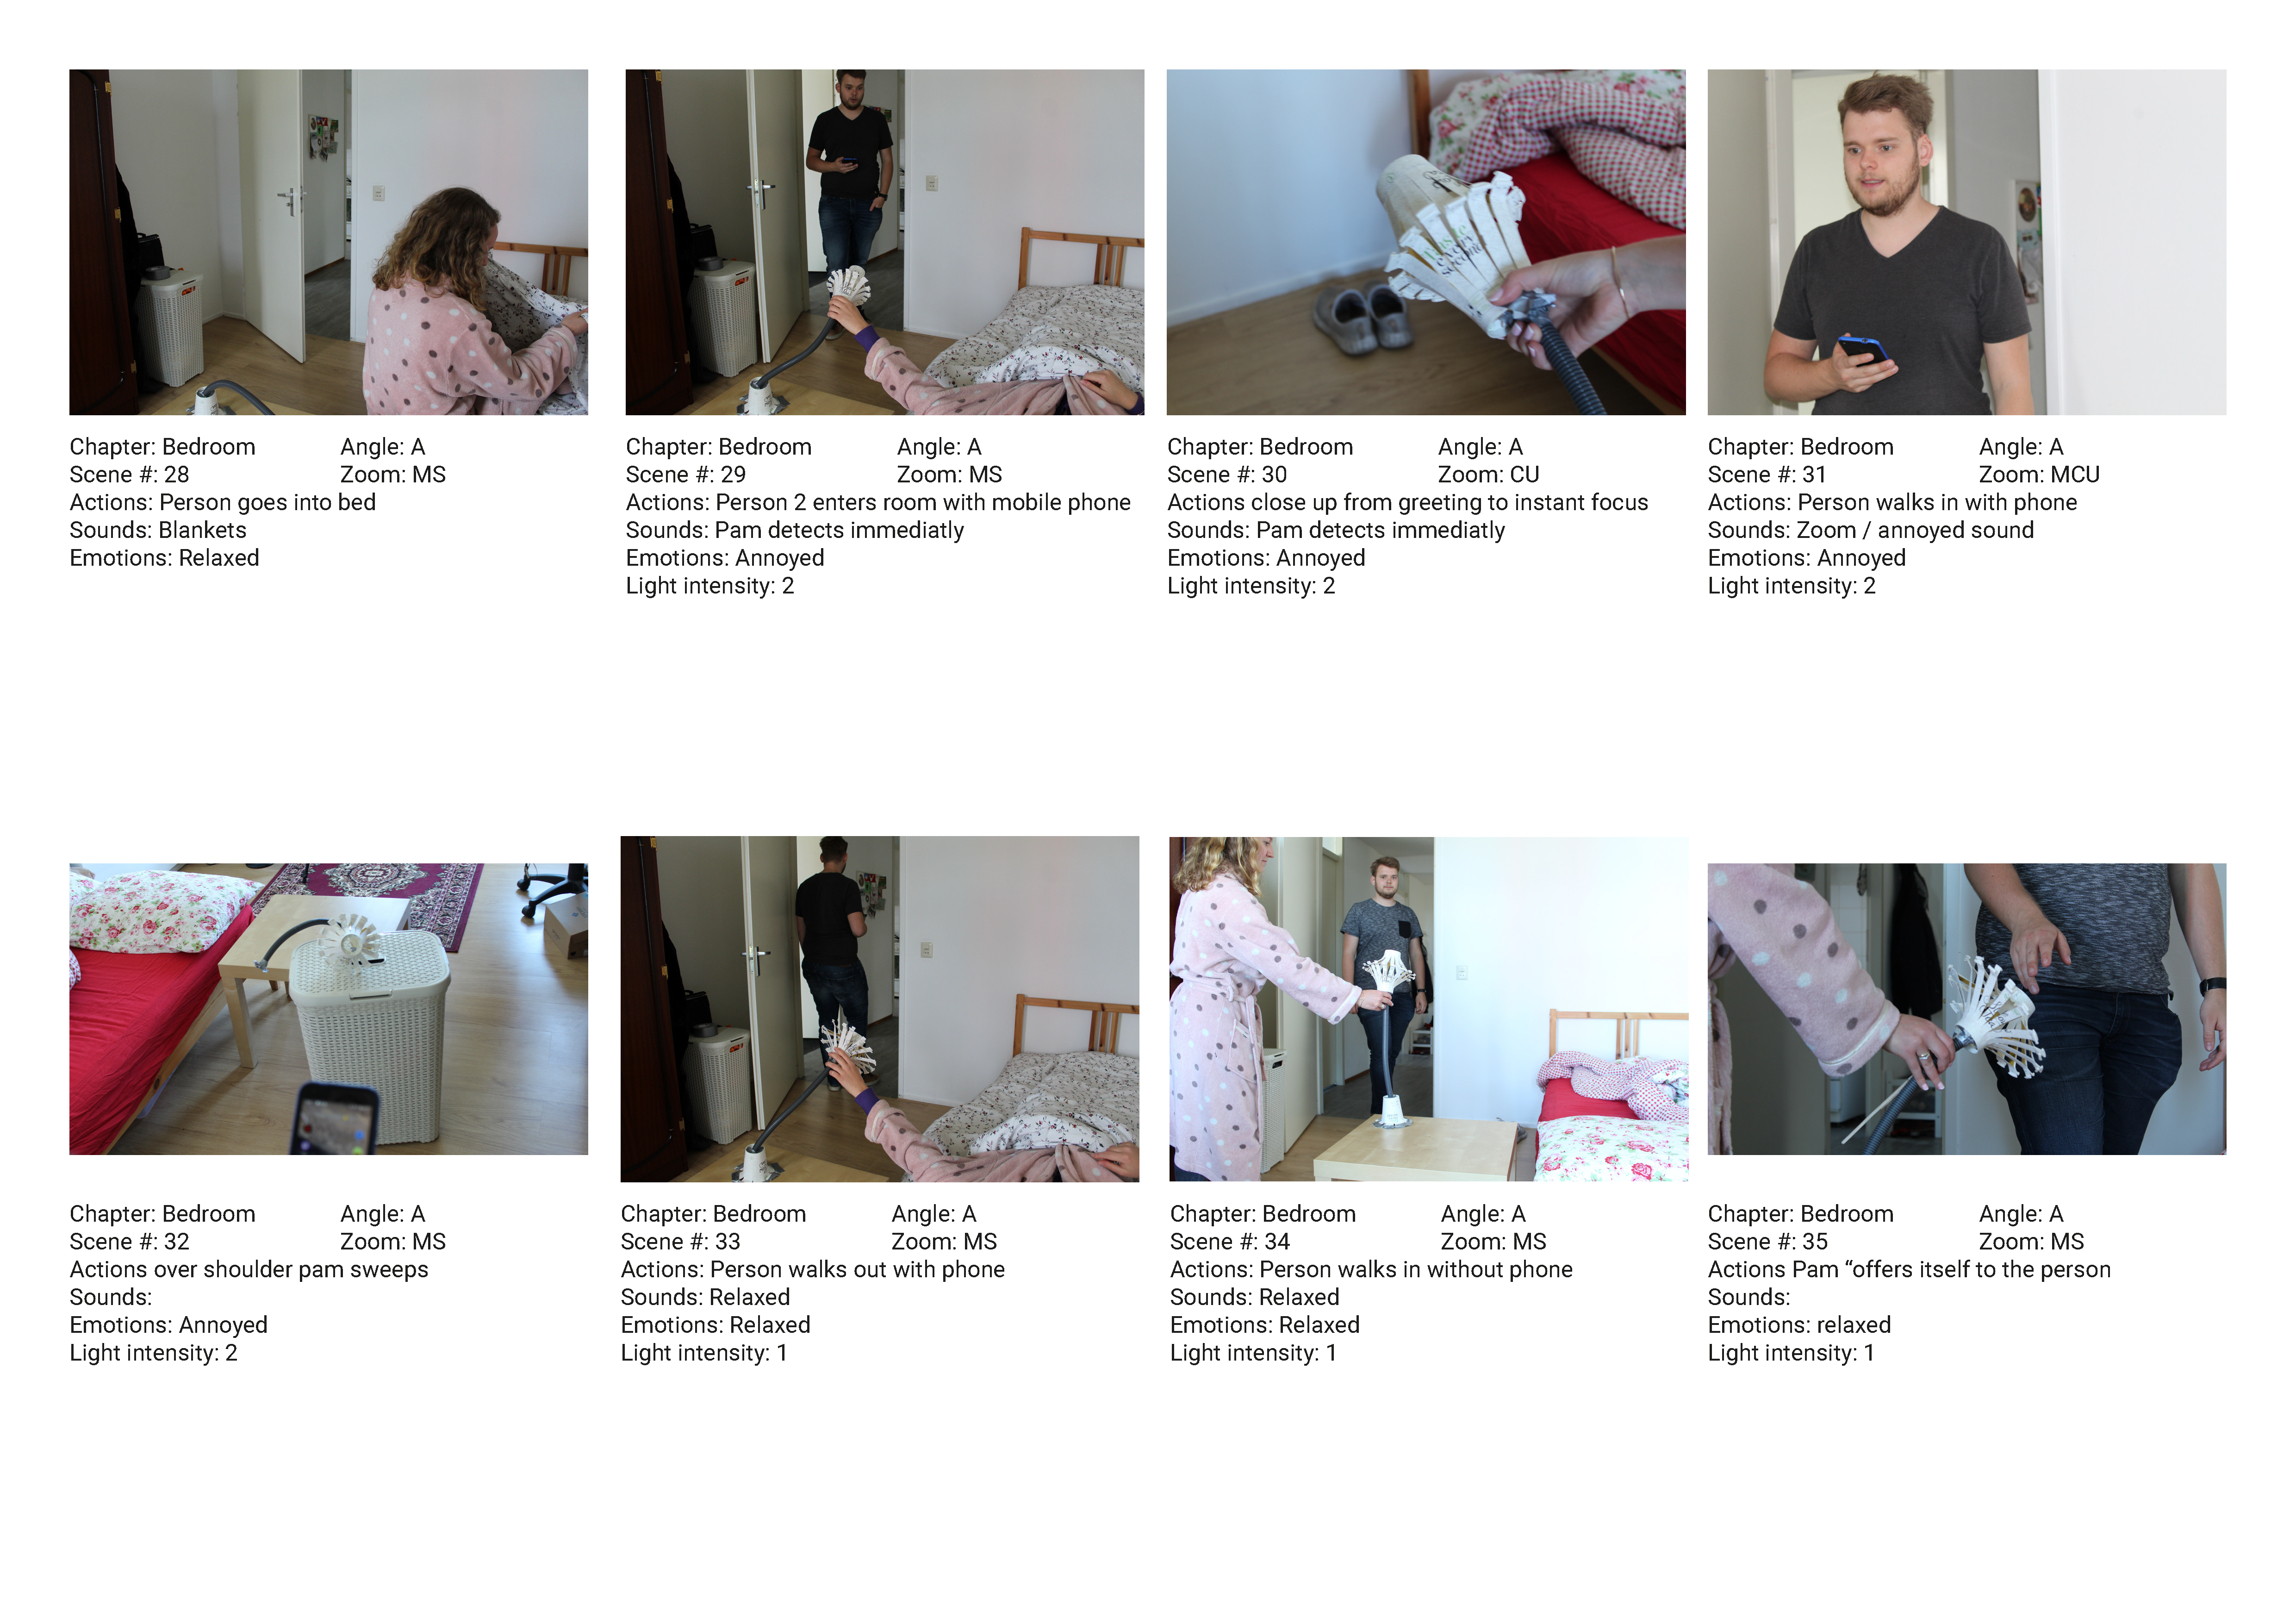
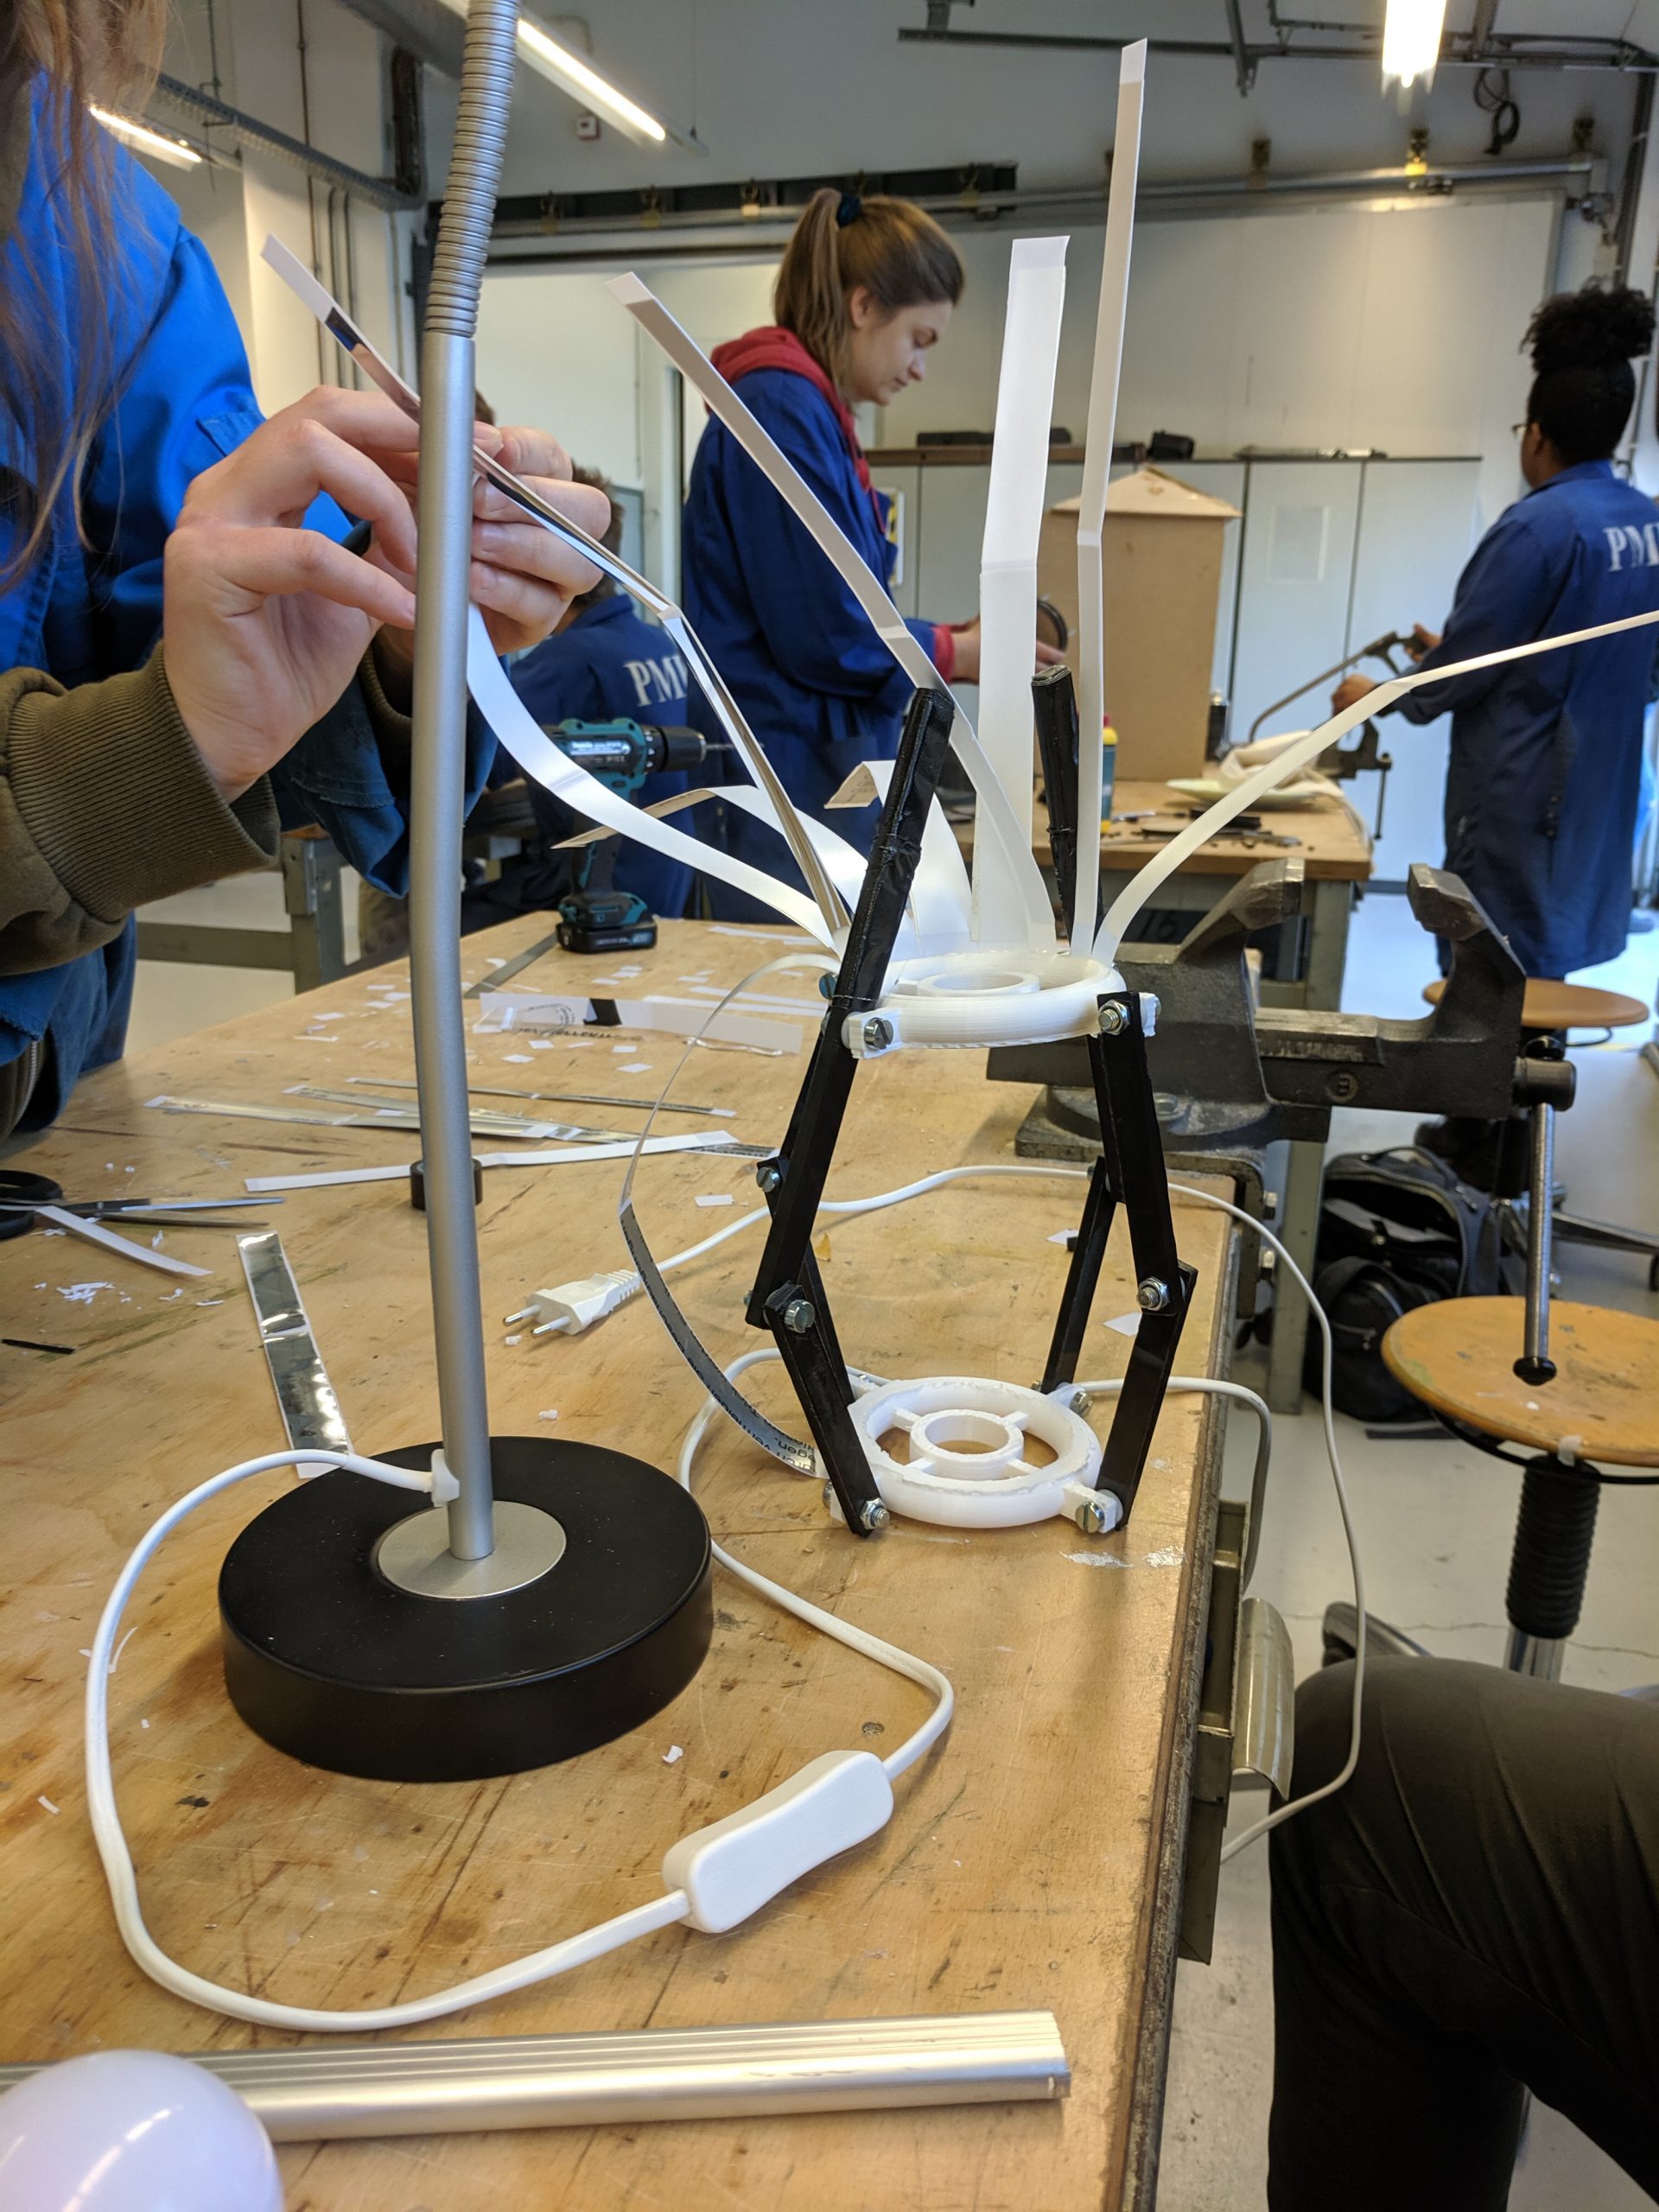
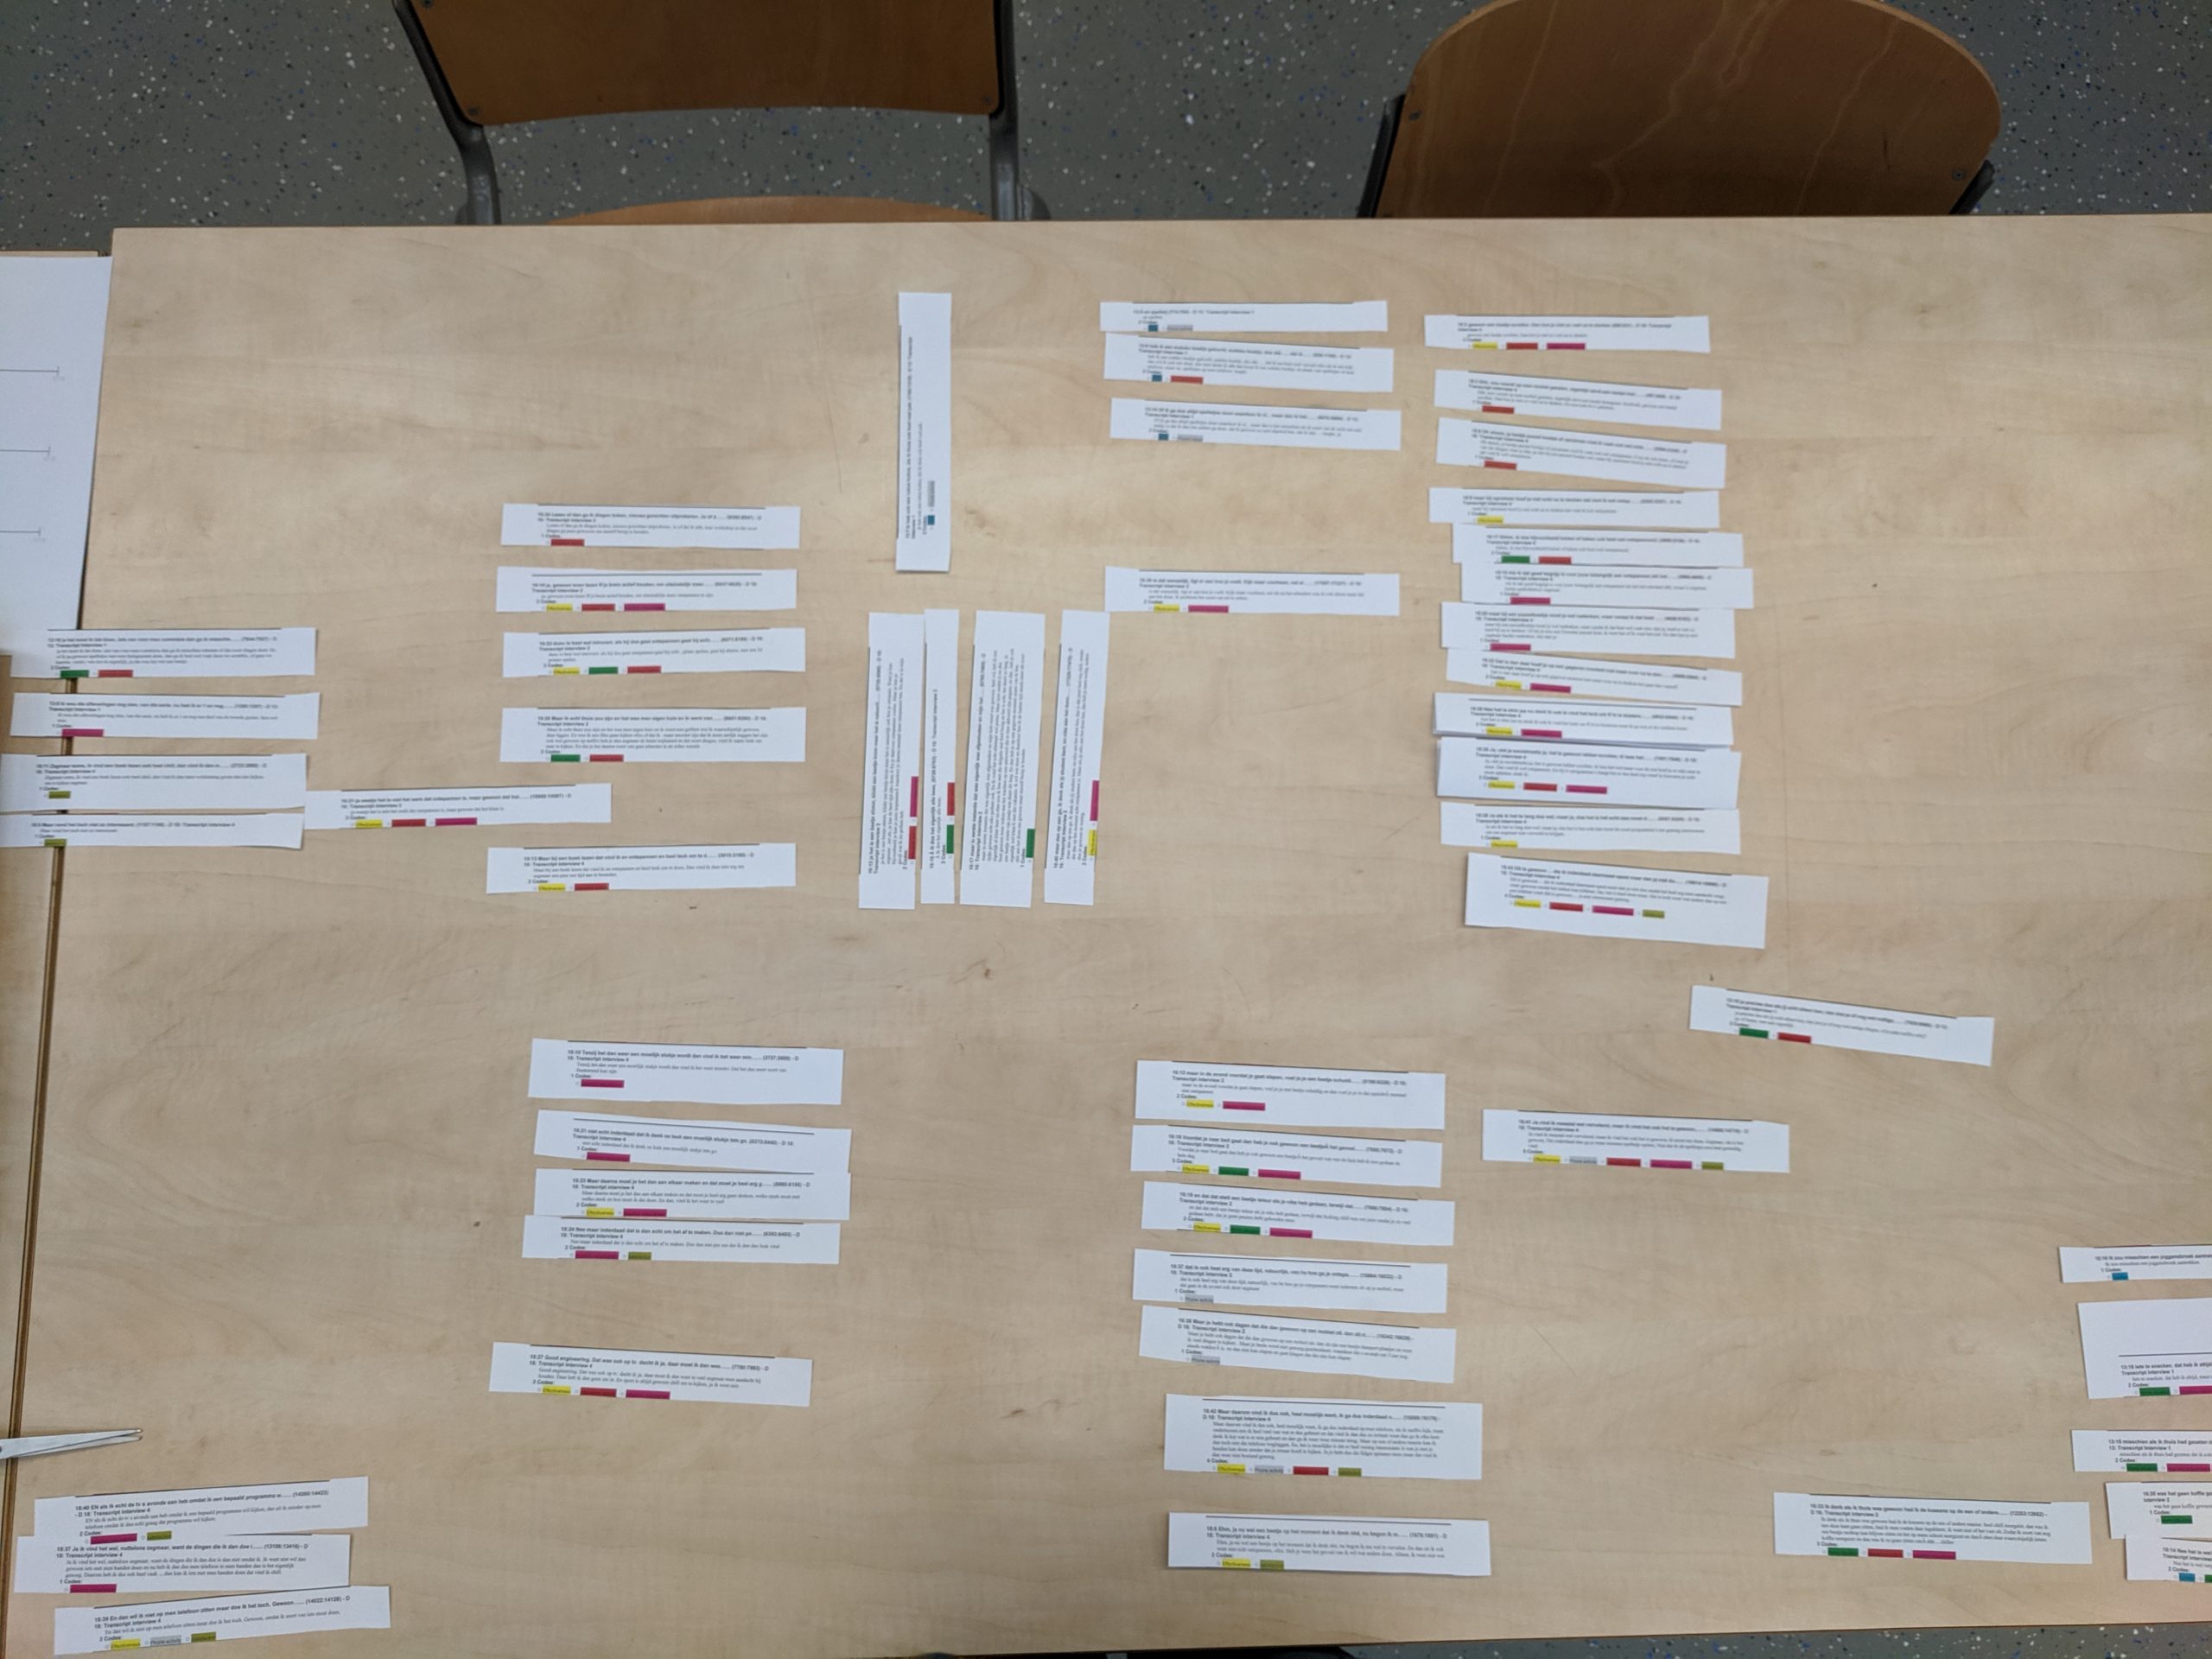
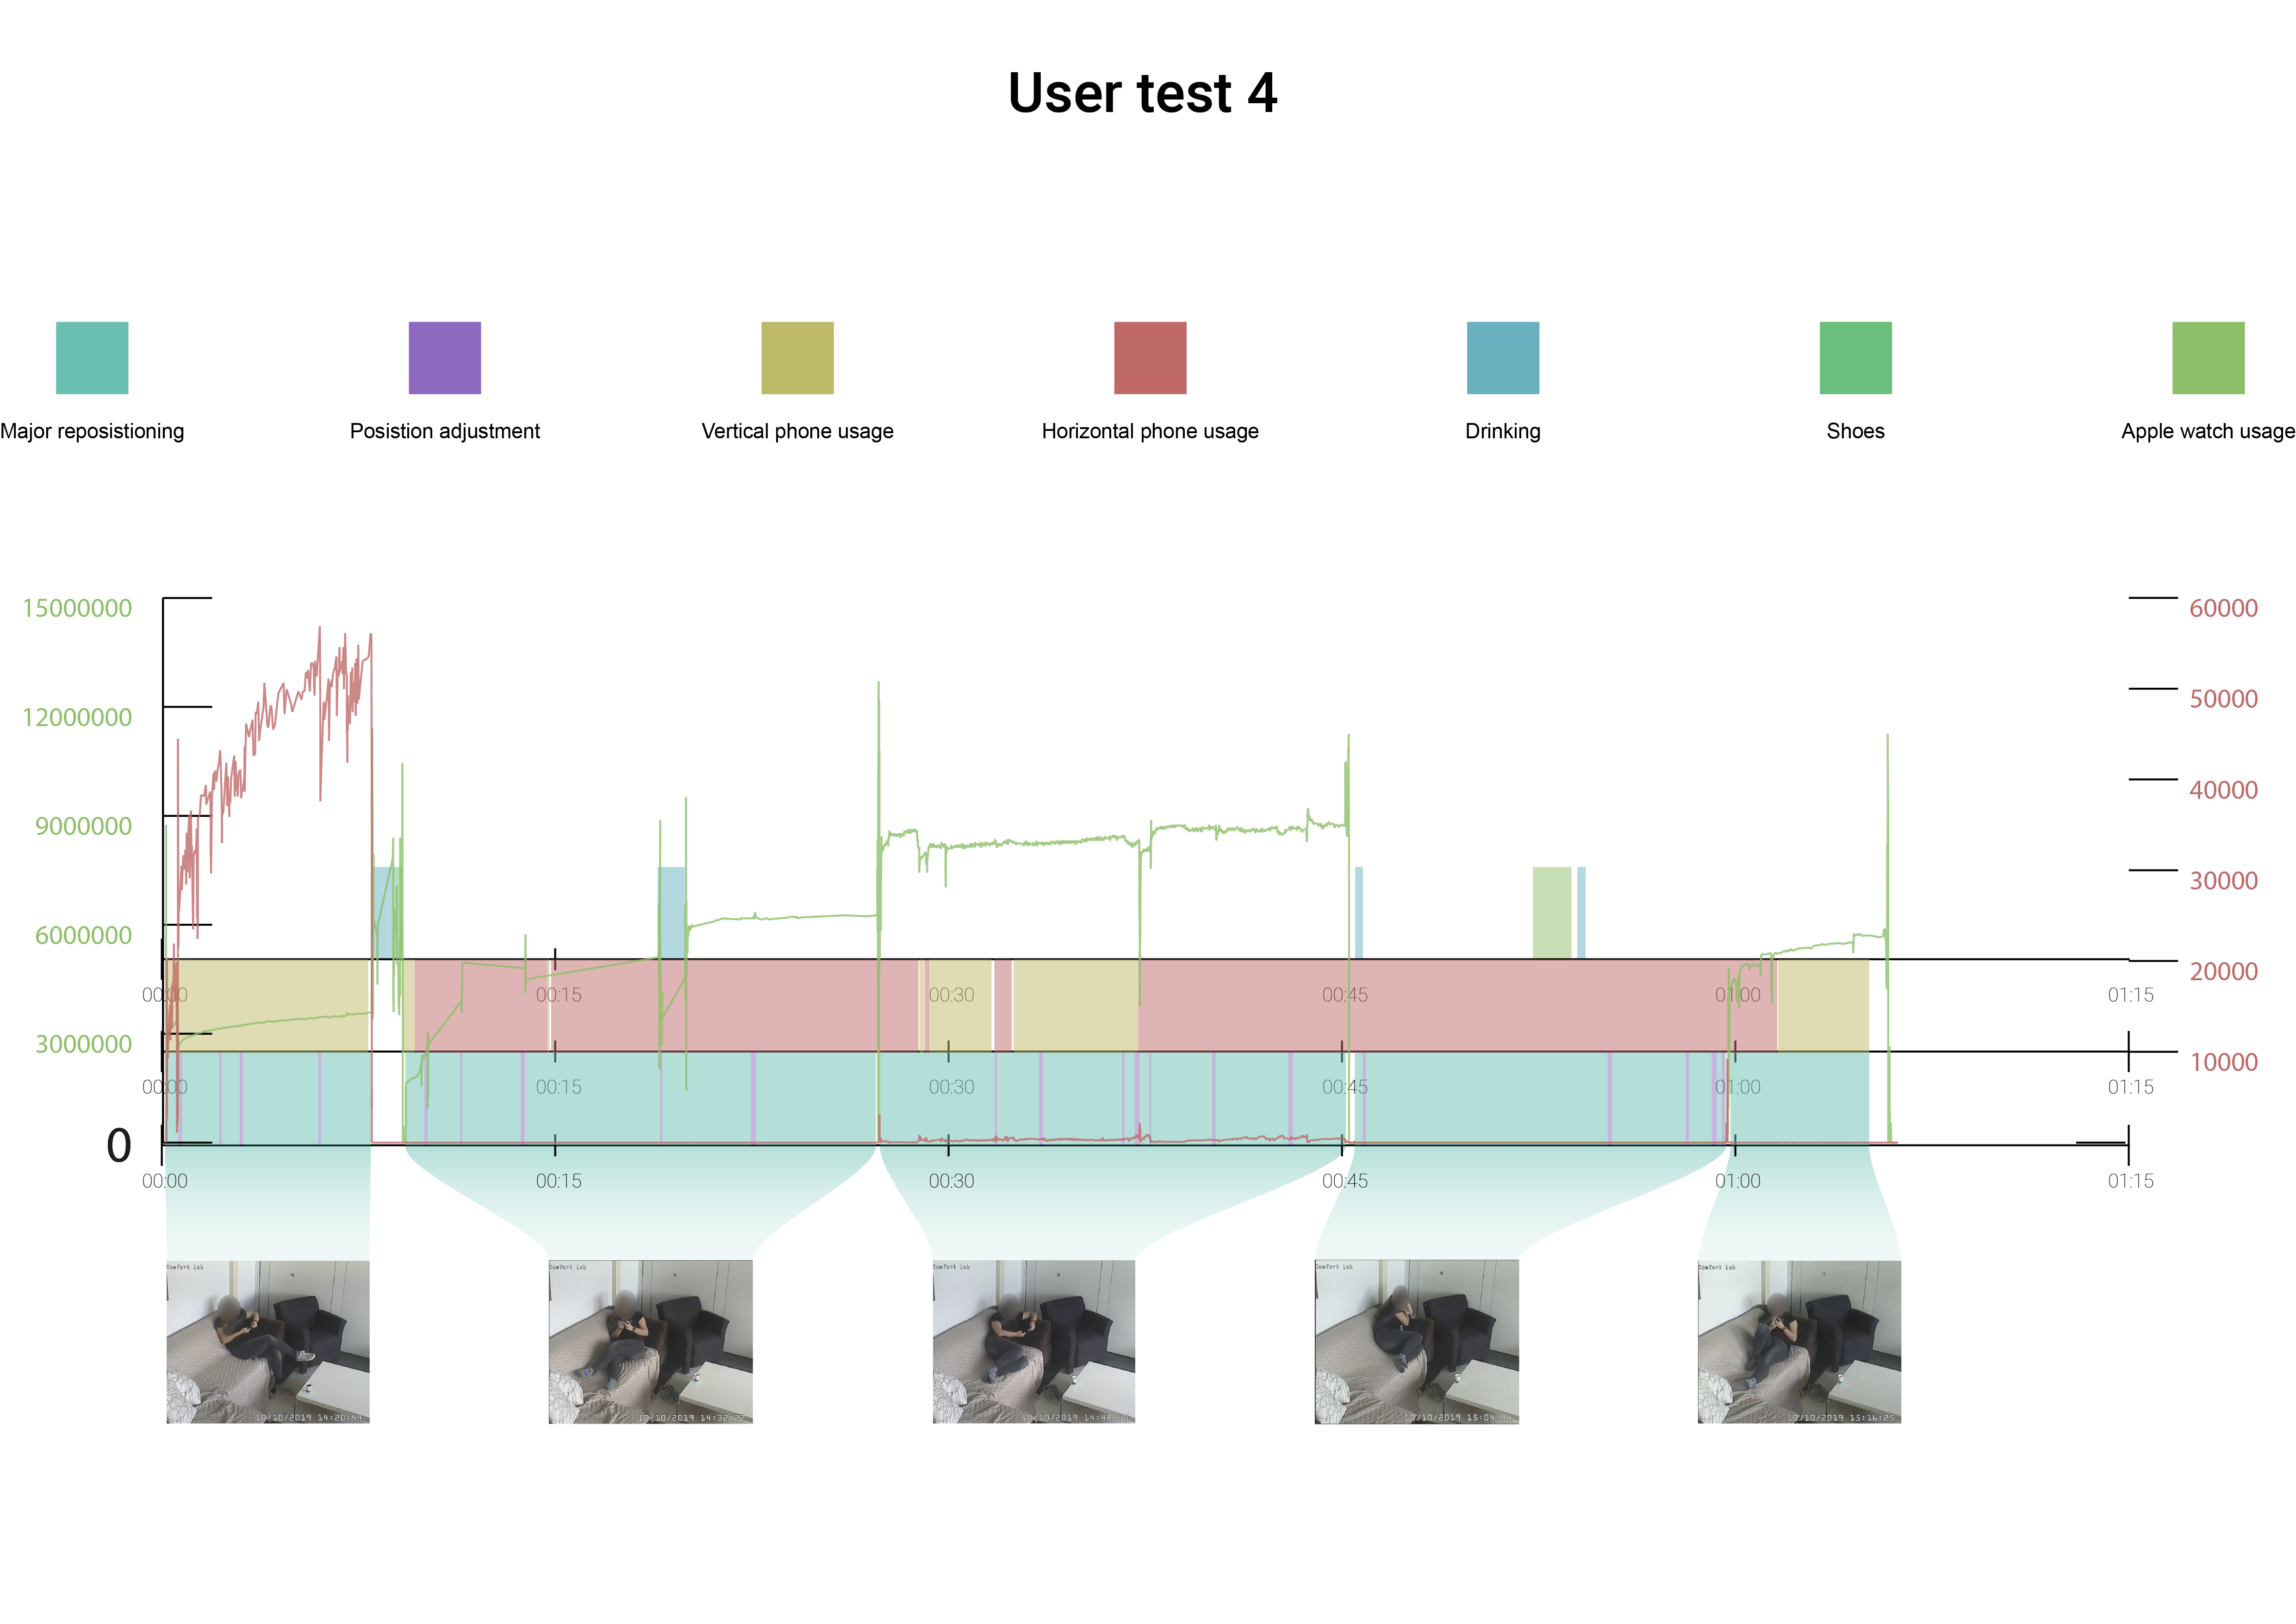
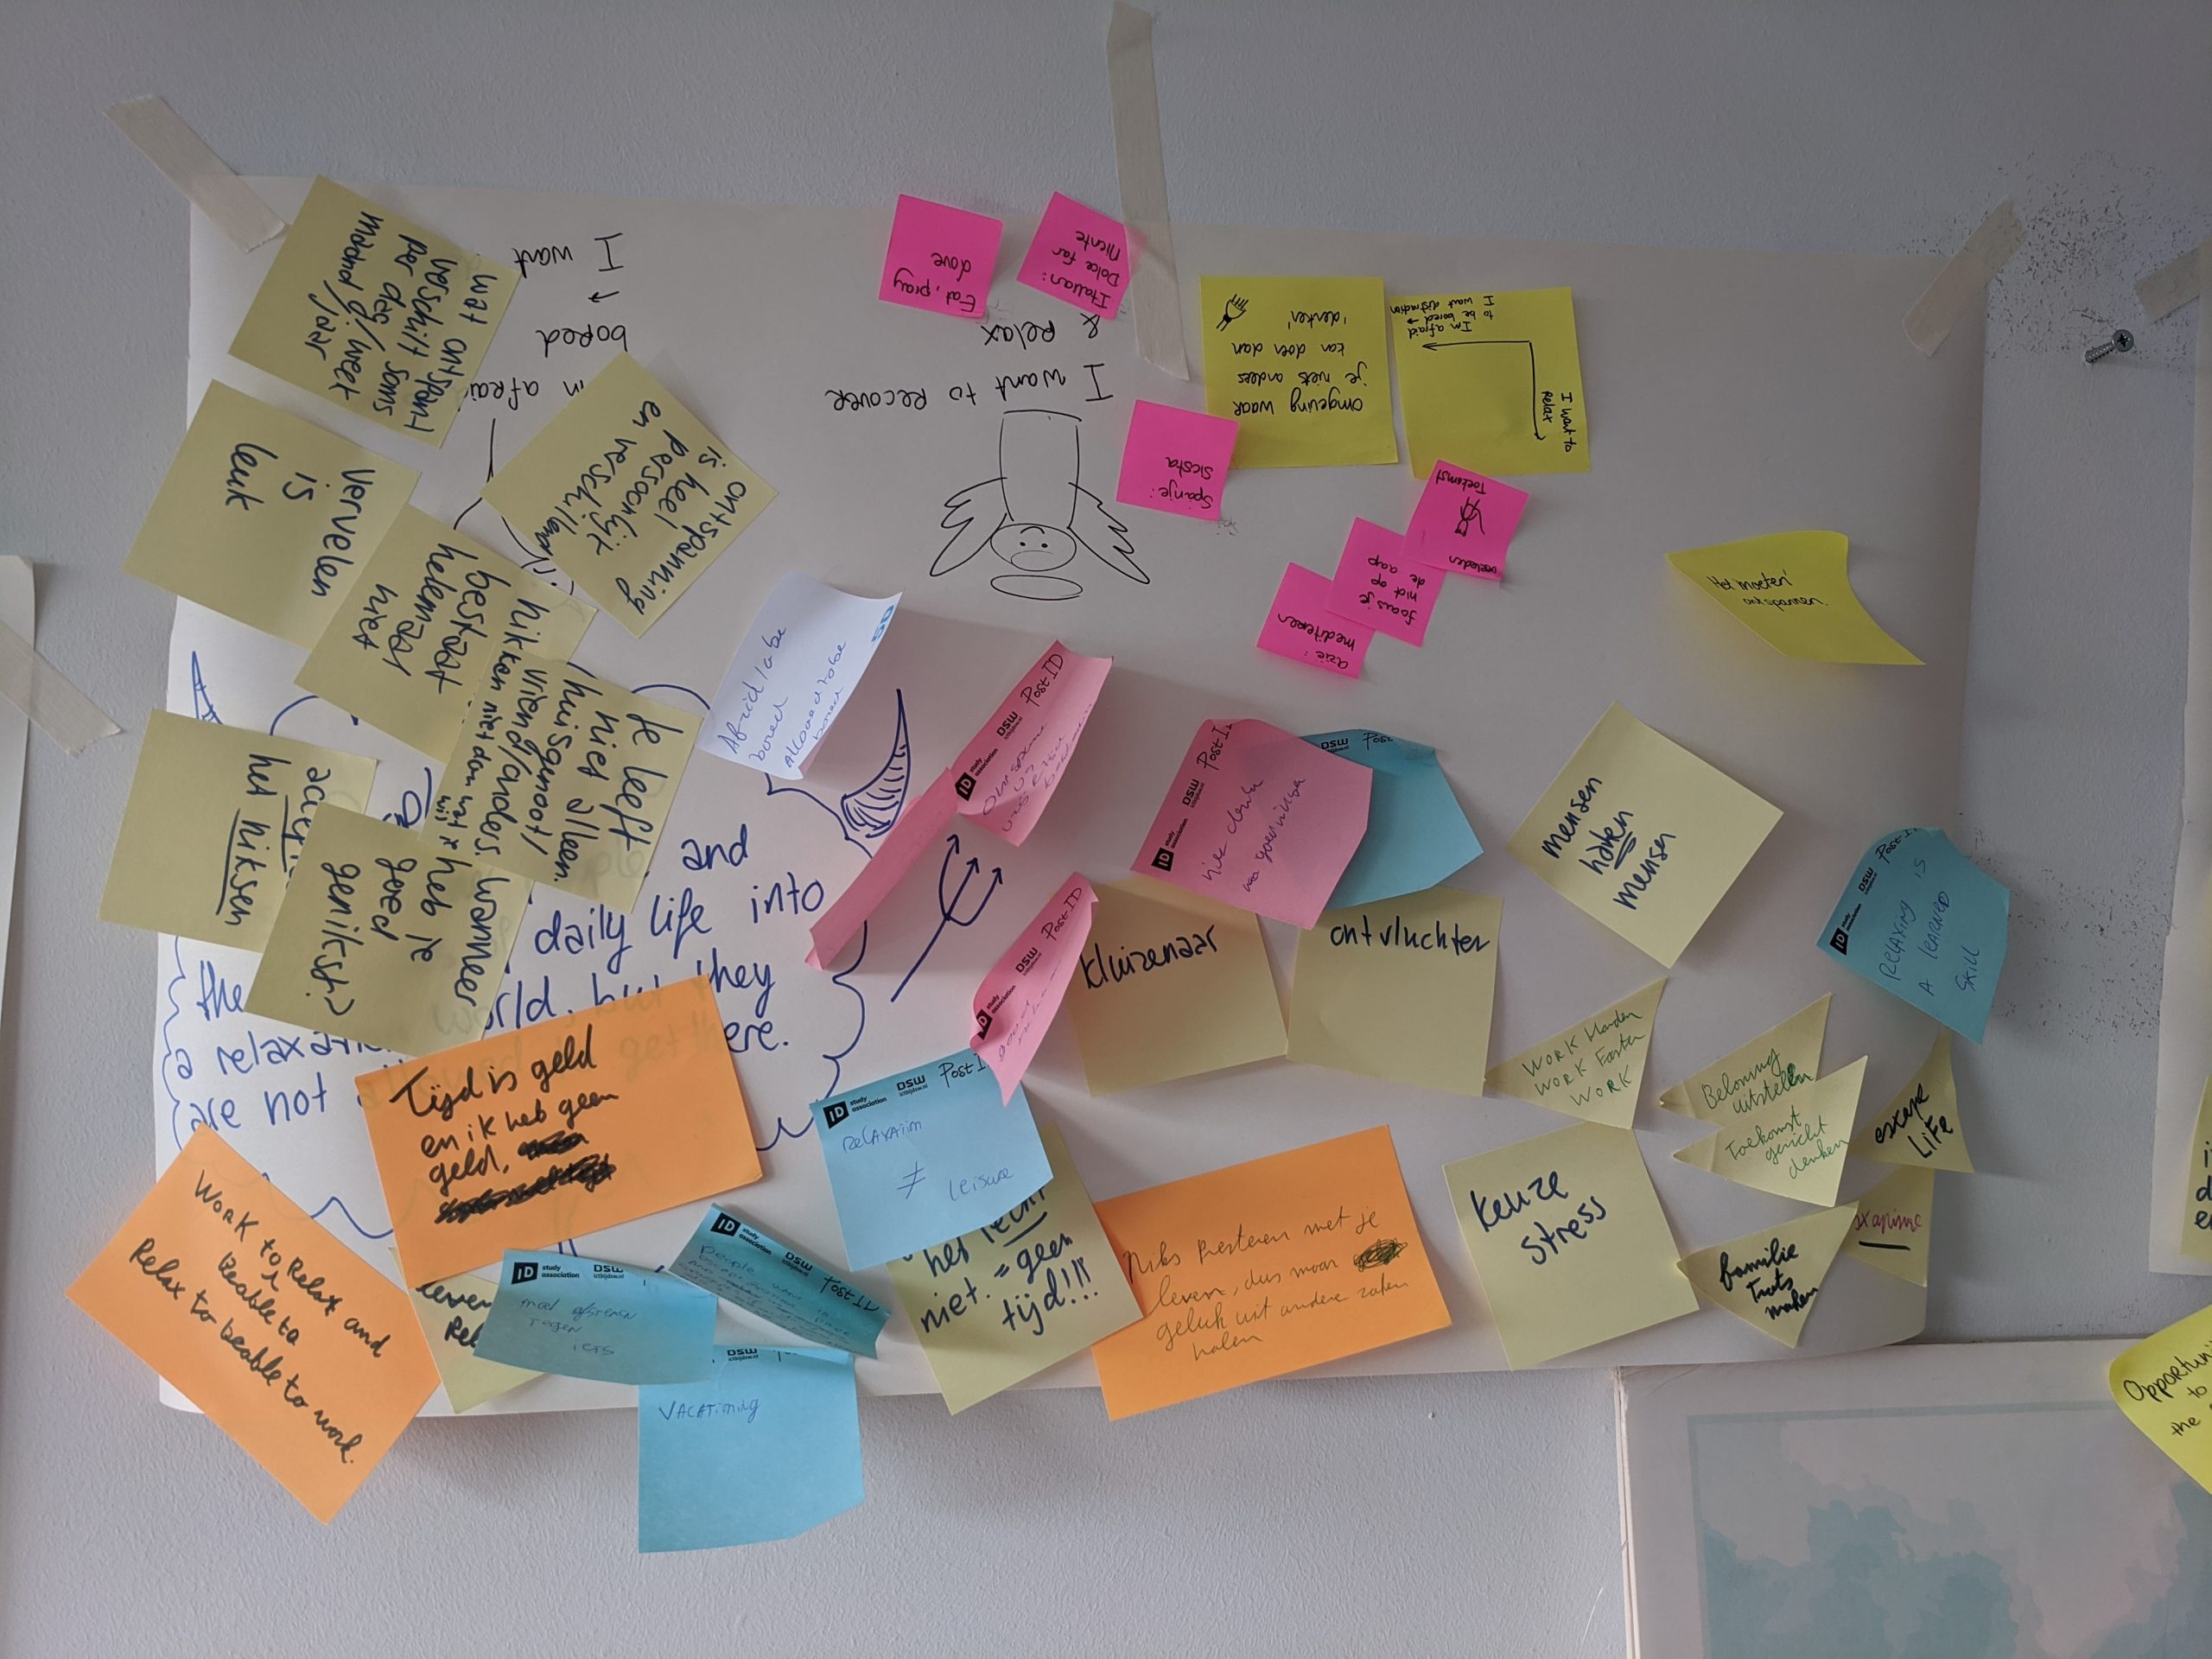
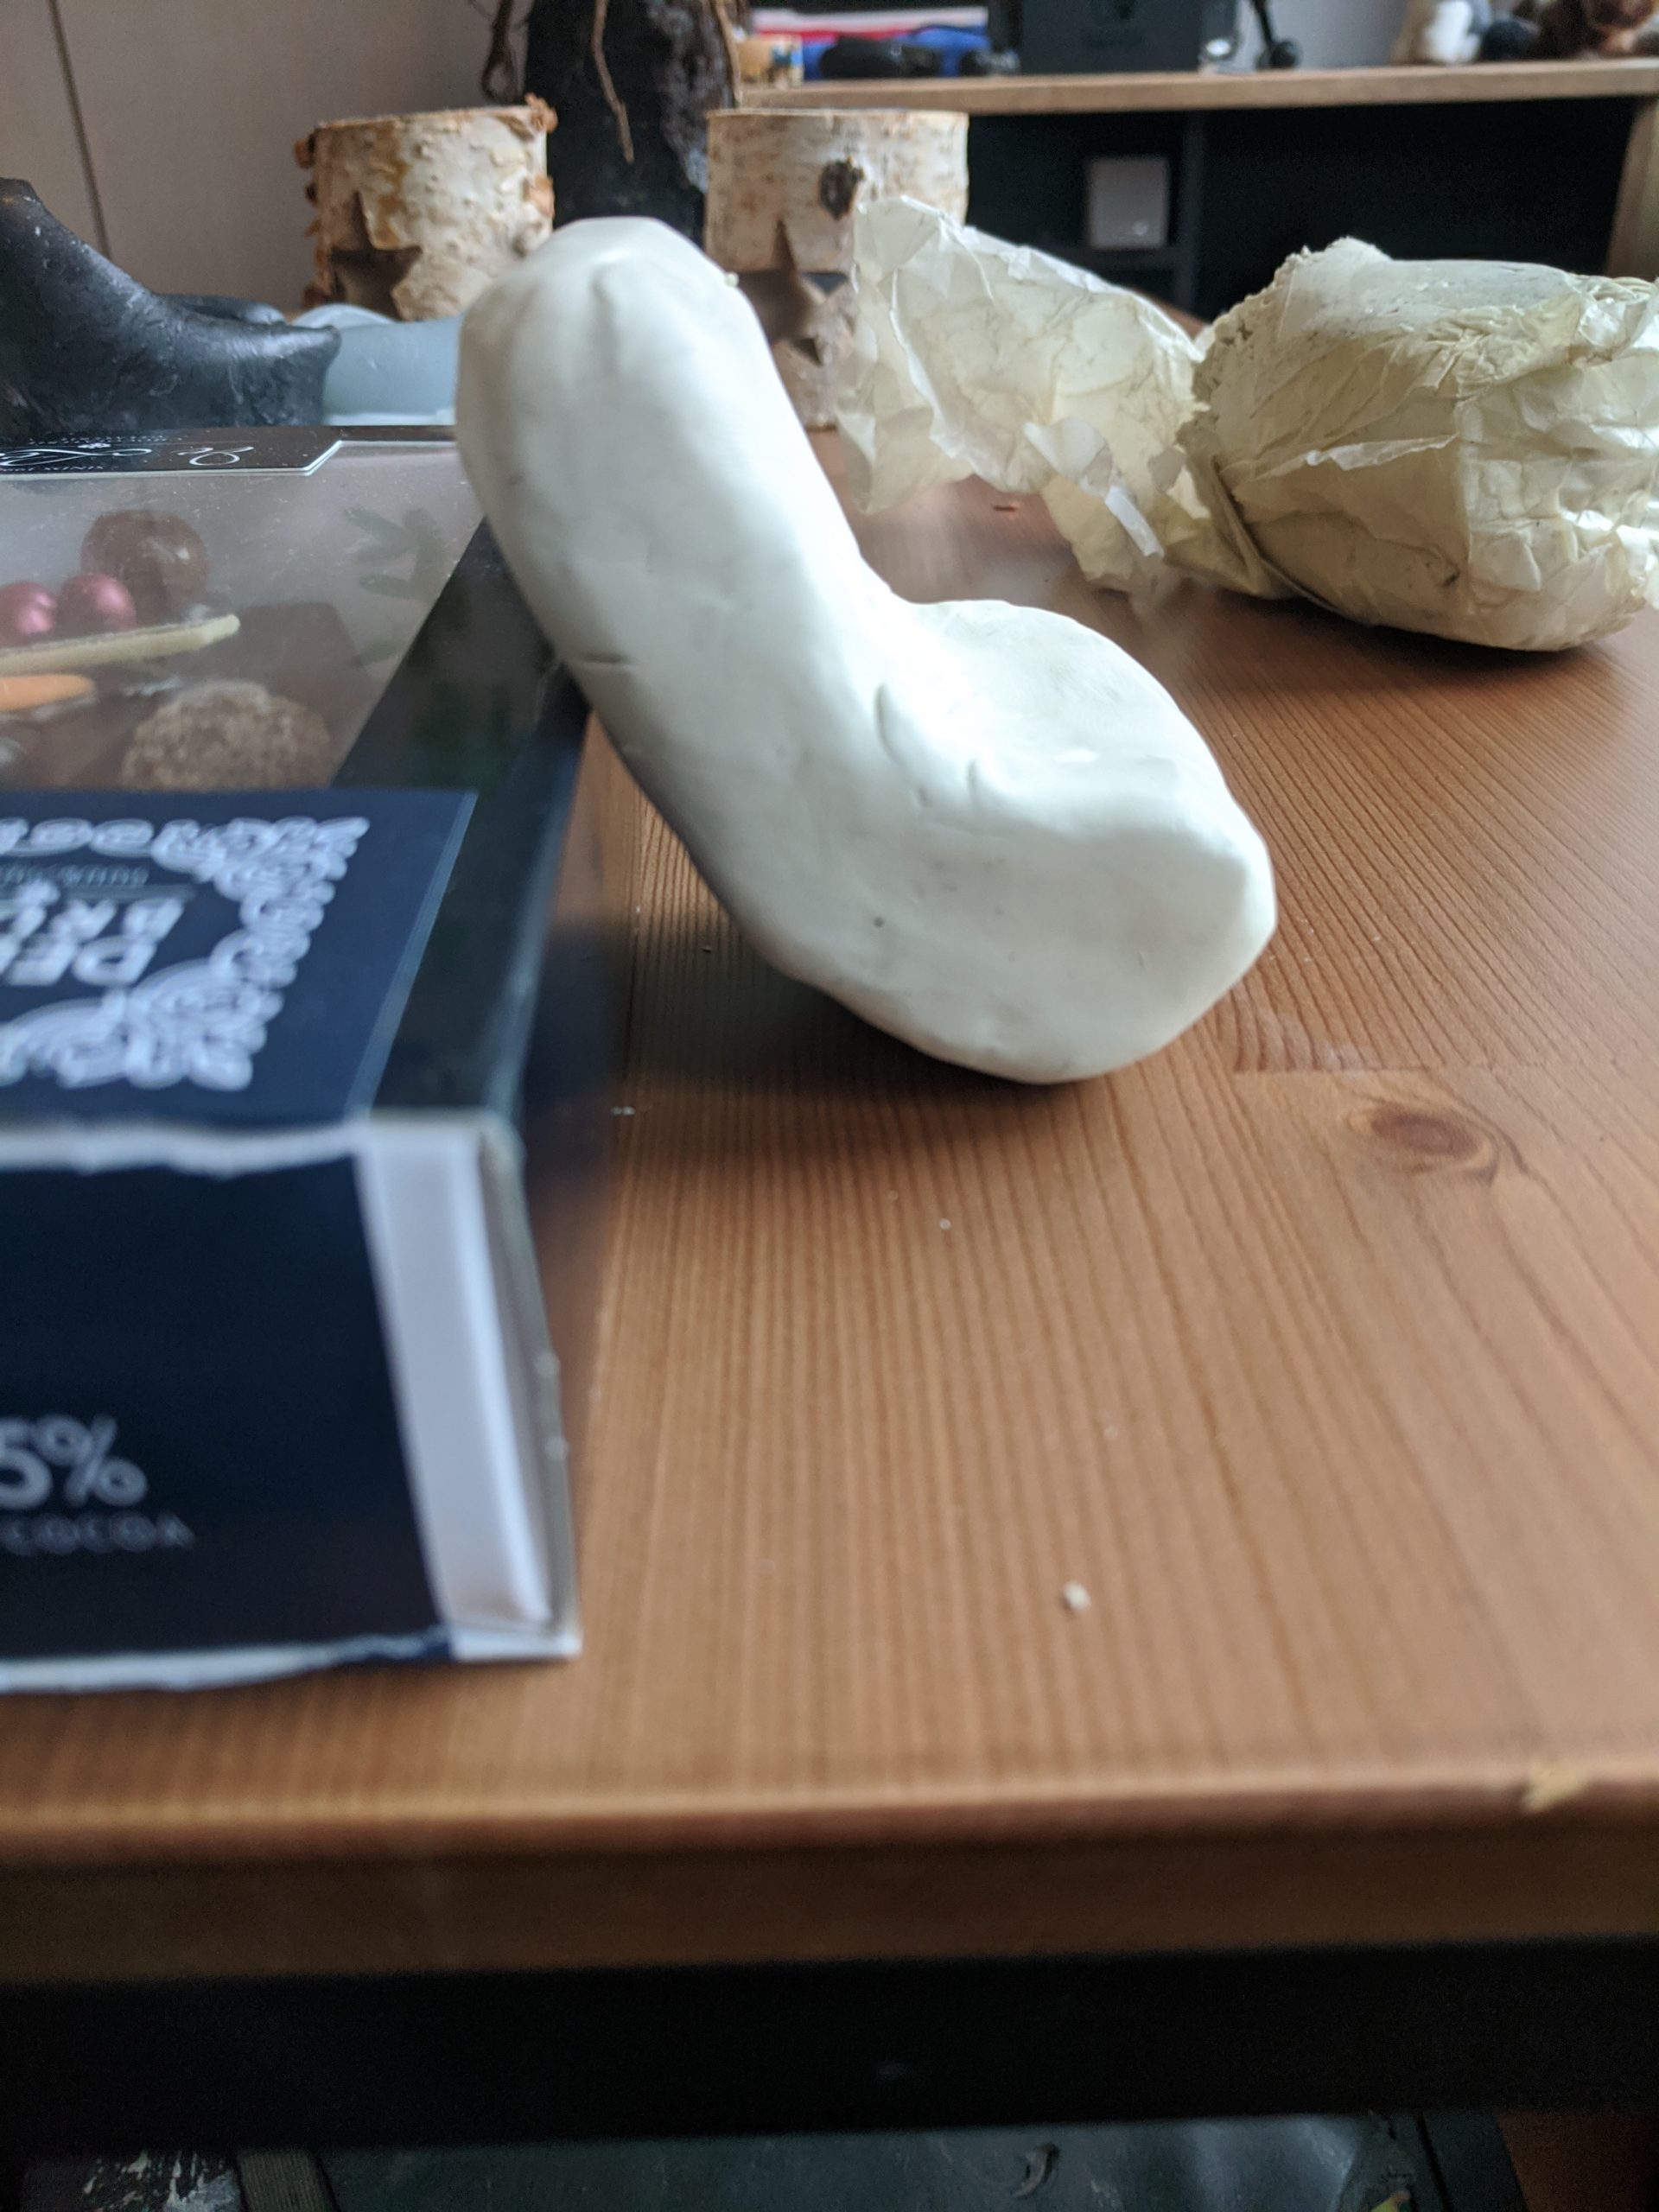
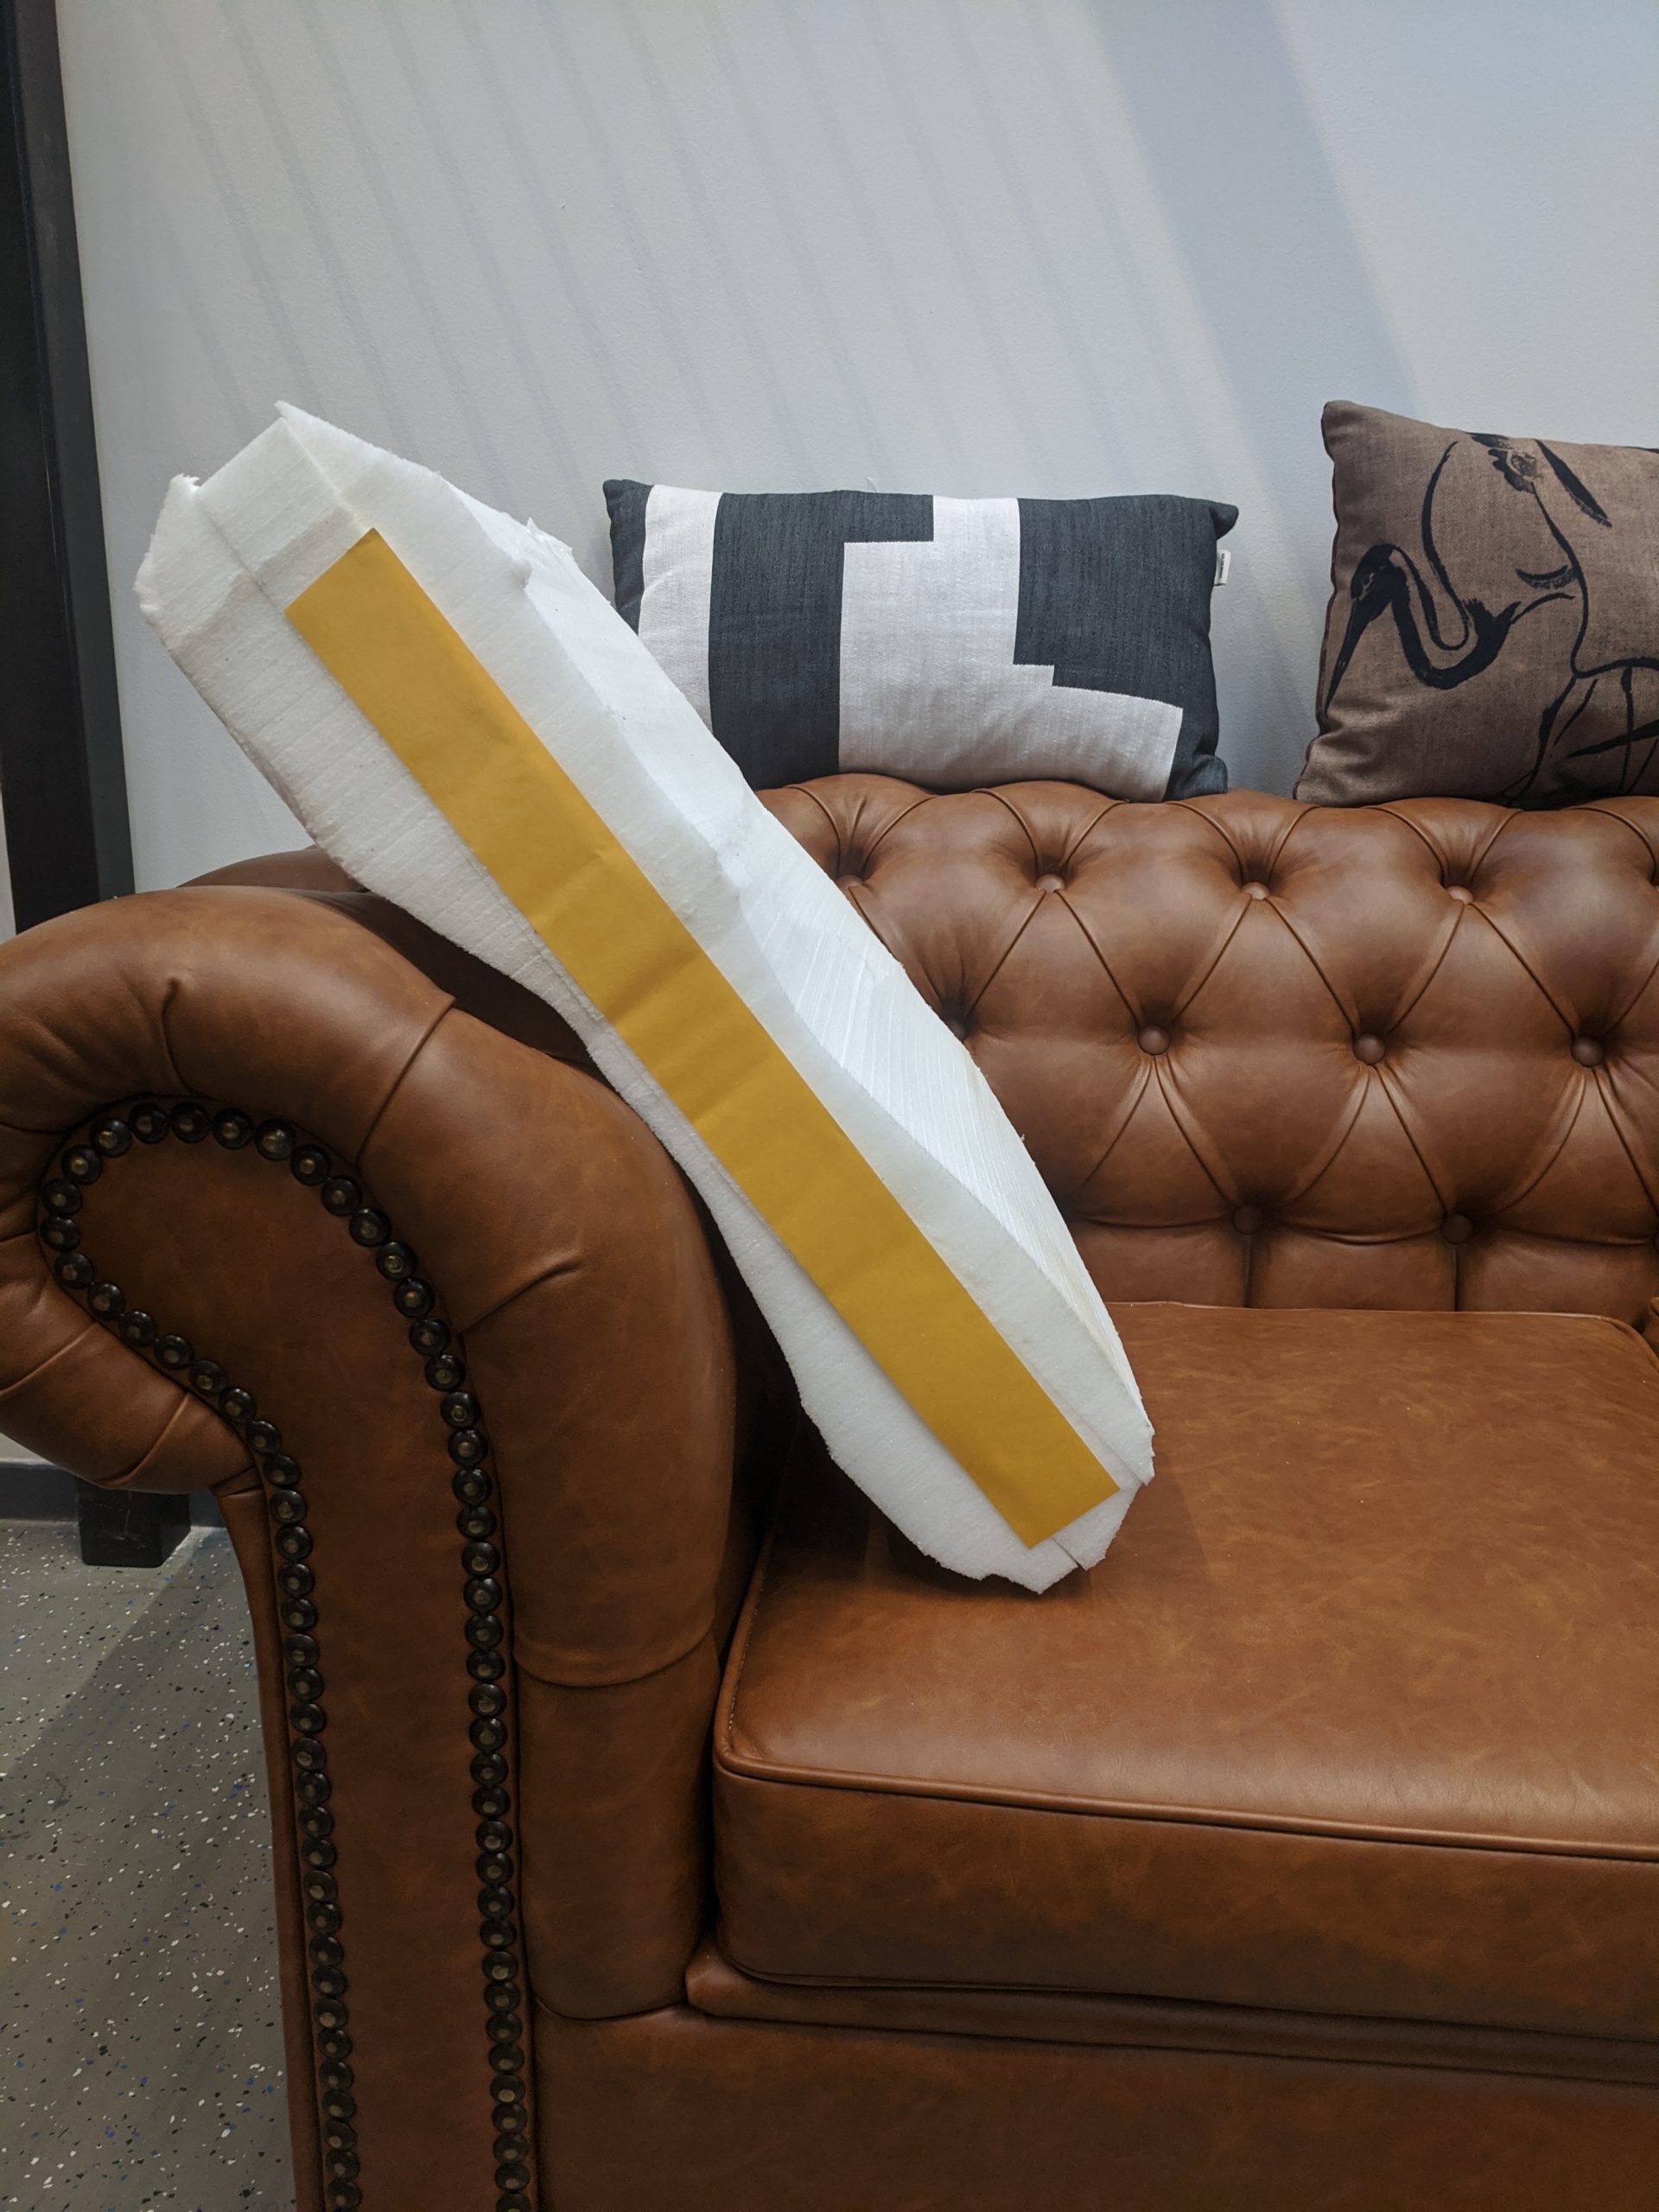
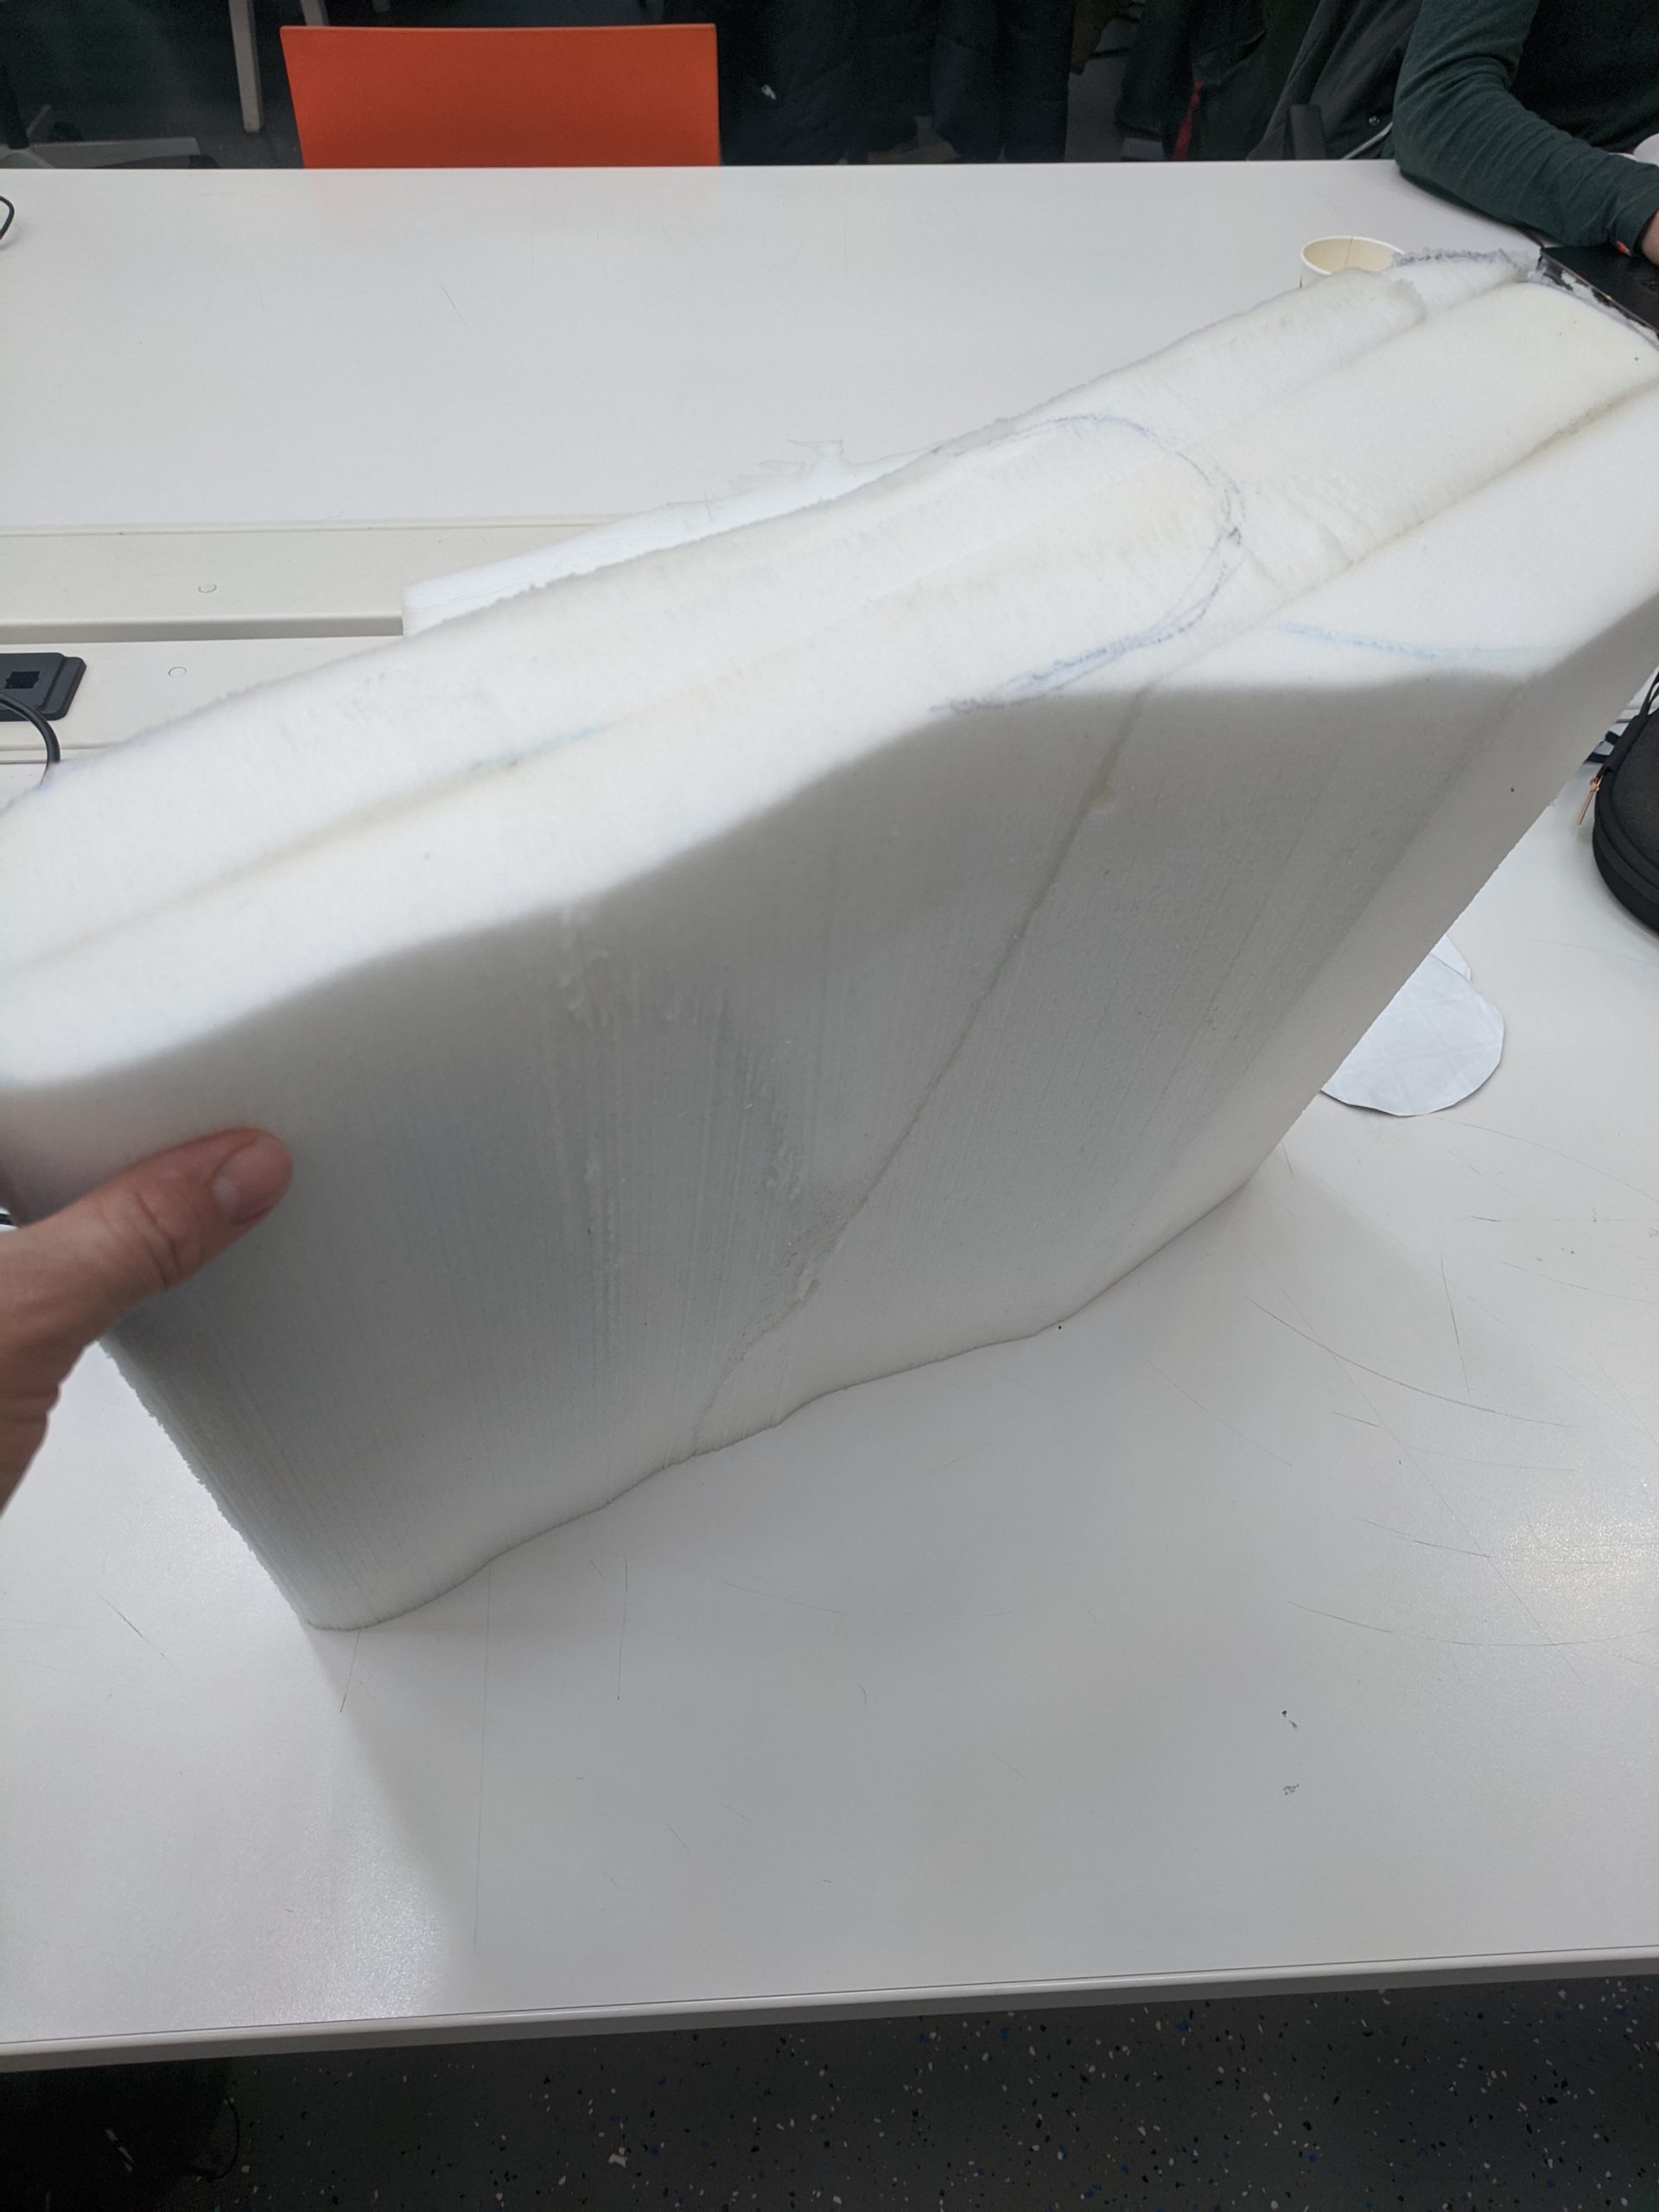
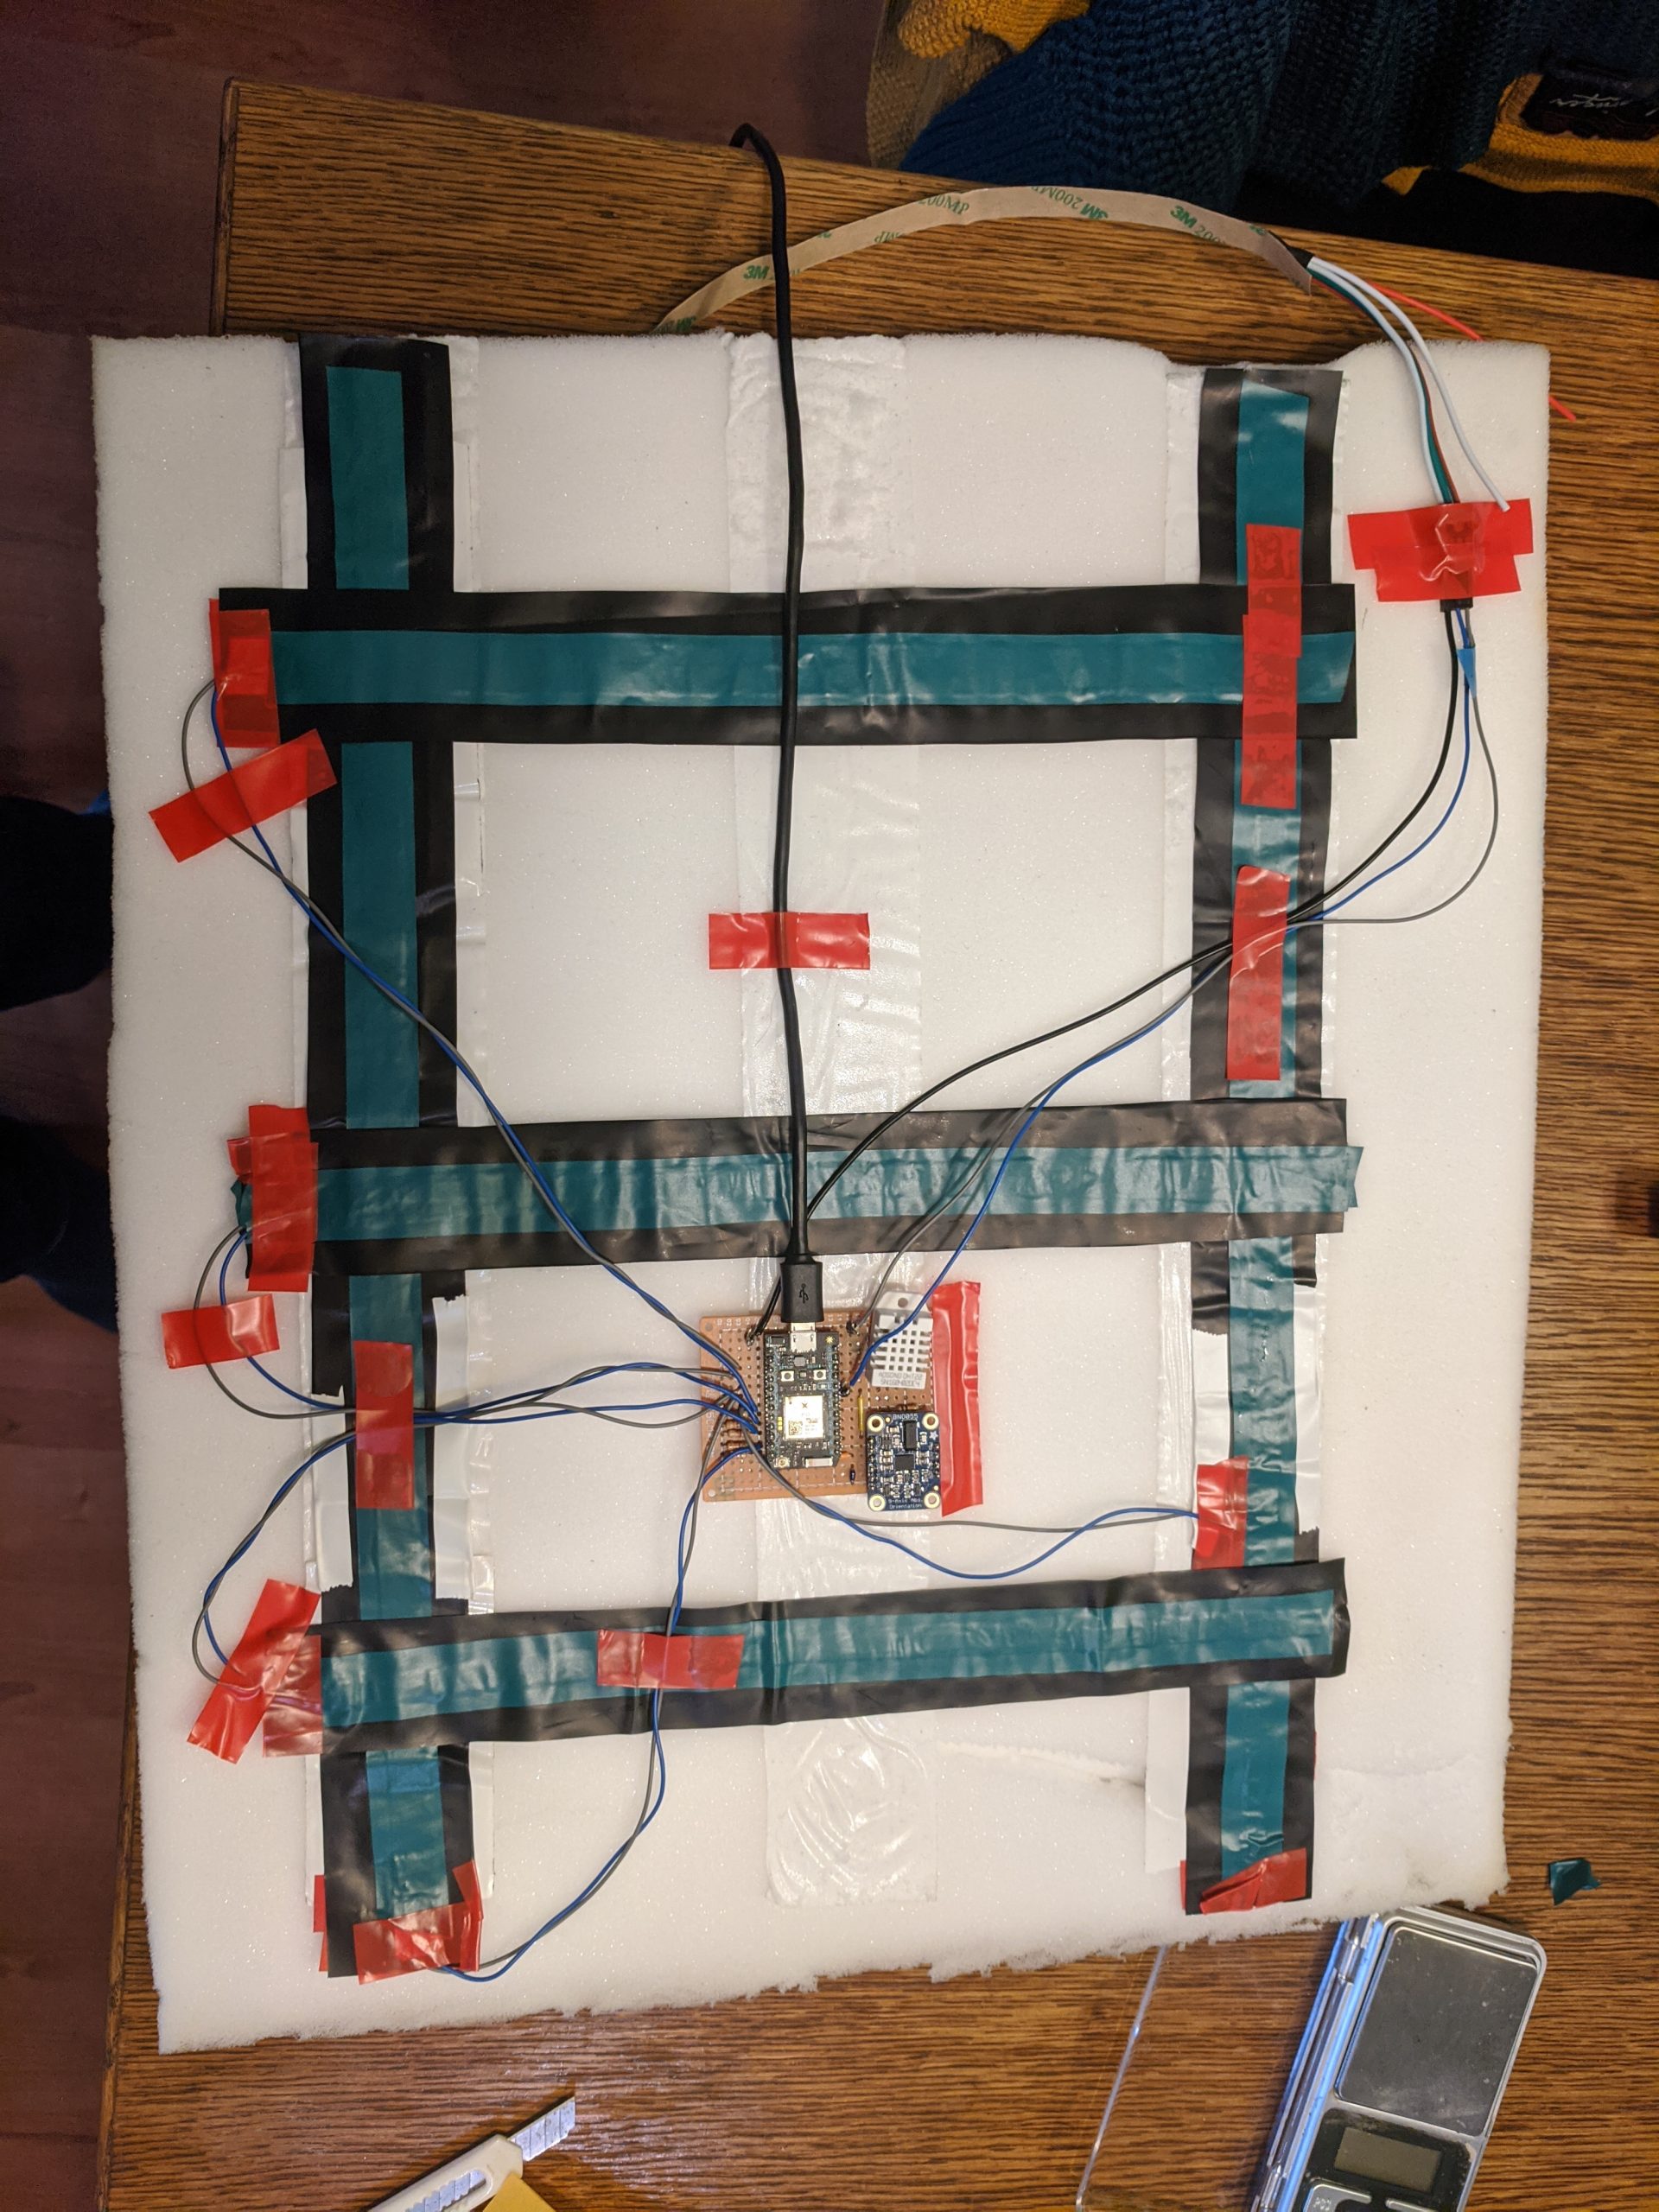
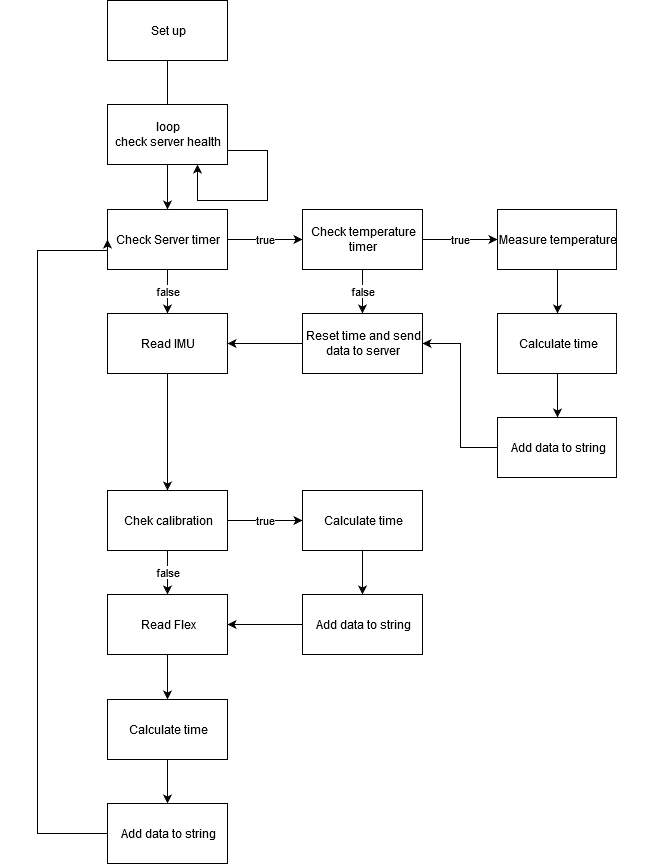
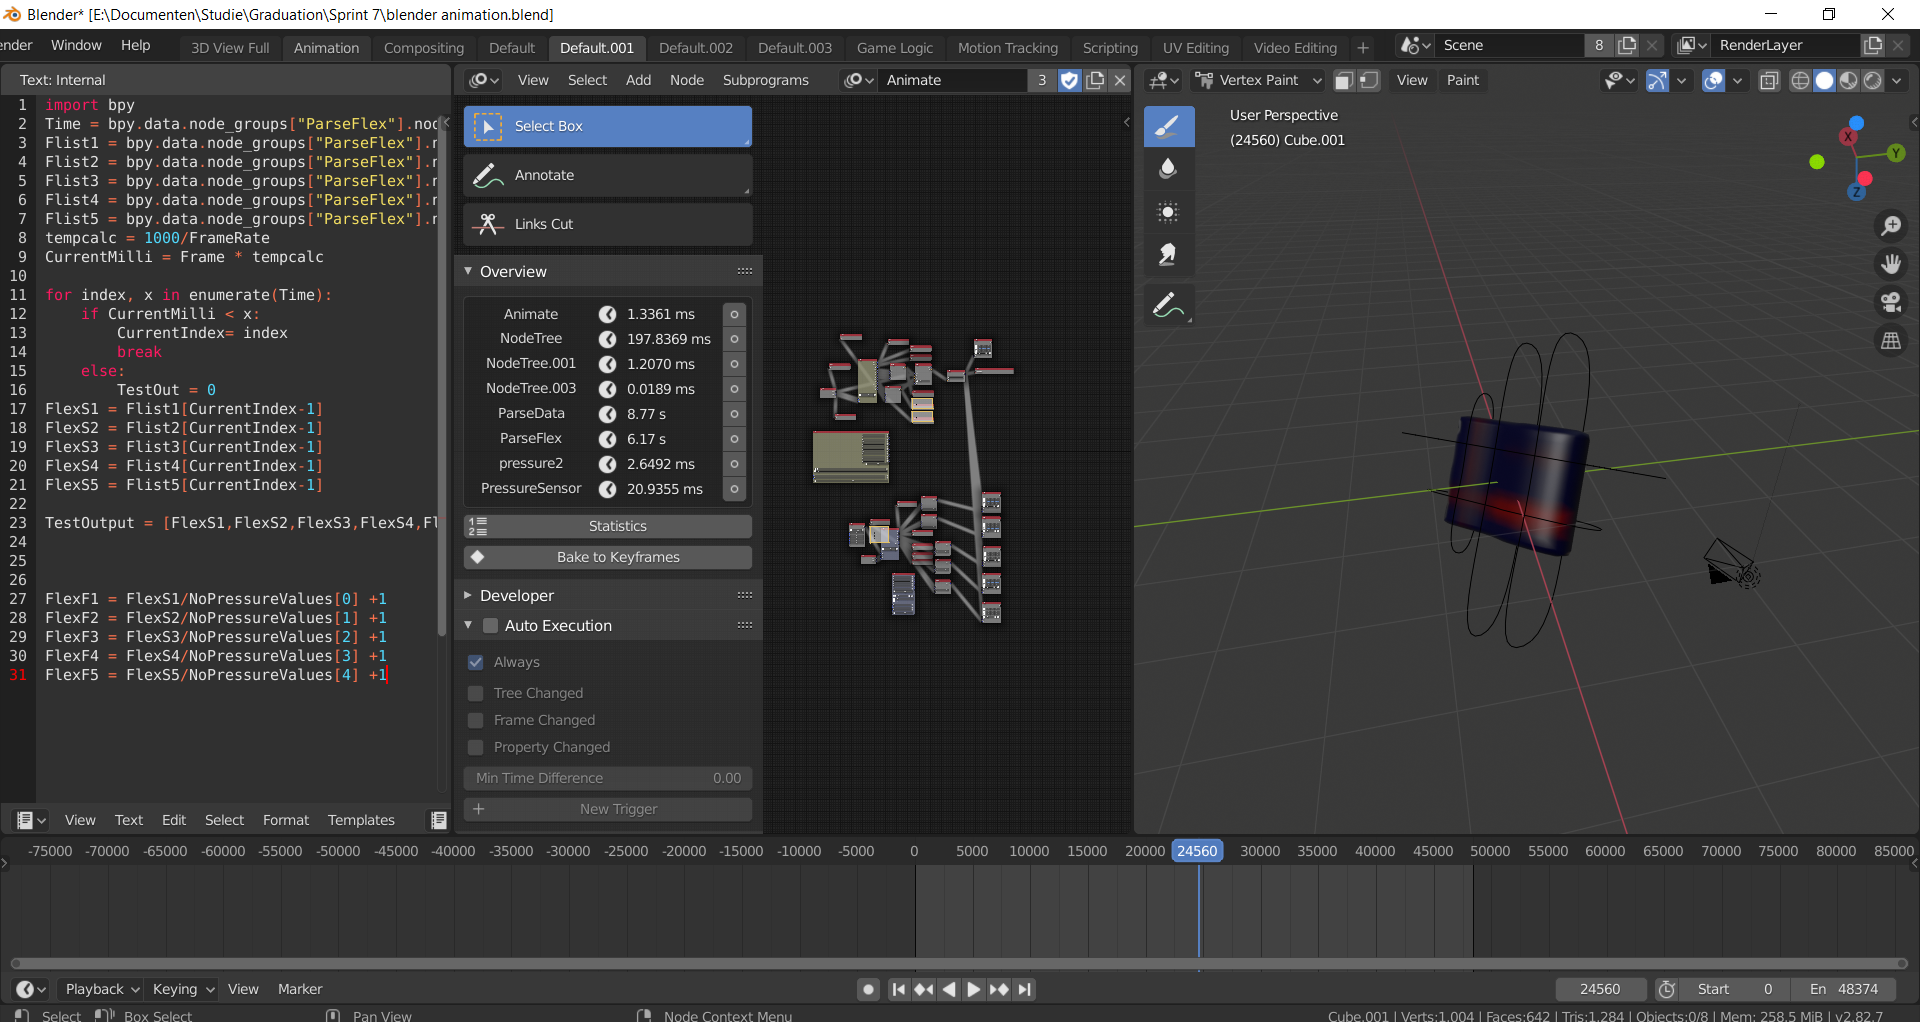
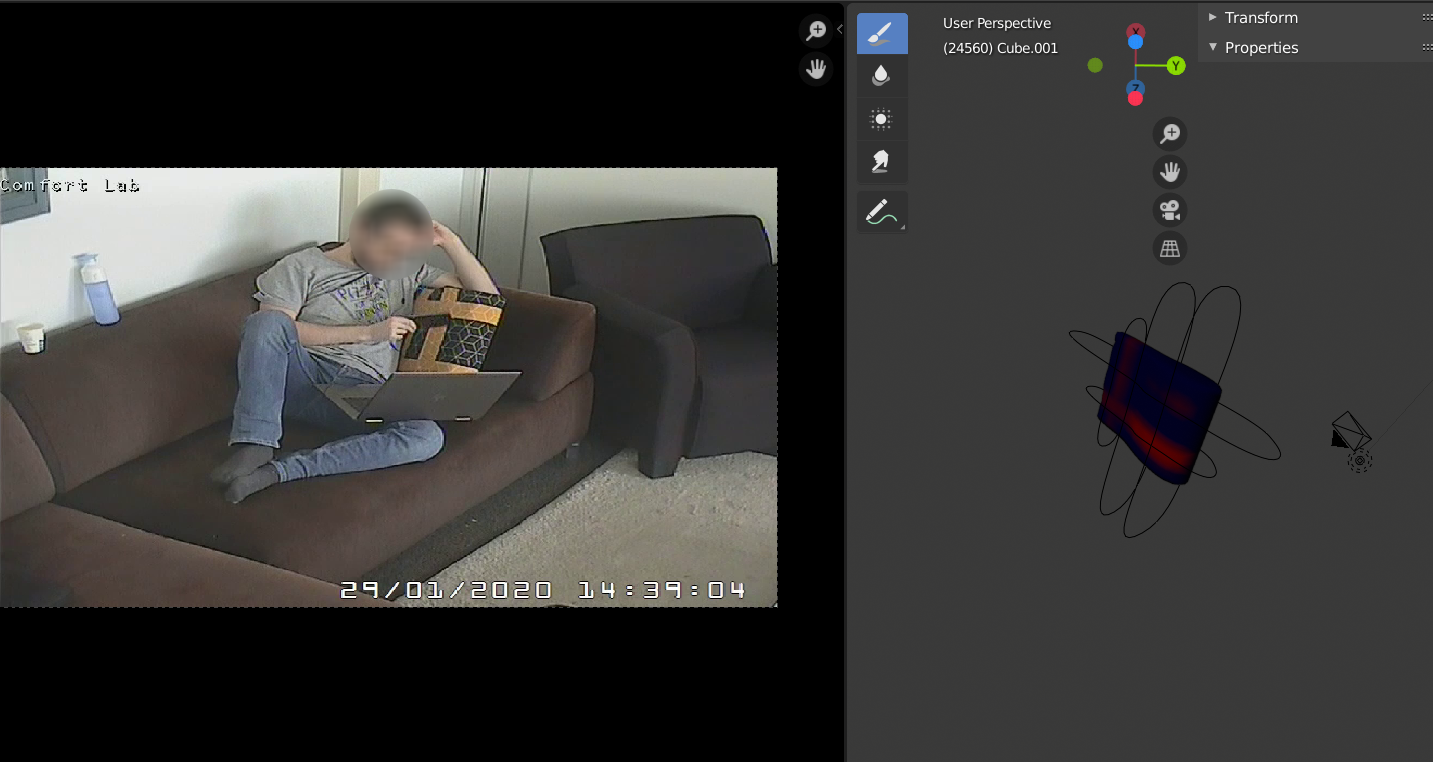
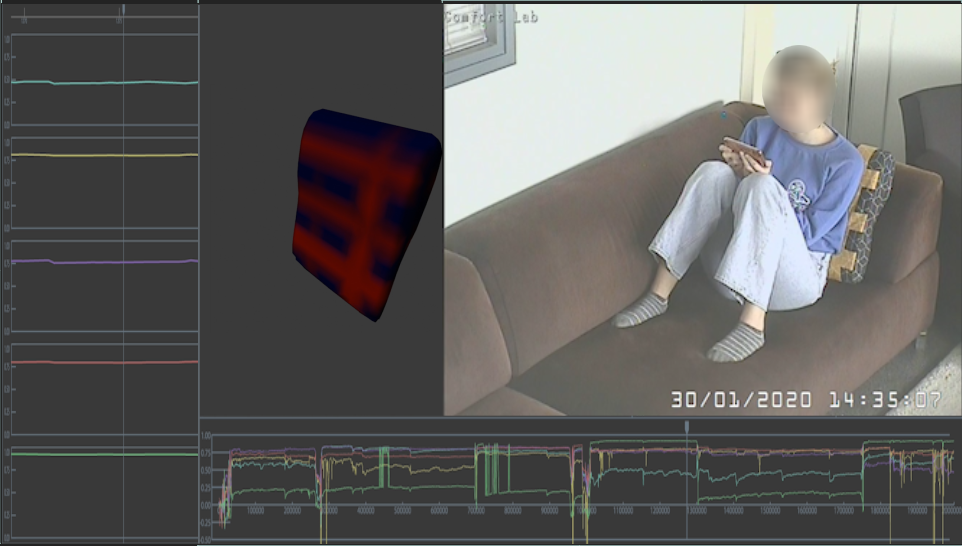
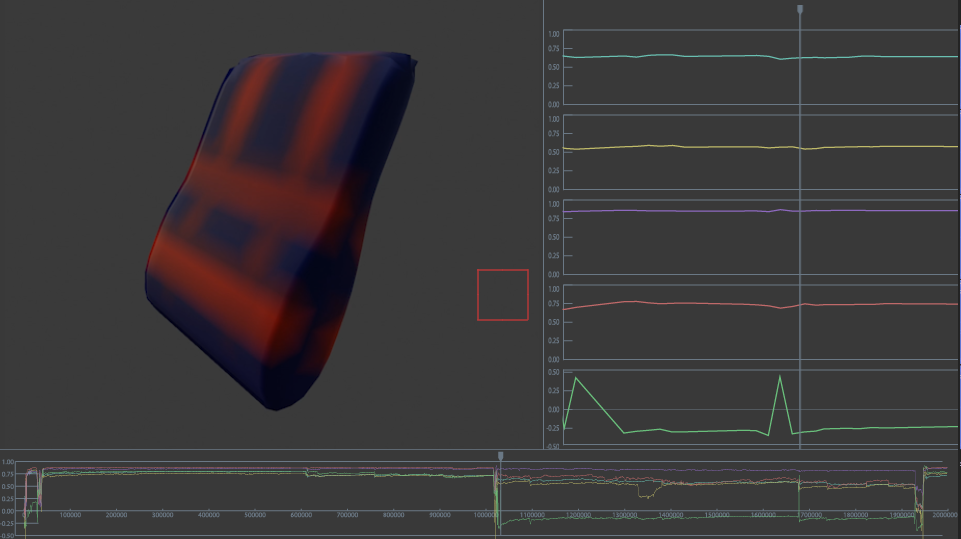
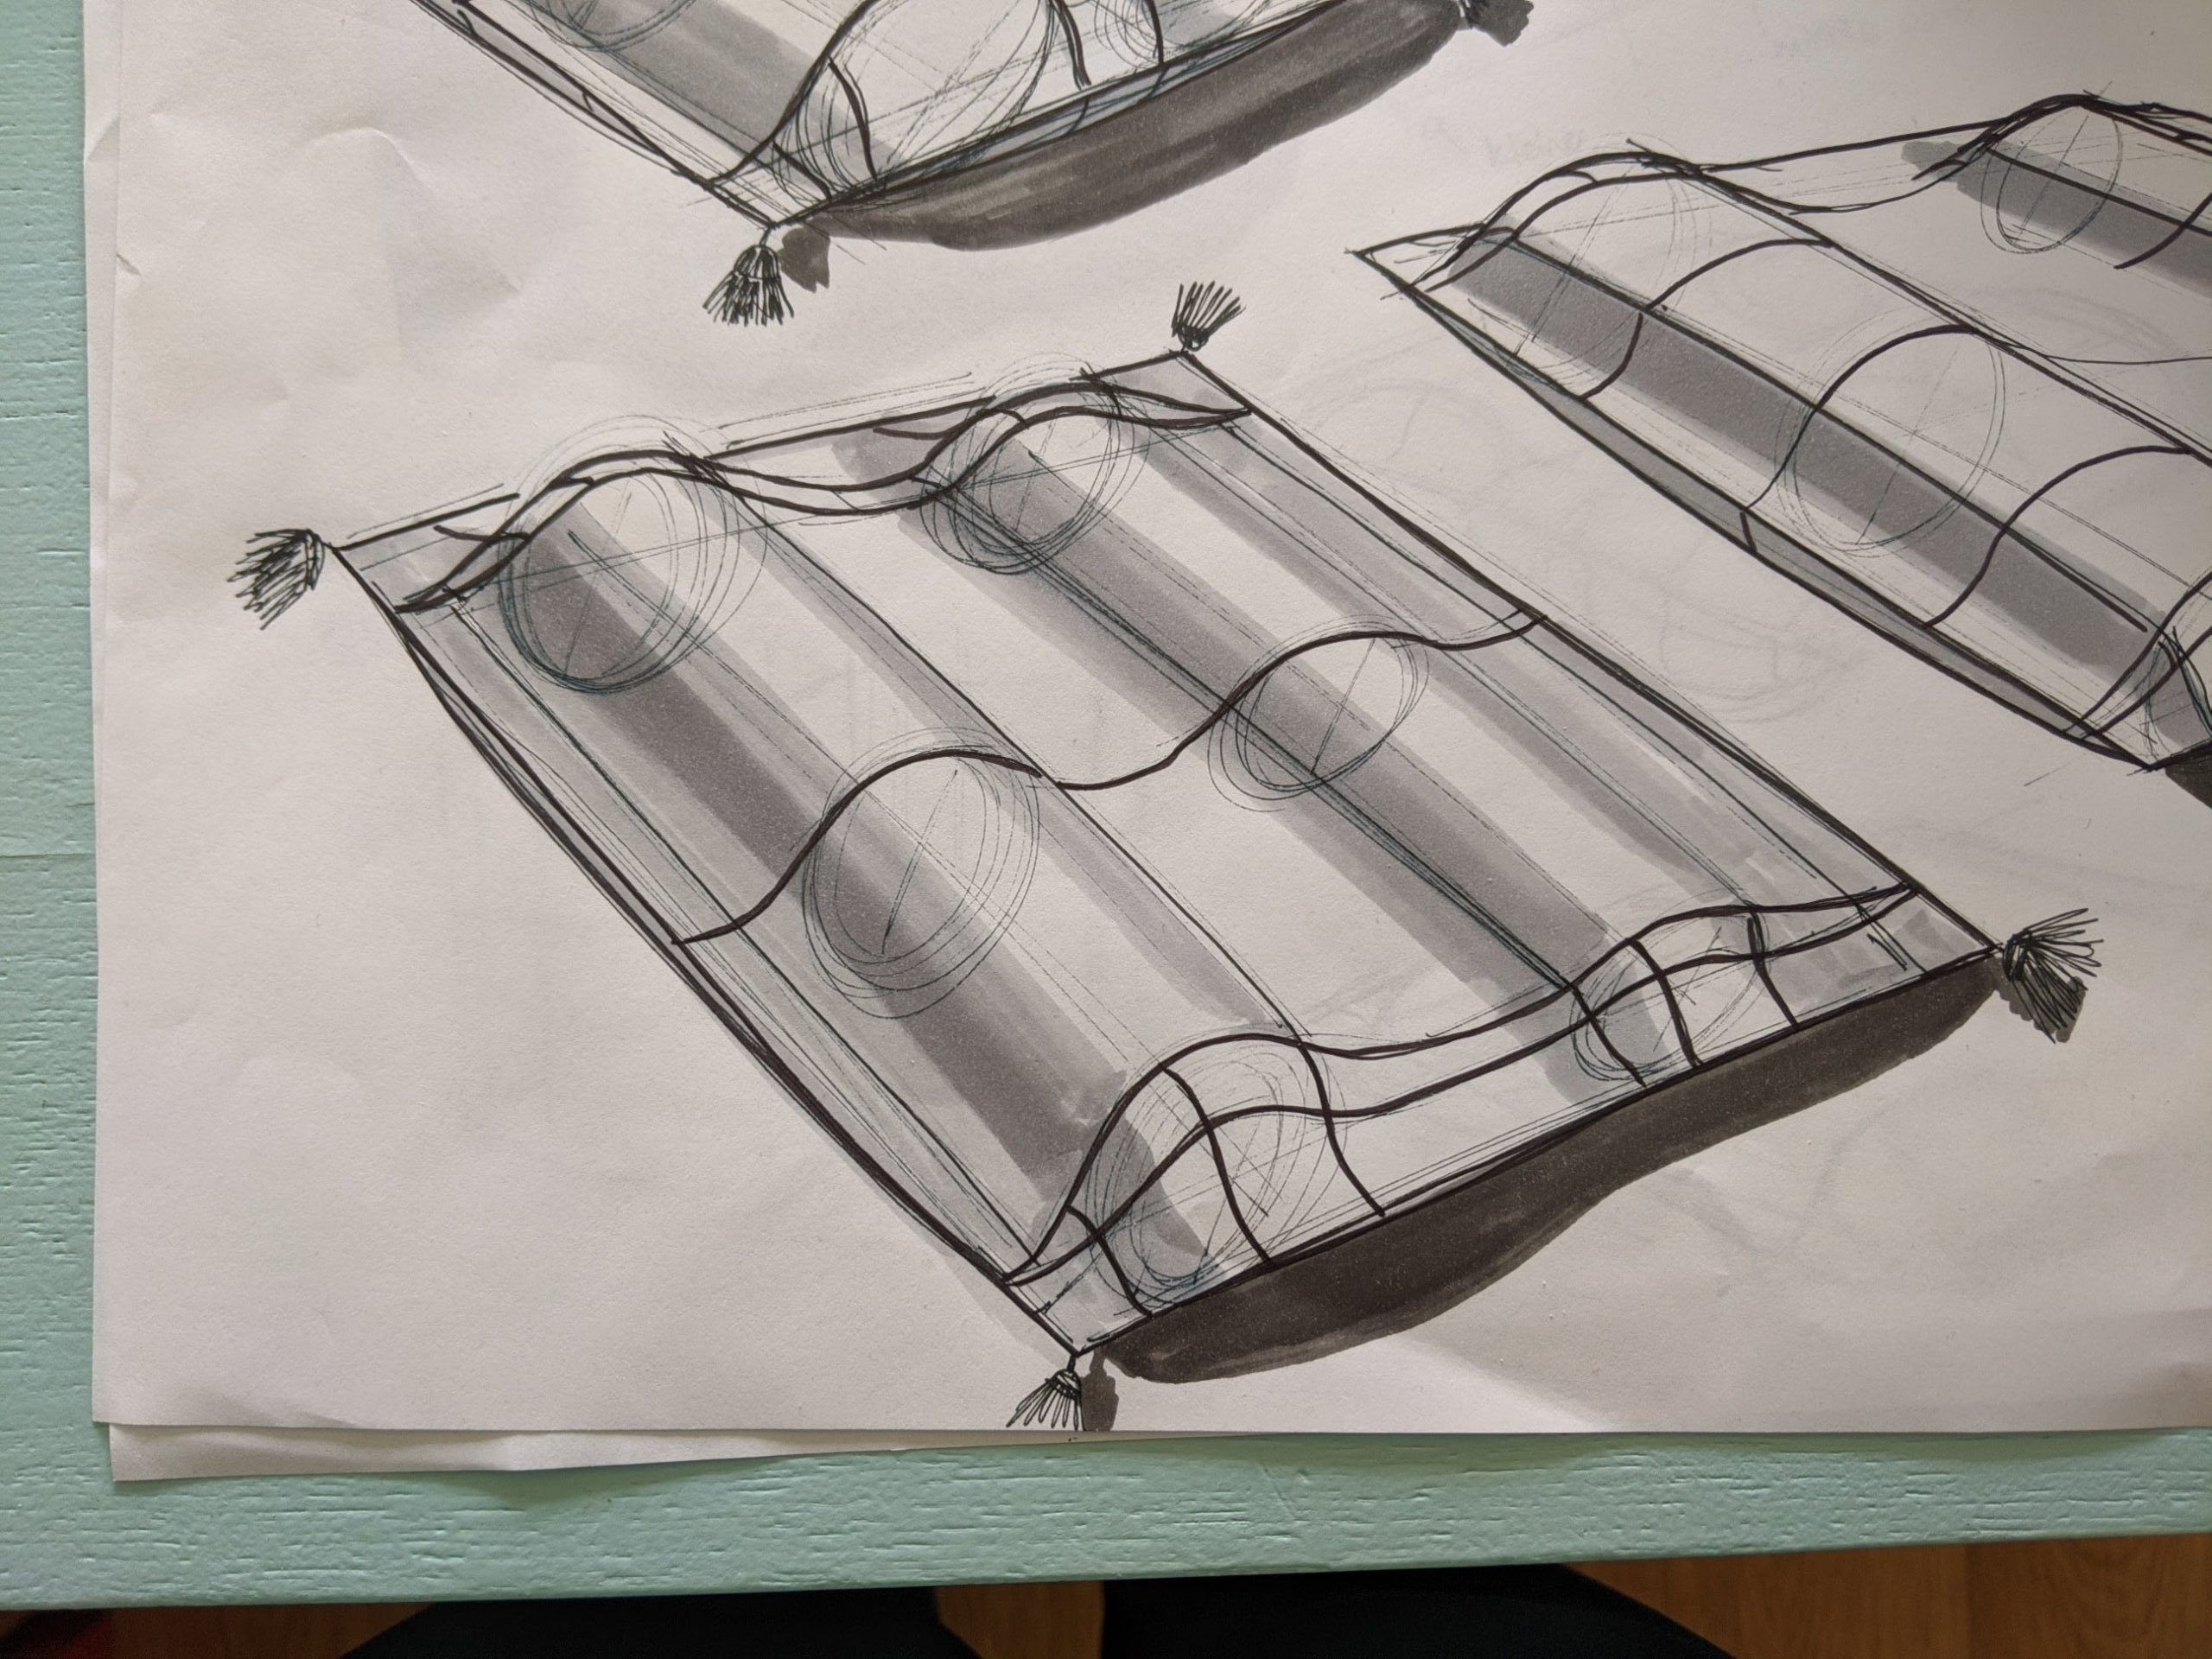
For my graduation, I did research on designing intelligent artefacts, their interactions and how data could be used in the process. This was done in the context of leisure in the living room. The result of this was a smart pillow that could actively provide comfort to users through hugging and by helping them to avoid slouching. The pillow prototype could sense the pressure applied on it, how it is positioned in space, and how warm it is. To get to this result traditional methods, such as user observations, interviews, tests, prototyping, desk research and co-creation, were used and sensor data was integrated into them. This was done by visualising the data and connecting it to the behaviour and experience of participants. The visualisation that proved most valuable in this is one were the pillow was recreated digitally and had the sensor data projected on it. This created something similar to a digital twin. By placing a video from the user next to it, the direct relationship between the usage and data could be seen. This allowed data to be used as a creative material and sparked a constant back and forth between data and usage. Based on this and other insights the interaction with the pillow was designed. 

Process

The goal of this project was to research on the design of intelligent artefacts, their interactions and how data could be used in the process. To do this I used leisure in the living room as a case study. The project consisted of four phases, context exploration, concept development, perspective and finally concept design. During each phase, I utilised three types of data, machine data, behavioural data and subjective data. Each provided a unique perspective and more insights were found at the intersections between data.

Types of data

Context Exploration

Couch equipped with sensors

During the first phase, the goal was to thoroughly understand how people relaxed in the context of a living room. To do so, a user test was set up where users were asked to relax inside a living room for an hour. During this time their behaviour was recorded and observed. Afterwards, they were interviews about their time and their daily lives with regards to relaxation. As an additional layer, pressure sensors were placed on the couch and covered with a blanket. This provided an additional perspective on their behaviour.

Afterwards, the data from the user test processed and analysed. For the interview, this meant transcribing the test and using ATLAS.ti to select and categorize quotes. Then these were analysed both inside of ATLAS.it and on paper. From here a model was created about their behaviour. The behavioural data was processed by labelling specific behaviours and visualising when they took place. The data from the sensors were placed on top of this to compare the two.

The results of these three types of data were compared to psychology research. Most noteworthy was the paper of Newman et al (2013), leisure and subjective well-being: a model of psychological mechanisms as mediating factors. To help me put the psychology research and my own research into perspective and formulate a clear design goal I organised a creative facilitated session. The session was let by a peer and was done in collaboration with students and users. Based on the performed research the following design goal was formulated.

Design Goal

I want to increase people’s subjective well-being during leisure after work by improving the quality of recovery-detachment and enforcing them to take control of how long they recover-detach.

Concept Development

As a first step in the second phase, a rough storyboard was created. This was done to translate the design goal into a situation and possible interaction. (1) The product should detect the presence of the person in the room or on the couch. (2) The product should then invite the person to use the product. (3) Based on the input of the user, a timer for how long the user wished to relax should be set. (4) The product should then support the relaxation of the user. (5) When the time is over the product should stimulate the person to leave the couch and stop recovering.

Based upon doing field research and the previous phase it was found that a pillow would be the most fitting product to transform into a smart object that can improve people’s time on the couch.  On the image below, the different stages of creating the shape and a prototype of a pillow are shown. The pillow is shaped to allow it to be used and comfortable in a wide variety of different postures. This was done because during the first user test it was found that people naturally and regularly switched there sitting positions. The pillow aims to provide comfort is as many of the postures found in the user test.

Final prototype
Electronics

Next to designing the shape of the pillow, the first part of its intelligence was also designed, its senses. The goal of these senses was for the pillow to be able to “see” how it’s being used. To do so, the temperature, the orientation and the pressure were being measured. The temperature and orientation sensors were bought and the pressure sensors were made. They were placed inside the pillow and together they were able to collect data about its usage and sent this data to a server.

Perspective Discovery

The goal of the thirds phase was to understand the perspective of the user and of the product. To get this understanding, that data-enabled prototype was used during a user test. This test consisted of three parts, usage of the pillow, interview about the usage and co-creation about the further development of the pillow. The data from this test was then processed into visuals to enable analysis. To do so, the machined data was first put into excel and get an initial image of what the data looked like.

Pressure sensor data in excel

The Excel graph, however, did not provide many insights. Therefore I looked for a better, more inspiring way to visualise the sensors data. I landed on creating digital twin that represented the pillow in real life. To create this digital representation blender was used. First, the model was created, afterwards, the data from the server was used as input for an animation.

Creating a 3d model in blender

This animation was then put next to a video of the observation to link the two together. Some interesting behaviours were compiled into a video. This video was then used to analyse the data gathered from the user test which was then used as an input for further designing the product.

Concept Design

Final design drawing

During the fourth phase, the concept of the pillow was further designed. During this procces the visualisation from the previous phase was used continously. First the shape of the pillow was redesigned. The inner, ergonomic, shape was kept but the outer shape was changed to look more like a throw pillow.

Secondly, the pillow was given actuators to allow it interact with the world around it. The first actuator that was added was a conductive fabric. This fabric heats up as a current is applied to it. This allows the pillow to provide the user with extra warmth. Secondly air pockets are added to the pillow. This allows the pillow to encapsulate and hug the user. It also provides the pillow with way to communcate with the user. For instance by activating all air pockets for a short burst the pillow creates discomfort for the user letting the user know their time is up

With the addition of actuators, the interaction with the pillow was further developed. This was done by creating a storyboard. Each drawing in the storyboard consists of 3 parts, the top part shows the situation. In the bottom left part the pillow is displayed, blue shows pressure applied by the user, grey shows air pockets that are activated by the pillow. In the bottom right two graphs can be seen, the top shows the pressure applied by the user over time, the bottom the actuation of the air pockets over time by the pillow.

More Info

For more info, you can view my complete graduation presentation, or read my graduation thesis. If you have any additional questions, feel free to contact me.